This blog covers a subset of REST APIs that are used by the Data Extraction tool. Although these APIs are not owned by Data Extraction, this post focuses on their use within the tool while related documentation is being updated. The blog title may be revised in the future to better reflect the broader scope.
Data extraction pipelines often start as manual workflows: define an extract, run it, wait for completion, download the output, unpack files, and upload them somewhere durable for downstream consumption.
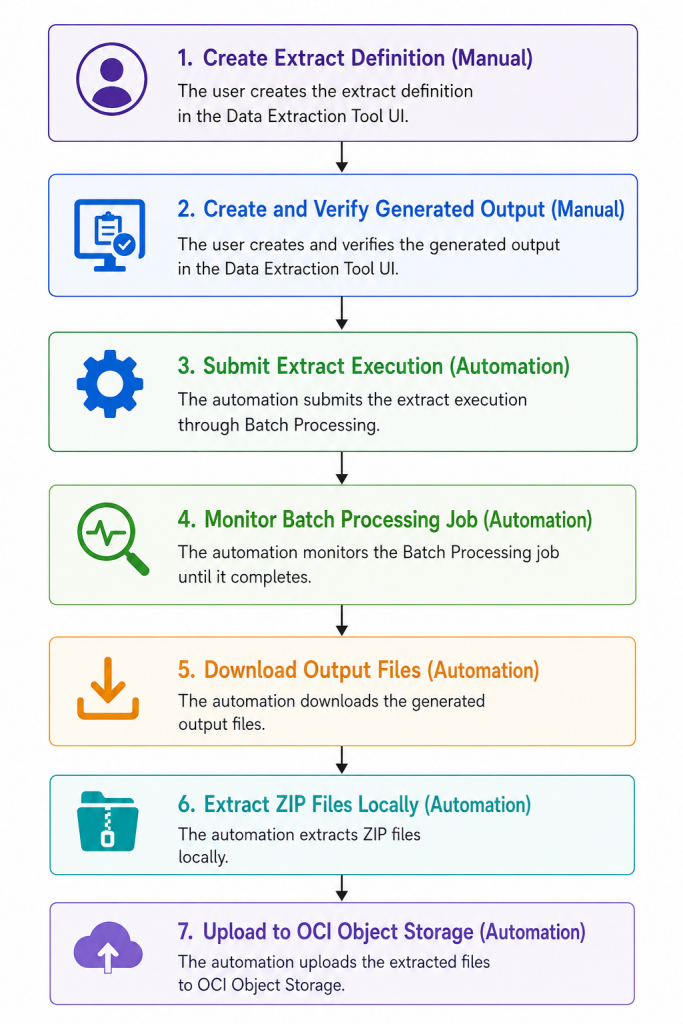
This post walks through a practical pattern for automating the execution of an existing Data Extraction extract and landing the resulting files in OCI Object Storage. The extract definition itself should be created in the Data Extraction Tool UI, which is simpler and more user friendly for selecting objects, attributes, output format, and filters. After the extract definition is created, the workflow uses OAuth-based API access, submits a Batch Processing job, monitors the job, downloads the output files, extracts ZIP archives, and uploads the final data files to an OCI Object Storage bucket.
What the pipeline does
At a high level, the pipeline performs the following steps:
- Create the extract definition in the Data Extraction Tool UI.
- Load configuration and credentials securely.
- Request OAuth access tokens for the data extraction APIs.
- Submit a Batch Processing for the extract.
- Poll the Batch Processing job until it completes.
- List the output files produced by the job.
- Download the output files.
- Extract ZIP files.
- Upload the extracted files to OCI Object Storage.
Architecture overview
The pipeline connects three main systems:
Data Extraction Tool UI
Used to create and maintain the extract definition.
Batch Processing API
Used to submit and monitor the extract execution job, and to retrieve generated output files.
OCI Object Storage
Used as the durable landing zone for the extracted data.
A simplified flow looks like this:
Prerequisites
Before you start, make sure you have:
- Access to the Fusion environment and its base URL.
- The Data Extraction Tool enabled and configured.
- An extract definition already created in the Data Extraction Tool UI.
- Oauth Confidential Applications created
- IDCS OAuth details: host, client ID, client secret, username, and password.
- Permission to submit Batch jobs and retrieve output files.
- An existing OCI Object Storage bucket.
- OCI SDK/config profile with permission to upload objects to that bucket.
- A runtime environment with network access to Fusion, IDCS, and OCI Object Storage.
The extract definition should be created from the Data Extraction Tool. In the UI, click the
+icon to start a new extraction, provide a name and optional description, choose the output format, select the required objects and attributes, optionally define filtering rules, and click Create to save the extract definition.
1. Load configuration
Start by separating non secret configuration from sensitive credentials.
Note: I tested the code using Oracle AI Data Platform Workbench. I stored all sensitive information in the credential store.
Non secret values can be kept in environment variables or deployment configuration:
def mask(value: str, visible: int = 4) -> str:
    if not value:
        return "<empty>"
    return "*" * max(0, len(value) - visible) + value[-visible:]
BASE_URL = "https://<fusion host>.fa.ocs.oraclecloud.com"
IDCS_HOST = aidputils.secrets.get(name="DataExtractionAPIs", key="IDCS_HOST")
IDCS_CLIENT_ID = aidputils.secrets.get(name="DataExtractionAPIs", key="IDCS_CLIENT_ID")
IDCS_CLIENT_SECRET = aidputils.secrets.get(name="DataExtractionAPIs", key="IDCS_CLIENT_SECRET")
IDCS_USERNAME = aidputils.secrets.get(name="DataExtractionAPIs", key="USERNAME")
IDCS_PASSWORD = aidputils.secrets.get(name="DataExtractionAPIs", key="password")
# <fusion hostname> if your fusion hostname is:
# https://fa-myfusion-test-saasfaprod1.fa.ocs.oraclecloud.com/
# you will put only myfusion-test
BATCH_SCOPE = os.getenv("BATCH_SCOPE", "urn:opc:resource:fusion:<fusion hostname>:saas-batch/")
BUCKET_NAME = os.getenv("OCI_BUCKET_NAME", "bucket-data")
# This must match the extract definition name created in the Data Extraction Tool UI.
extract_name = os.getenv("EXTRACT_NAME", "ExampleCostDistributionExtract")
print(f"Configured host {BASE_URL}, client {mask(IDCS_CLIENT_ID)}")The code snippets sometimes include extra characters that weren’t part of the original code, so please pay extra attention when copying them.
2. Request OAuth tokens
The pipeline needs separate access tokens for the Data Extraction APIs. A reusable token function keeps authentication consistent:
import requests
from requests.auth import HTTPBasicAuth

session = requests.Session()
session.headers.update({"Accept": "application/json"})

class HttpError(RuntimeError):
    pass

def request_token(scope: str) -> str:
    url = f"{IDCS_HOST.rstrip('/')}/oauth2/v1/token"

    response = session.post(
        url,
        data={
            "grant_type": "password",
            "username": IDCS_USERNAME,
            "password": IDCS_PASSWORD,
            "scope": scope,
        },
        auth=HTTPBasicAuth(IDCS_CLIENT_ID, IDCS_CLIENT_SECRET),
        headers={"Content-Type": "application/x-www-form-urlencoded;charset=UTF-8"},
        timeout=30,
    )

    if response.status_code != 200:
        raise HttpError(
            f"Token request failed with status {response.status_code}: "
            f"{response.text[:500]}"
        )

    token = response.json().get("access_token")
    if not token:
        raise HttpError("Token response did not include access_token")

    return token
Then request both tokens:
BATCH_TOKEN = request_token(BATCH_SCOPE)A helper for authenticated API calls keeps the rest of the code clean:
def auth_headers(token: str, content_type: str = "application/json") -> dict:
    return {
        "Authorization": f"Bearer {token}",
        "Accept": "application/json",
        "Content-Type": content_type,
    }
3. Add a reusable API request helper
API automation becomes easier to maintain when error handling is centralized.
def api_request(method: str, endpoint: str, token: str, **kwargs):
    url = f"{BASE_URL.rstrip('/')}{endpoint}"

    response = session.request(
        method,
        url,
        headers=auth_headers(token),
        timeout=60,
        **kwargs,
    )

    if response.status_code >= 400:
        raise HttpError(
            f"{method} {endpoint} failed: "
            f"{response.status_code} {response.text[:500]}"
        )

    return response
This helper handles URL construction, headers, timeouts, and basic error reporting.
4. Define the extract
Before submitting the Batch Processing job, create the extract definition in the Data Extraction Tool UI.
An extract definition describes what data should be exported and how the output should be formatted. The UI is the recommended way to create and maintain this definition because it provides a guided experience for selecting objects, attributes, formats, and filters.
In the Data Extraction Tool UI:
- Click the
+icon to start a new extraction. - Provide a clear name and optional description.
- Define an extract date if required.
- Choose your output format: CSV or JSON.
- Select objects and attributes.
- Optionally set up data filtering rules.
- Click Create to save your extraction definition.
After the extract definition is created, note the extract definition name. The automation uses this value when submitting the Batch Processing job.
extract_name = "ExampleCostDistributionExtract"5. Submit the Batch Processing Job
Submit the extract through Batch Processing.
Example for Full Extract:
schedule_name = f"{extract_name}Schedule"
extract_type = "Full"
#allowed values Full/Incremental
recurrence = "Immediate"
#allowed values Immediate/Simple/Hourly/Daily/Weekly/Monthly/Yearly

schedule_objst_payload = {
    "serviceName": "boss",
    "jobDefinitionName": "DataExport",
    "description": f"{schedule_name}::{extract_name}::{extract_type}::{recurrence}",
    "requestParameters": {
        "submit.argument1": extract_name,
        "submit.argument2": "Full Data Extract",
    },
}
Example for Incremental Extract:
schedule_name = f"{extract_name}Schedule"
extract_type = "Incremental"
recurrence = "Hourly"

schedule_objst_payload = {
  "serviceName": "boss",
  "jobDefinitionName": "DataExport",
  "description": f"{schedule_name}::{extract_name}::{extract_type}::{recurrence}",
  "requestParameters": {
    "submit.argument1": extract_name,
    "submit.argument2": "Incremental Data Extract"
  },
  "runAtTimes": {
    "fixedInterval": {
      "interval": 1,
      "timeUnit": "HOUR"
    },
    "startDate": "2026-05-15", #Date must be in the format YYYY-MM-DD
    "endDate": "2026-05-15",
    "startTime": "1200",
    "endTime": "1500"
  }
}
The fixedInterval defines a fixed rate schedule or a fixed interval schedule, for example, every 30 minutes or 150 minutes, where the time unit could be a minute, hour, or day.
The allowed values for timeUnit are: “”MINUTE”, “HOUR”, “DAY”.
The startDate and endDate together define the overall time frame in which the scheduling rules should apply, and startDate should be a future time.
The startTime and endTime define the window within which a scheduled run should start when its prerequisites are all met. The default startTime is midnight at “0000” and the default endTime is “2359”. These values are given in the format of “HHMM”.
Submit the job request:
schedule_objst_response = api_request(
    "POST",
    "/api/saas-batch/jobscheduler/v1/jobRequests",
    BATCH_TOKEN,
    json=schedule_objst_payload,
)

location = (
    schedule_objst_response.headers.get("Location")
    or schedule_objst_response.headers.get("location")
)

if not location:
    raise RuntimeError("Batch Processing job request did not return a Location header")

job_request_id = location.rstrip("/").split("/")[-1]

print("Created Batch Processing jobRequestId:", job_request_id)
The jobRequestId is the key identifier used for monitoring job progress and retrieving output files.
6. Poll the Batch Processing job status
Once the job is submitted, poll the Batch Processing API until the job reaches a terminal state.
import time

terminal_statuses = {
    "SUCCEEDED",
    "COMPLETED",
    "ERROR",
    "FAILED",
    "CANCELLED",
    "PAUSED",
    "WARNING",
}

while True:
    batch_status_response = api_request(
        "GET",
        f"/api/saas-batch/jobscheduler/v1/jobRequests/{job_request_id}",
        BATCH_TOKEN,
    )

    batch_status = batch_status_response.json()

    status = (
        batch_status.get("jobStatus")
        or batch_status.get("jobDetails", {}).get("jobStatus")
        or batch_status.get("jobProgress", {}).get("status")
    )

    print(f"Batch jobRequestId {job_request_id} status {status}")

    if status in terminal_statuses:
        break

    time.sleep(10)
7. List output files
After the job completes, list the generated files:
output_files_response = api_request(
    "GET",
    f"/api/saas-batch/jobfilemanager/v1/jobRequests/{job_request_id}/outputFiles",
    BATCH_TOKEN,
)

output_files = output_files_response.json().get("items", [])

print("Found", len(output_files), "output file(s)")
Each item typically contains metadata about the file and a download link in the response context.
8. Download output files
import tempfile
from pathlib import Path
from urllib.parse import urlparse

def download_output_files(items, batch_token: str) -> list[Path]:
    paths = []
    tmp_dir = Path(tempfile.mkdtemp(prefix="bof_extract_"))

    headers = {
        "Authorization": f"Bearer {batch_token}",
        "Accept": "application/octet-stream",
    }

    for item in items:
        file_name = Path(item["fileName"]).name
        href = item["$context"]["links"]["enclosure"]["href"]

        parsed = urlparse(href)
        if parsed.scheme != "https":
            raise RuntimeError(f"Refusing non-HTTPS download URL: {href}")

        destination = tmp_dir / file_name

        with session.get(href, headers=headers, stream=True, timeout=120) as response:
            response.raise_for_status()

            with open(destination, "wb") as file:
                for chunk in response.iter_content(chunk_size=1024 * 1024):
                    if chunk:
                        file.write(chunk)

        print(f"Downloaded {file_name} to temporary storage")
        paths.append(destination)

    return paths
This function includes two important safeguards:
First, it strips any directory path from the remote filename by using Path(item["fileName"]).name. Second, it refuses non-HTTPS download URLs.
9. Extract ZIP files
import os
import zipfile

def extract_zip(zip_path: Path, extract_dir: Path) -> None:
    extract_dir.mkdir(parents=True, exist_ok=True)

    base = extract_dir.resolve()

    with zipfile.ZipFile(zip_path, "r") as zip_file:
        for member in zip_file.infolist():
            target = (extract_dir / member.filename).resolve()

            if not str(target).startswith(str(base) + os.sep):
                raise RuntimeError(
                    f"Unsafe ZIP member path blocked: {member.filename}"
                )

        zip_file.extractall(extract_dir)
Then extract downloaded ZIP files:
extract_dir = Path("/tmp/extract_output")

downloaded_paths = download_output_files(output_files, BATCH_TOKEN)

for downloaded_path in downloaded_paths:
    zip_path = Path(downloaded_path)

    if zip_path.suffix.lower() == ".zip":
        extract_zip(zip_path, extract_dir)
10. Upload files to OCI Object Storage
Use the OCI Python SDK to upload the extracted files to Object Storage.
import oci

profile = os.getenv("OCI_CONFIG_PROFILE", "DEFAULT")
config_path = os.getenv("OCI_CONFIG_PATH", "~/.oci/config")

config = oci.config.from_file(config_path, profile)
object_storage_client = oci.object_storage.ObjectStorageClient(config)

namespace = object_storage_client.get_namespace().data
Create a small upload helper:
def upload_to_object_storage(file_path: Path, object_name: str | None = None):
    object_name = object_name or file_path.name

    with open(file_path, "rb") as file:
        object_storage_client.put_object(
            namespace_name=namespace,
            bucket_name=BUCKET_NAME,
            object_name=object_name,
            put_object_body=file,
        )

    print(f"Uploaded object {object_name} to bucket {BUCKET_NAME}")
Upload all extracted files:
for file_path in extract_dir.rglob("*"):
    if file_path.is_file():
        upload_to_object_storage(file_path)
Conclusion
By creating and maintaining the extract definition in the Data Extraction Tool UI, you keep the setup experience simple and aligned with the tool’s guided workflow. After the extract definition exists, a secure API driven pipeline can automate the execution, monitoring, download, extraction, and upload of Fusion data into OCI Object Storage with less operational effort and fewer handoffs.