Introduction
With the adoption of OCI IAM Domains, integrating external systems with Oracle Integration Cloud (OIC) has become more secure but also more nuanced.
In our earlier article, Simplifying OAuth for OIC to Fusion Integrations: Authorization Code Across IAM Domains we focused on how OIC integrates with Fusion Applications, and how different OAuth strategy can be applied in cross-domain scenarios.
This article extends that discussion to the other side of the architecture – how external systems invoke OIC APIs.
OIC supports multiple OAuth 2.0 grant types, including:
- Client Credentials
- Authorization Code
Additionally, JWT Assertion is used for outbound identity propagation (OIC → Fusion), while Client Credentials is the standard pattern for inbound external API invocation
However, in real-world integrations, the key challenge is not just how to configure OAuth but choosing the correct grant type for the use case.
For external API invocation, OAuth Client Credentials is the commonly used pattern for service-to-service integrations. It enables secure, non-interactive, service-to-service communication.
Despite this, many implementations encounter issues such as:
- HTTP 401 Unauthorized errors at OIC trigger
- Tokens appearing valid but still being rejected
- Inconsistent behavior when multiple resources (e.g., OIC and Fusion) are configured together
These issues are often not caused by incorrect token generation, but by improper IAM design, including:
- Incorrect resource scoping
- Role misconfiguration
- OIC expects token audience aligned to its resource, mixing resources can lead to authorization ambiguity
Additionally, some implementations attempt to use Authorization Code flow for backend integrations, which introduces unnecessary complexity and instability.
While the patterns discussed apply to both same-domain and cross-domain scenarios, this article focuses on cross-domain IAM configurations, where most real-world integration challenges occur.
Objective
The objective of this article is to:
- Demonstrate a clean and reliable pattern to invoke OIC integrations using OAuth Client Credentials
- Explain the correct IAM configuration required for OIC authorization
- Clarify when Authorization Code may be used and when it should not
- Provide a reusable design that works across OCI Services, VBCS, and external applications
- Highlight common pitfalls and architectural anti-patterns
Architecture Overview
Invoking Oracle Integration Cloud (OIC) APIs using OAuth 2.0 follows a layered architecture where authentication is handled by OCI IAM, and authorization is enforced at the OIC level using application roles.
Depending on the integration scenario, two primary OAuth patterns are used for invoking OIC APIs:
- Client Credentials (system-to-system)
- No user context involved
- Token represents the calling application
- Suited for:
- Scheduled jobs
- System-to-system communication
- Invoking OIC APIs from backend integrations
- No user interaction is required
- OIC acts as a service integration layer
- Authorization Code (user-context via UI applications)
- Initial interactive login required (tokens can be reused via refresh token)
- Token represents the authenticated user session
- Suitable for:
- OIC APIs are invoked in a user-authenticated session (not true user impersonation)
- User context or auditing is required at OIC level
- UI-driven applications
- VBCS frontends
- Applications requiring user login
- A one-time login is acceptable
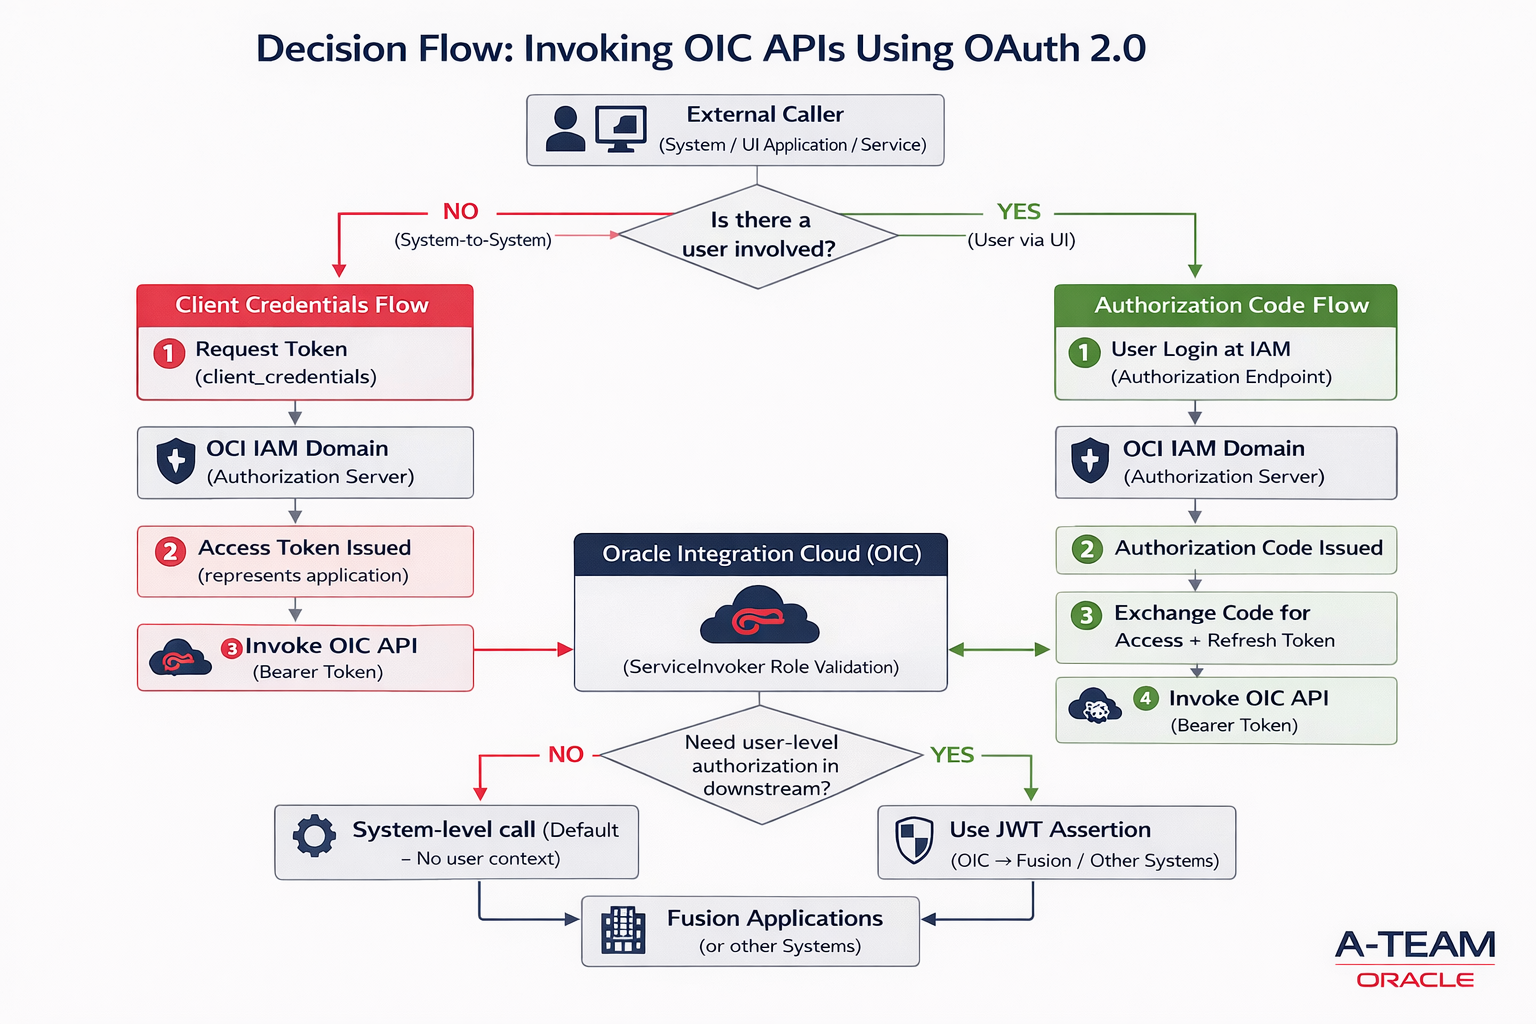
Important Design Boundary: Identity Propagation
While both flows above are used to invoke OIC APIs, it is critical to understand, OIC does not automatically propagate user identity to downstream systems like Fusion Applications – If user-level authorization is required in downstream systems:
External Client → OIC → Fusion Applications
then OAuth token used to invoke OIC is NOT sufficient , Identity must be propagated separately using – JWT Assertion (from OIC to Fusion), in that way fusion RBAC can be fully applied.
Implementation Details
Using OAuth 2.0 Client Credentials Flow
Suited for system-level integrations where no user interaction is required.
Steps –
Step 1 – Create OAuth Confidential Client in the IAM domain.
- Login to the IAM Domain
- Navigate to Identity > Domains > [Your Domain] > Integrated Applications.
- Go to Integrated Application, Press Button – Add Application
- Choose Confidential Application.
- Configure this application as a client now
- Select Client Configuration
- Client Credentials
- No redirect URI is needed.
- Add Resource >> Add Scope
- OIC instance as a resource
- Press Next for Configure Policy
- Finish
- Activate Application.
- Make note of the application’s Client ID and Client Secret & Scope.
This application represents the calling client (e.g., OCI Services like – Log Analytics, External Applications etc..).
Step 2: Assign ServiceInvoker Role
- In Identity Domain >> Go to Oracle Cloud Service >>Find Your Integration Instance
- Navigate to Application Roles
- Assign ServiceInvoker role to the confidential client Application using Manage Applications.
- Press Manage applications – Add Confidential Client
- This allows the application to invoke OIC integrations. At minimum, the ServiceInvoker role is required; additional roles may be needed depending on the integration.
Token validity alone is not sufficient – OIC also validates audience, scope, and IAM role mappings for authorization.
Step 3: Generate Access Token
Call: POST /oauth2/v1/token
With:
- grant_type = client_credentials
- client_id / client_secret
- scope = Copy Scope from Confidential Client Resource
| Grant Type | Client Credentials |
| Access Token URL | https://<your-iam-domain>.identity.oraclecloud.com/oauth2/v1/token |
| Client ID | <Client ID> |
| Client Secret | <Client Secret> |
| Scope | Use the exact scope value configured in the IAM application resource. Do not manually construct or modify the scope – Eg.. https://<OIC>.integration.us-ashburn-1.ocp.oraclecloud.com:443urn:opc:resource:consumer::all |
| Client Authentication | Send as Basic Auth Header |
Step 4: Invoke OIC Integration
Call OIC REST API:
Sample -<a href="https://https://<OICIntegration>/ic/api/integration/v1/flows/rest/GETESSHEALTHINFO/1.0/ess-jobs/health
Authorization: Bearer <access_token>
If configured correctly:
- Integration is triggered successfully
- No 401 Unauthorized errors
Alternative Pattern: Using OAuth 2.0 Authorization Code Flow with Refresh Token
Best suited for UI-driven scenarios where a user logs in and invokes OIC APIs using an authenticated session. However,Authorization Code flow authenticates the user at OIC, but OIC does not automatically propagate that identity to downstream systems. Additional mechanisms like JWT Assertion are required for downstream identity propagation.
For true end-to-end user propagation (OIC → Fusion Applications), identity must be propagated separately using JWT Assertion
Steps –
Step 1: Create Confidential Application in IAM
- Login to IAM Domain
- Navigate Identity > Domains > [Your Domain] > Integrated Applications.
- Go to Integrated Application, Press Button – Add Application
- Choose Confidential Application.
- Configure this application as a client now
- Select Client Configuration
- Authorization Code
- Refresh Token
- Add the Redirect URI for OIC Gen3:
- Use the redirect URI of the client application. OIC-specific callback URLs are only required for OIC-managed OAuth flows and are not needed for external clients or custom applications, eg..
- https://<oic_instance>/icsapis/agent/oauth/callback (primary)
- https://<oic_instance>/ic/pub/oauth2callback (optional)
- Use the redirect URI of the client application. OIC-specific callback URLs are only required for OIC-managed OAuth flows and are not needed for external clients or custom applications, eg..
- Add Resource >> Add Scope
- OIC instance as a resource
- Press Next for Configure Policy
- Finish
- Activate Application.
- Make note of the application’s Client ID and Client Secret & Scope.
Step 2: Assign ServiceInvoker Role
- In Identity Domain >> Go to Oracle Cloud Service >>Find Your Integration Instance
- Navigate to Application Roles
- Assign ServiceInvoker role to the confidential client Application using Manage Applications.
- Press Manage applications – Add Confidential Client
- Press Manage User – Ensure User is also added to this role
- This allows the application to invoke OIC integrations. At minimum, the ServiceInvoker role is required; additional roles may be needed depending on the integration.
Token validity alone is not sufficient – OIC also validates audience, scope, and IAM role mappings for authorization.
Step 3: Generate Access Token
Call: POST /oauth2/v1/token
With:
- grant_type=authorization_code
- code=<authorization_code>
- redirect_uri=<redirect_uri_used_in_authorize_request>
- client_id=<client_id>
- client_secret=<client_secret>
| Security Policy | OAuth Authorization Code |
| Client ID | <Client ID> |
| Client Secret | <Client Secret> |
| Call Back URL | https:// <oic_instance>/rpa/v1/callback |
| Authorization code URI | https://<your-iam-domain>.identity.oraclecloud.com /oauth2/v1/authorize |
| Access token URI | https://<your-iam-domain>.identity.oraclecloud.com/oauth2/v1/token |
| Scope | Use the exact scope value configured in the IAM application resource. Do not manually construct or modify the scope – Eg.. https://XXXX.integration.us-ashburn-1.ocp.oraclecloud.com:443urn:opc:resource:consumer::all |
| Client Authentication | client_credentials_as_header |
| Refresh Token URL | https:// :<your-iam-domain>.identity.oraclecloud.com/oauth2/v2/token |
When you try get Access token, it will prompt for browser login for User consent, provide consent using a valid user account with appropriate access available in your domain.
Step 4: Invoke OIC Integration
Call OIC REST API:
Sample – <a href="https://https://<OICIntegration>/ic/api/integration/v1/flows/rest/GETESSHEALTHINFO/1.0/ess-jobs/health
Authorization: Bearer <access_token>
If configured correctly:
- Integration is triggered successfully
- No 401 Unauthorized errors
Conclusion
Invoking OIC APIs using OAuth 2.0 becomes straightforward once the correct pattern is chosen based on how identity is involved in the integration.
- Client Credentials is ideal when systems interact with OIC without any user involvement. It is simple, reliable, and the common choice for most backend and service-to-service integrations.
- Authorization Code is appropriate when OIC APIs are invoked from UI-driven or user-authenticated application contexts, It fits UI-driven scenarios and can support API usage via refresh tokens after initial login.
- JWT Assertion is typically used for outbound identity propagation (OIC → downstream systems) and is not commonly used for invoking OIC APIs from external clients. Instead, it is used within OIC integrations to propagate user identity to downstream systems such as Fusion Applications, where user-level authorization (RBAC) must be enforced.
The key is to align the pattern with where identity is required:
- If the caller is a system (no user context) → use Client Credentials
- If a user is interacting with an application (UI or login flow) → use Authorization Code
- If user identity must be preserved in downstream systems (e.g., Fusion) → use JWT Assertion from OIC to target systems, not at the OIC entry point
Choosing the right pattern ensures – Correct authorization behavior, Simpler implementation & production ready scalable integrations