Introduction
With the evolution of OCI IAM Domains and the growing adoption of Oracle Integration Cloud (OIC Gen3), integrating with Oracle Fusion Applications (FA) now offers a flexible and secure foundation for enterprise integrations including cross-domain scenarios.
Oracle provides multiple OAuth-based patterns that enable versatile integration models across identity domains. However, implementing these patterns consistently requires a clear understanding of:
• Cross-domain identity handling
• OAuth trust configuration
• Certificate management
• Resource application setup
• Token validation and authorization behavior (401 vs 403)
Without this clarity, teams often introduce unnecessary complexity, configuring trust models or components that may not be required for their specific use case.
This blog provides a practical, end-to-end guide to implementing OAuth 2.0 for secure communication between OIC and Fusion Applications across IAM domains. It focuses on Authorization Code flows for delegated user-context integrations and demonstrates how to apply them consistently for both REST and SOAP integrations.
Objective
When OIC and Fusion reside in different IAM domains, the following challenges arise:
- Token Trust Issues
- Fusion only trusts tokens issued by known identity providers
- External IAM tokens are rejected unless explicitly trusted – Requires issuer + certificate configuration
- Identity Resolution Problems
- Valid token ≠ Authorized request
- Fusion validates token first, then resolves user locally, then applies RBAC – If user does not exist → request fails
- Overuse of Complex Patterns
- Creating unnecessary resource applications
- Uploading certificates when not required
- Using external IAM when Fusion IAM is sufficient
The objective of this blog is to:
- Explain how OAuth 2.0 works across different IAM domains in Oracle Cloud
- Provide a clear implementation pattern showing how OAuth 2.0 Authorization Code flow can be used effectively for OIC to Fusion integrations
- Minimizes unnecessary complexity
- Ensures secure and working integrations
- Differentiates between-
- When trust is required
- When it can be avoided
Architecture Overview
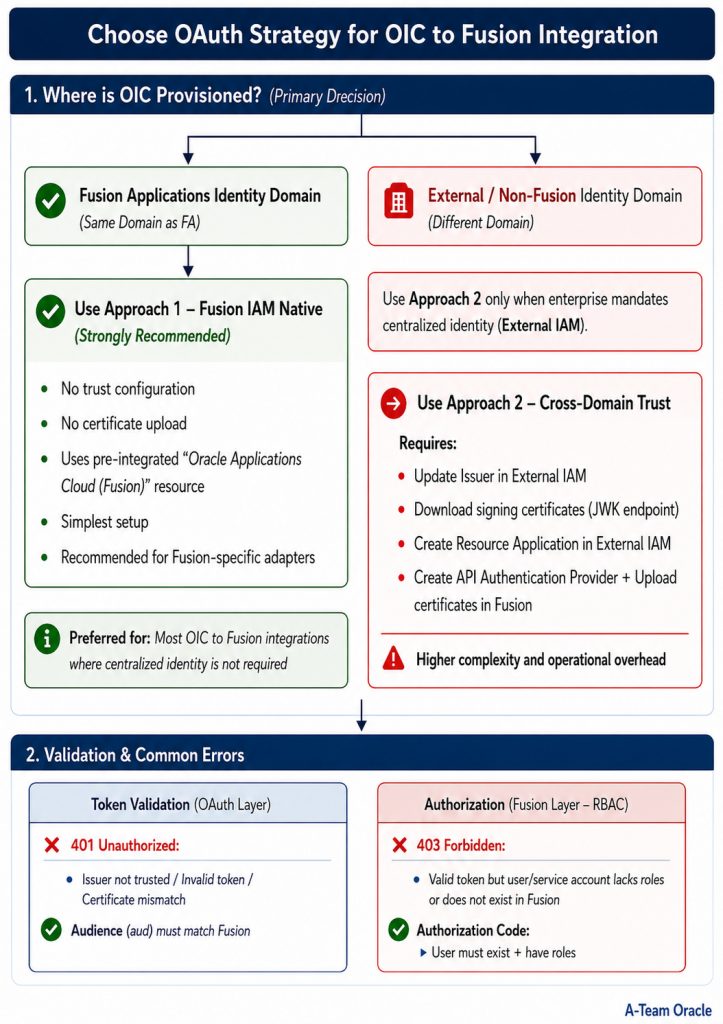
There are two primary patterns for OIC → Fusion integration.
- Approach 1 — Fusion IAM Native (Recommended)
- OIC → Fusion IAM → OAuth Token → Fusion APIs
- Token issuer = Fusion IAM → No trust required
- Characteristics
- Simplest setup
- No certificate upload
- No trust configuration
- Uses pre-integrated Fusion resource
- Approach 2 — External IAM (Cross-Domain Trust)
- OIC → External IAM → OAuth Token → Fusion (via trust)
- Token issuer ≠ Fusion IAM → Trust must be established
- Characteristics
- Requires OAuth trust setup
- Requires certificate upload
- Requires resource application
- Supports enterprise identity models
- User authenticating in external IAM must exist in Fusion with the same username, otherwise Fusion will reject the request during authorization phase.
- Requires precise alignment of token attributes (issuer, audience, user identity) and is more sensitive to configuration compared to Approach 1
- Characteristics
- Note
Adapter behavior may vary – generic REST/SOAP adapters rely on API-level validation, whereas Fusion-specific adapters (such as ERP) invoke additional internal services with stricter identity validation. As a result, some scenarios may require tokens issued by the Fusion IAM domain, in which case Approach 1 (Fusion IAM Native) is recommended
Fusion validates requests in two stages: token validation (OAuth) and authorization (user/service identity and roles), Authentication validates the token, while authorization determines whether the identity has access.
Implementation Details
Approach 1 – Using Fusion IAM Domain (Recommended)
When to Use
- OIC can use Fusion IAM for authentication
- No enterprise requirement for centralized external identity
- Simpler architecture preferred
Using OAuth 2.0 Authorization Code Flow
Best suited for user-context operations where actions are performed on behalf of a Fusion Applications user. However, the user context is established only once at the connection level and does not dynamically reflect the application UI session.
For true user propagation from OIC to Fusion Applications, JWT Assertion–based identity propagation patterns may also be considered for advanced delegated user propagation scenarios depending on adapter and service support, as Authorization Code flow enables user authentication but not dynamic user propagation.
Steps –
Step 1: Create Confidential Application in Fusion IAM
- Login to IAM in same domain which is domain of FA
- Navigate to Identity > Domain> Choose FA Domain
- Go to Integrated Application, Press Button – Add Application
- Choose Confidential Application.
- Configure this application as a client now
- Select Client Configuration
- Authorization Code
- Refresh Token
- Add the Redirect URI for OIC Gen3:
- https://<oic_instance>/icsapis/agent/oauth/callback
- https://<oic_instance>/ic/pub/oauth2callback
- Add Resource >> Add Scope
- Oracle Applications Cloud (Fusion)
- Press Next for Configure Policy
- Finish
- Activate Application.
- Make note of the application’s Client ID and Client Secret & Scope.
Step 2: Configure Connection in OIC Gen3
- Create a new REST/SOAP Connection.
- Enter WSDL URL Information ending with ?wsdl in case of SOAP
- Enter REST API Base URLin case of REST.
- Choose OAuth 2.0 Authorization Code as the security policy.
- Enter:
- Client ID & Client Secret (from IAM app).
- Authorization Code URI (FA IAM/oauth2/v1/authorize).
- Access Token URI (FA IAM/oauth2/v1/token).
- Optional Security
- Scope (Defined from IAM app – Resource/Scope)
- To obtain a refresh token (required for Authorization Code flow so OIC can automatically refresh the token), add the scope – offline_access in addition to the Fusion resource Scopes ,
- Eg..urn:opc:resource:fa:instanceid=XXXXX urn:opc:resource:consumer::all
- offline_accessoffline_access is mandatory only for Authorization Code to ensure OIC receives a Refresh Token.
- Client Authentication – Send client credential as basic auth header
- Test the connection – you’ll be prompted for consent.
- Enter Fusion Application Username/password.
- Post Consent, test, validate and save connection.
| Security Policy | OAuth Authorization Code (Recommended) |
| Client ID | <Client ID> |
| Client Secret | <Client ID> |
| Authorization code URI | https://<FA_IDCS>.identity.oraclecloud.com/oauth2/v1/authorize |
| Access token URI | https:// <FA_IDCS>.identity.oraclecloud.com/oauth2/v1/token |
| Scope | Use the exact scope value configured in the IAM application resource. Do not manually construct or modify the scope – Eg.. urn:opc:resource:fa:instanceid=XXXurn:opc:resource:consumer::all offline_access |
| Client Authentication | client_credentials_as_header |
| Refresh Token URL | https:// <FA_IDCS>.identity.oraclecloud.com/oauth2/v2/token |
Approach 2 – Using External IAM Domain (Cross-Domain Trust)
When to Use
- Enterprise mandates centralized IAM (External IAM)
- OIC cannot use Fusion IAM directly
- Multi-system identity standardization required
Note: While this approach is supported in principle, it may not work consistently due to strict token validation (issuer, audience, and user resolution) enforced by Fusion.
Steps –
When using an External IAM domain, you must perform these additional trust setup steps before creating client applications
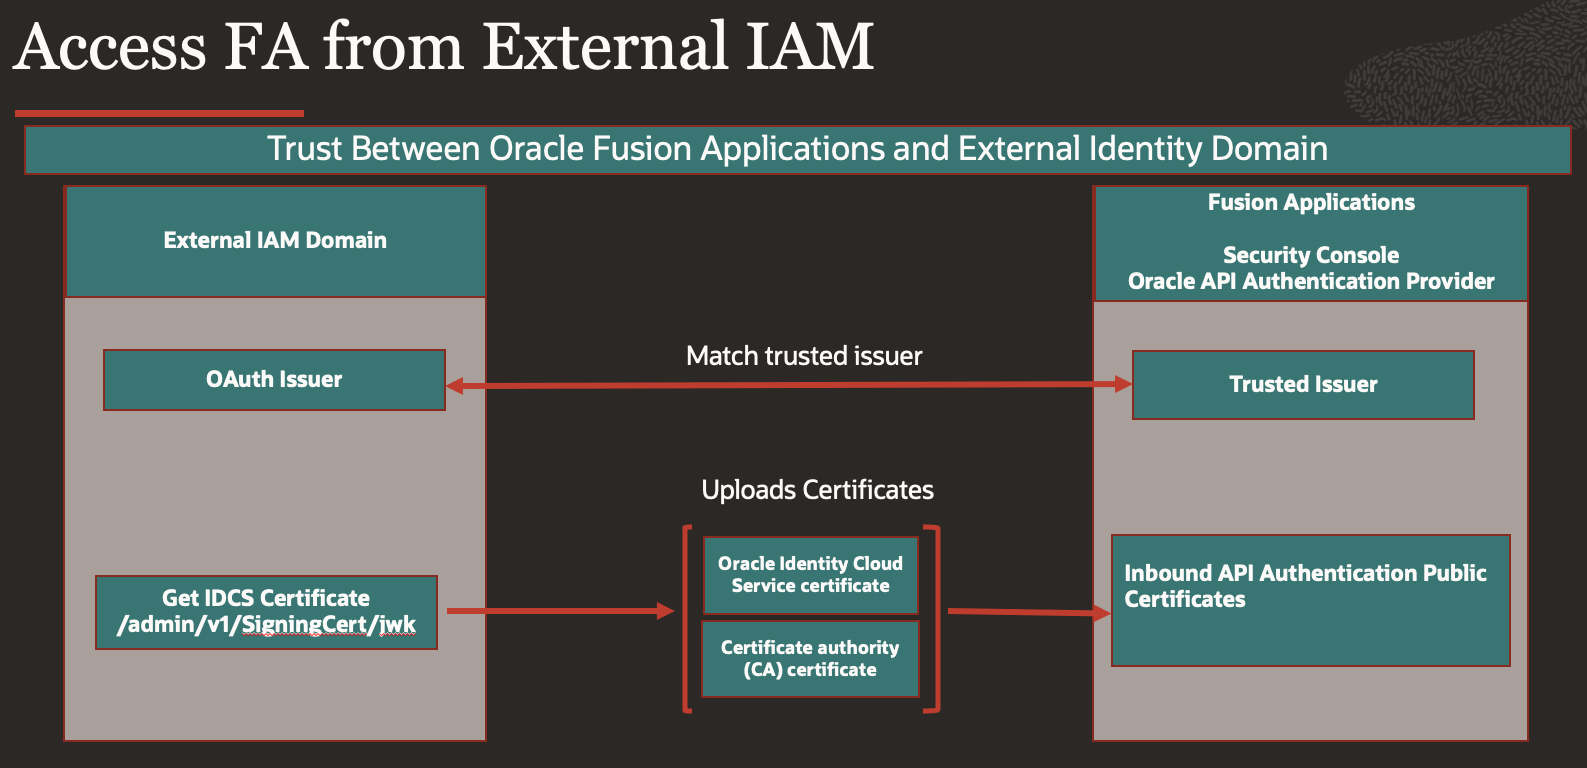
Step 1 : Update OAuth Issuer in the External IAM Domain
- Before configuring trust in Fusion, ensure the external IAM domain issues tokens with a unique issuer (different from the default).
- Navigate to: Identity > Domains > [Your External Domain] > Security > OAuth Configuration (or Token Issuance).
- Ensure the IAM domain URL is configured consistently as the issuer, as this value appears in the token as the iss claim and must match the trusted issuer configured in Fusion.
- https://idcs-<domain>.identity.oraclecloud.com
- This must match the issuer (
iss) claim in the issued OAuth token – refer
Step 2 : Get Certificates from External IAM
- Enable Access Signing certificate
- Navigate to Identity>Domains>[Your External Domain] >Settings>Domain settings>>Access Signing Certificate
- Enable Configure Client Access using Checkbox.
- This will Allow you download IAM Certificates
- Download certificates from IAM
- Get the signing certificates from the Oracle OCI IAM identity domain’s JWK endpoint
- Get the URL of the Oracle OCI IAM JWK endpoint that gives you the signing certificates
- <OCI IAM identity domain URL>/admin/v1/SigningCert/jwk
- Call the JWT endpoint in your browser to retrieve the payloads of the certificates
- There are two values in the “x5C” sections within the output
- First value: OCI identity domain certificate – Save it in file as oci_identity_domain_signing.cer
- Second value: Certificate authority (CA) certificate – Save it in file as oci_identity_domain_ca.cer
- Copy each certificate value into a separate file. Note that the headers and footers in the files must be in the following exact format without any additional preceding or trailing characters to be successfully uploaded to Oracle Fusion Applications
—–BEGIN CERTIFICATE—–
MIIDZjCCAk6gAwIBAgIGAZyQll3…..
—–END CERTIFICATE—– - You can validate the certificate chain by running below commands
- openssl x509 -in oci_identity_domain_ca.cer -noout -text
- openssl x509 -in oci_identity_domain_signing.cer -noout -text
Step 3 : Create API Authentication Provide in Fusion Applications.
- Login to Fusion Cloud Application & navigate to Tools>>Security Console>> API Authentication
- Press Button – Create Oracle API Authentication Provider and press Edit button
- Create a new Oracle API Authentication Provider. Set the Issuer to the exact external IAM domain URL
(e.g., https://idcs-<your-external-domain>.identity.oraclecloud.com).
Step 4 : Upload Signing Certificate in Fusion
- Upload OCI IAM domain certificates in Fusion Security Console
- Within the “Oracle API Authentication Provider Details” page from the previous step under tab “Inbound API Authentication Public Certificates” upload both certificates download earlier.
- OCI identity domain certificate
- Certificate authority (CA) certificate
- Note: In some Fusion environments, certificate upload may require raising a Service Request (SR) with Oracle Support. Check your tenancy policy.
Step 5 : Create Resource Application in External IAM
- Create Resource Confidential Application for Fusion Applications in External Identity Domain
- Navigate to Identity>Domains><DomainName>>Integrated applications
- Press Button – Add Application
- Choose Confidential Applications, choose Resource server configuration, Provide Name , in this case – FA Resource
- In primary Audience add – Fusion Application URL
- In Scope provide – /
- Save and Activate Application
Using OAuth 2.0 Authorization Code Flow
Best suited for user-context operations where actions are performed on behalf of a Fusion Applications user. However, the user context is established only once at the connection level and does not dynamically reflect the application UI session.
For true user propagation from OIC to Fusion Applications, JWT Assertion–based identity propagation patterns may also be considered for advanced delegated user propagation scenarios depending on adapter and service support, as Authorization Code flow enables user authentication but not dynamic user propagation.
Steps –
Step 1: Create Confidential Application in External IAM
- Login to the External IAM Domain
- Navigate to Identity > Domains > [Your External Domain] > Integrated Applications.
- Go to Integrated Application, Press Button – Add Application
- Choose Confidential Application.
- Configure this application as a client now
- Select Client Configuration
- Authorization Code
- Refresh Token
- Add the Redirect URI for OIC Gen3:
- https://<oic_instance>/icsapis/agent/oauth/callback (primary)
- https://<oic_instance>/ic/pub/oauth2callback (optional)
- Add Resource >> Add Scope
- FA Resource – Select the FA Resource application created earlier (in External IAM).
- Press Next for Configure Policy
- Finish
- Activate Application.
- Make note of the application’s Client ID and Client Secret & Scope.
Step 2: Configure Connection in OIC Gen3
- Create a new REST/SOAP Connection.
- Enter WSDL URL Information ending with ?wsdl in case of SOAP
- Enter REST API Base URLin case of REST.
- Choose OAuth 2.0 Authorization Code as the security policy.
- Enter:
- Client ID & Client Secret (from IAM app).
- Authorization Code URI (External IAM/oauth2/v1/authorize).
Access Token URI (External IAM/oauth2/v1/token).
- Optional Security
- Scope (Defined from IAM app – Resource/Scope)
- In scope to obtain refresh token along with access_token, you need to add – offline_access, refer Scopes, eg..
- urn:opc:resource:consumer::all offline_access
- offline_access is mandatory only for Authorization Code to ensure OIC receives a Refresh Token.
- Client Authentication – Send client credential as basic auth header
- Test the connection – you’ll be prompted for consent.
- Enter Username/password.
- Post Consent, test, validate and save connection.
| Security Policy | OAuth Authorization Code (Recommended) |
| Client ID | <Client ID> |
| Client Secret | <Client ID> |
| Authorization code URI | https://<EXT_IDCS>.identity.oraclecloud.com/oauth2/v1/authorize |
| Access token URI | https:// <EXT_IDCS>.identity.oraclecloud.com/oauth2/v1/token |
| Scope | Use the exact scope value configured in the IAM application resource. Do not manually construct or modify the scope – Eg.. https://XXX.integration.us-ashburn-1.ocp.oraclecloud.com:443urn:opc:resource:consumer::all |
| Client Authentication | client_credentials_as_header |
| Refresh Token URL | https:// <EXT_IDCS>.identity.oraclecloud.com/oauth2/v2/token |
Conclusion
This blog demonstrates that:
- The Fusion IAM native approach is the simplest and most effective in most scenarios
- Cross-domain trust should only be implemented when truly required
- Most integration complexity in OIC to Fusion OAuth implementations comes from identity architecture and trust configuration decisions rather than OAuth itself.
Use the Fusion IAM-native approach (Approach 1) wherever possible – it is the simplest, most secure, and recommended pattern. Introduce cross-domain trust (Approach 2) only when enterprise requirements (e.g., centralized identity with external IAM) truly demand it. Adapter choice can also influence behavior and Fusion-specific adapters may require Fusion IAM–issued tokens (Approach 1) even when cross-domain OAuth is configured.
While this article focused on how OIC securely integrates with Fusion Applications, the complete integration picture also includes how OIC itself is invoked by external systems.
In a follow-up article, we cover this complementary perspective:
Invoking Oracle Integration Cloud (OIC) APIs Using OAuth 2.0 (Client Credentials and Authorization Code) Across IAM Domains
This completes the end-to-end integration architecture : External Applications → OIC → Fusion Applications, with the correct OAuth pattern applied at each layer.