Introduction
Running Oracle Database inside Microsoft Azure brings the power of Exadata performance closer to your applications while simplifying multicloud architecture. Oracle operates and manages the database infrastructure directly within Azure data centers, and you access it just like any native Azure service.
This collaboration between Oracle and Microsoft was first announced in September 2023, with general availability beginning later that year.
Today the service is live in many Azure regions around the world, making it easier than ever to connect your applications and Oracle databases on the same cloud platform.
Agenda
- What is Oracle Database@Azure?
- Regional Availability
- Quick Onboarding Process
- Network Fundamentals
- Subnet Delegation
- Create Oracle Exadata VM Cluster
- DNS Provisioning
- Conclusion
What is Oracle Database@Azure?
Oracle Database@Azure is a service that brings OCI-managed database infrastructure into Azure data centers. The offering allows customers to subscribe to Oracle’s database service running in Azure’s physical data centers, giving low latency connectivity to Azure-based application.
Oracle Database@Azure key features include guide deployment, direct low-latency connectivity, Azure native monitoring (metrics + events), and tight integration of Oracle’s database stack inside Azure.
This service supports Oracle Autonomous Database and Exadata Database Service on Azure, enabling mission-critical Oracle workloads to run with high performance inside Azure infrastructure.
Regional Availability
Here are some of the key regions where Oracle Database@Azure is already available:
- East US/East US2
- Central US/South Central US
- Brazil South (Latin America)
- France Central (Europe)
- Japan East (Asia Pacific)
Oracle and Microsoft continue to expand the number of supported regions, for example, as of October 2025 we have listed 14 live regions with many more being added.
For the full and up-to-date region list, please check the link below.
Regional Availability for Oracle Database@Azure
Onboarding Process (Brief Overview)
Before diving into the network setup, there is a short onboarding process to enable Oracle Database@Azure in your Azure environment. It only needs to be done once per subscription:
- Prerequisites and Permissions
- Ensure you have an active Azure subscription and the necessary permissions (Owner or Contributor role).
- You may also link an existing Oracle Cloud Infrastructure (OCI) tenancy if required.
- Accept the Offer
- Access the Oracle Database@Azure offer from the Azure Marketplace and click Accept to register it in your subscription.
- This step enables the Oracle managed resource provider within Azure.
- Link Azure and Oracle Tenancies
- Connect your Azure subscription with an OCI tenancy.
- Create a service principal or enterprise application in Azure AD to establish trust between Azure and Oracle.
- Configure identity federation for unified authentication (Optional).
- Assign Roles and Access
- Add users or groups and grant them the required roles in Azure to deploy and manage Oracle Database@Azure resources.
- Ready to Deploy
- Once the onboarding process is complete, you can start, configuring networking, creating clusters, and deploying your first database system directly from the Azure portal.
For more detailed onboarding instructions and the complete checklist, please check the link.
Networking Fundamentals
Building a reliable and secure network is the most important step when deploying Oracle Database@Azure. Even though the service is managed by Oracle, the network design and connectivity remain under your control within Azure.
The good news is that Azure and OCI networking makes this process straightforward, if you plan your subnets, routing, and DNS resolution from the start. Below is the Oracle Exadata DB@Azure network design and key building blocks to establish a strong networking foundation.
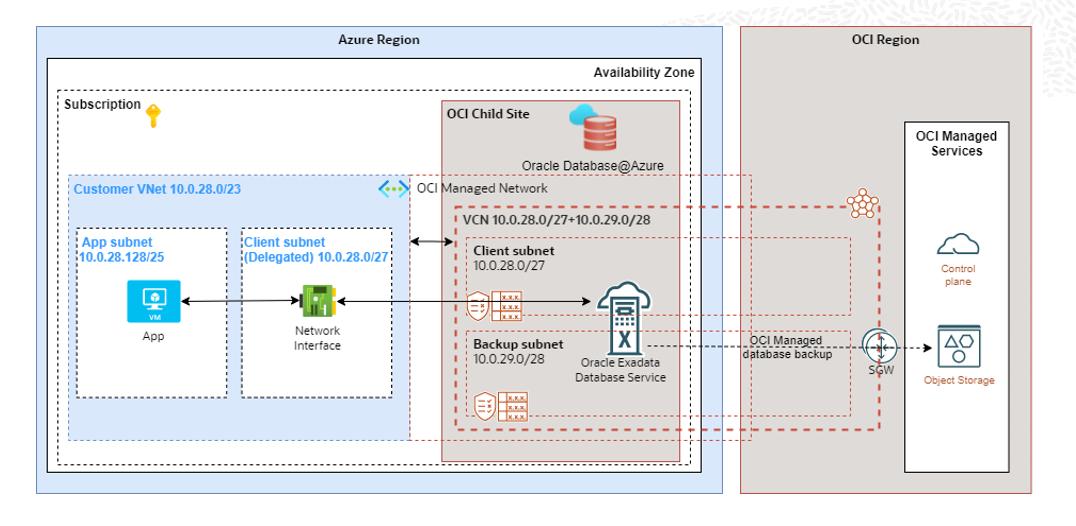
In the diagram above, we have created a child site within the same data center as Azure. We deployed our engineered system racks including networking and interconnect directly inside Azure. Essentially, this is a full-fledged Oracle Exadata inside the Azure data center.
Note: In this blog, I cover Oracle Exadata Database@Azure, however Oracle Autonomous Database is also available for deployment, and I will discuss it in a future blog.
Virtual Network & Subnet
We are presenting the Oracle Database as a virtual network interface(vNIC) connected to your Azure Virtual Network (VNet) through a delegated subnet.
Therefore, we need to create an Azure Virtual Network (VNet) to host the Oracle Database@Azure database.
Note: You can use your existing VNet if you already have one.
Within that VNet, define a dedicated private subnet for the database cluster. You need to create one client subnet for ExaDB-D in Azure and specify the backup subnet CIDR block during VM cluster deployment.
Each VM in a VM cluster requires 4 IP addresses, and each cluster must have a minimum of 2 virtual machines. Therefore, a cluster with 2 VMs needs at least 8 IP addresses in the client subnet.
Additionally, 3 IP addresses are needed for Single Client Access Names (SCANs), regardless of the number of virtual machines in the cluster.
Furthermore, 13 IP addresses in the client subnet are reserved for networking services, regardless of how many VM clusters exist in the subnet. These reserved addresses include the first 4 IP addresses, the 9th to 16th IP addresses, and the last IP address of the range.
As a result, a minimum CIDR block of /27 is recommended for the ExaDB-D client subnet.
Note: Allocate a dedicated backup subnet to avoid using the default one (192.168.252.0/22), as creating a second cluster could result in the same CIDR and cause overlapping with Azure or On-Premises network, which we want to prevent.
Note: The backup subnet will be deployed in OCI, not in Azure.
Subnet Delegation
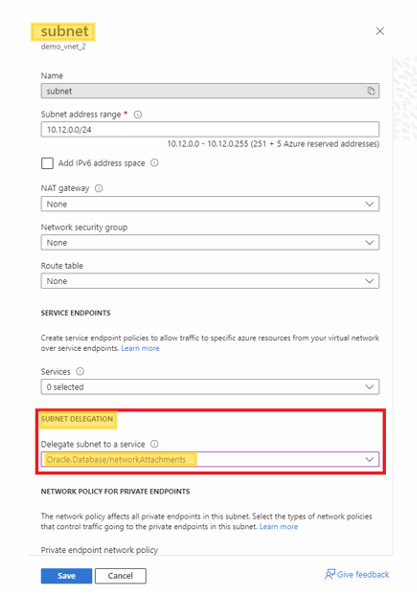
Subnet delegation is a mandatory step that allows Oracle to deploy and attach its infrastructure securely within your Azure network. Delegation grants Oracle the ability to manage network interfaces and resources within that subnet, while you retain ownership and visibility.
In the Azure portal, the client subnet must be delegated to the Oracle provider service so Oracle can securely attach the Exadata infrastructure. Keep in your mind, you can only have 1 delegated subnet per VNet.
Please check the screenshot below.
Note: Avoid overlapping IP ranges with other VNets and On-Premises. Please plan for IP address space in Oracle DB@Azure.
For more information about IP address requirements, please check the link below:
Plan for IP Address Space in Oracle Database@Azure
Create Oracle Exadata VM Cluster
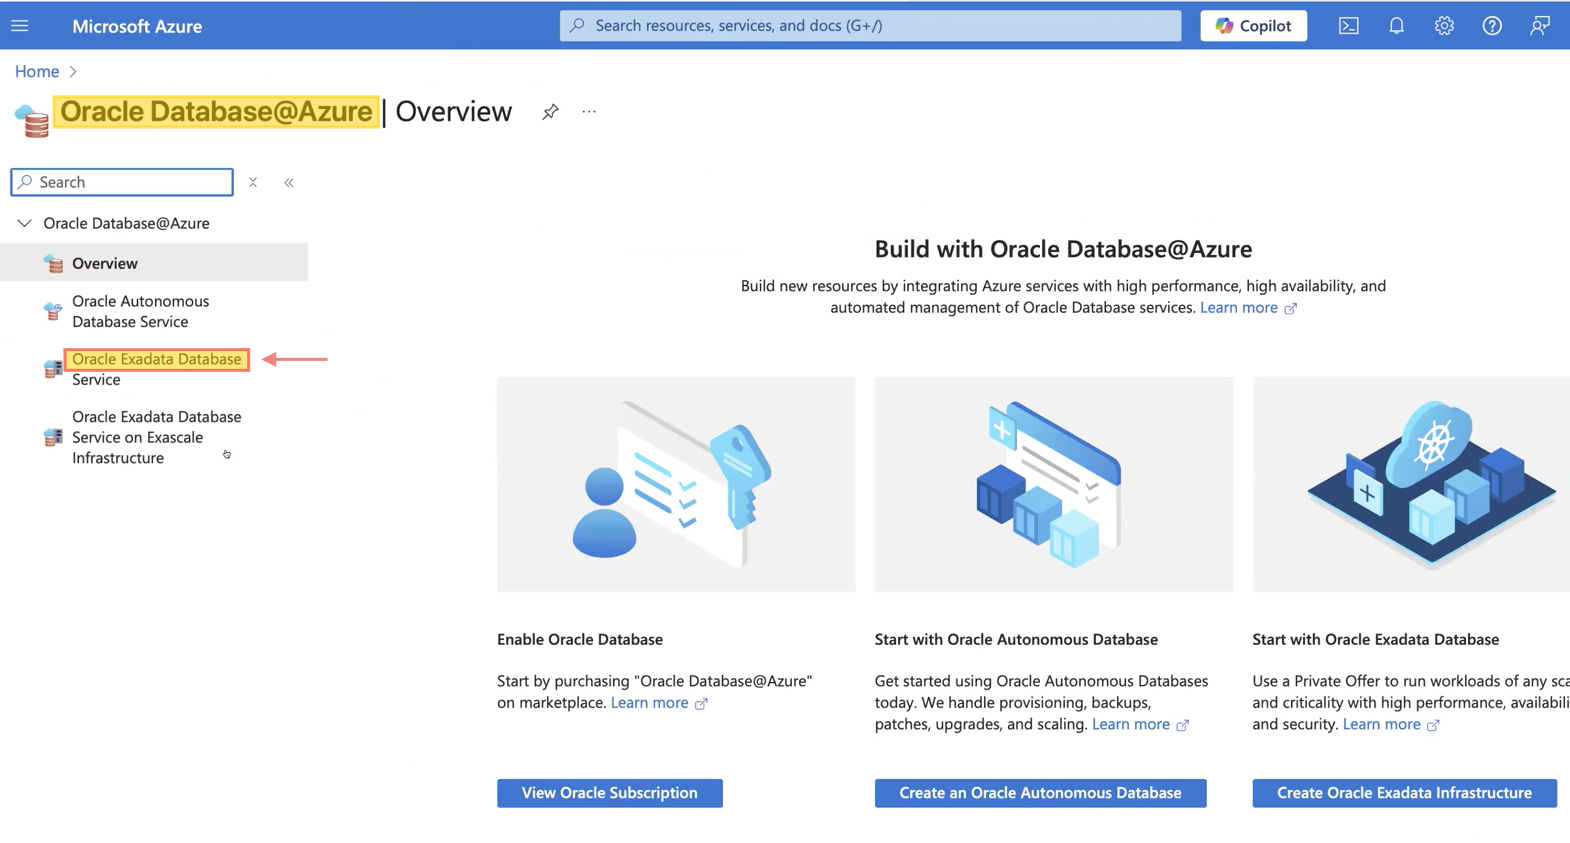
After completing the VNet creation (which is outside the scope of this blog) and subnet delegation, use the Azure search bar to look for “Oracle Database@Azure.” Then, select “Oracle Exadata Database” to begin creating VM clusters. Check out the screenshots below.
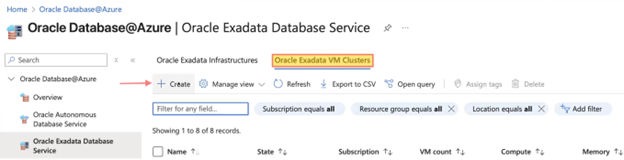
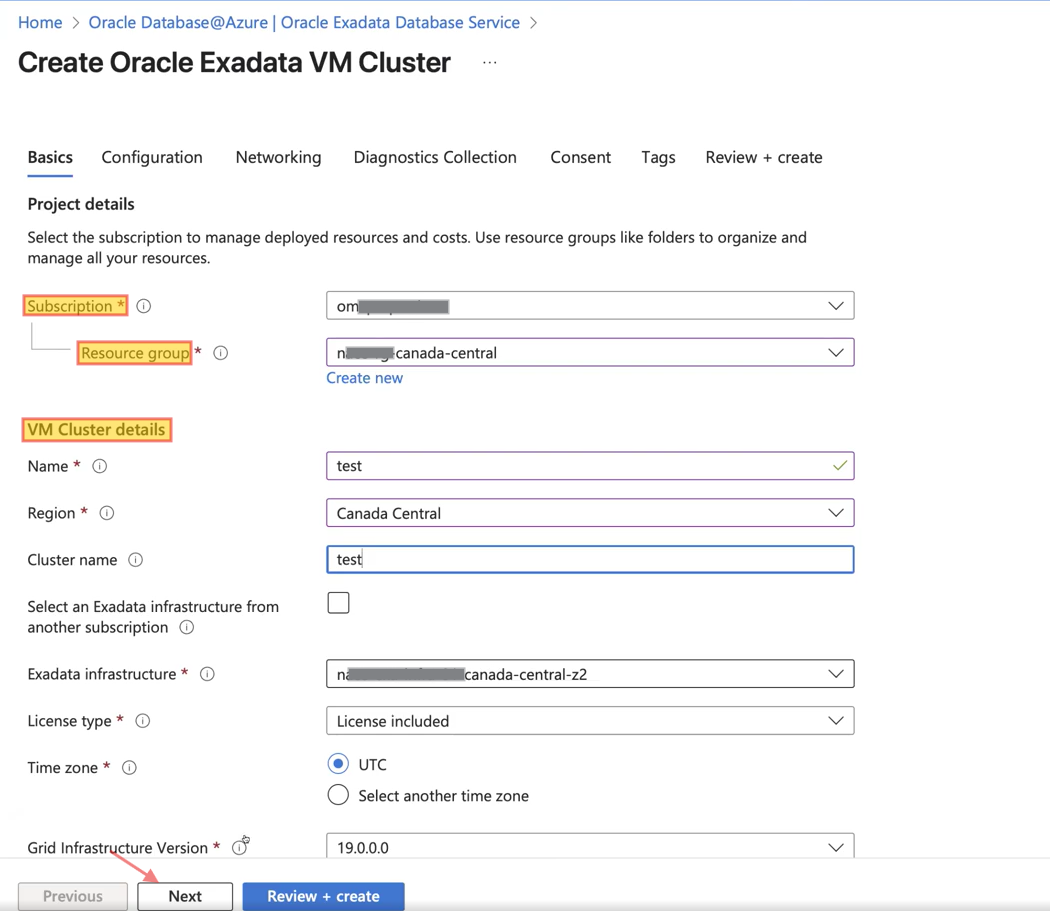
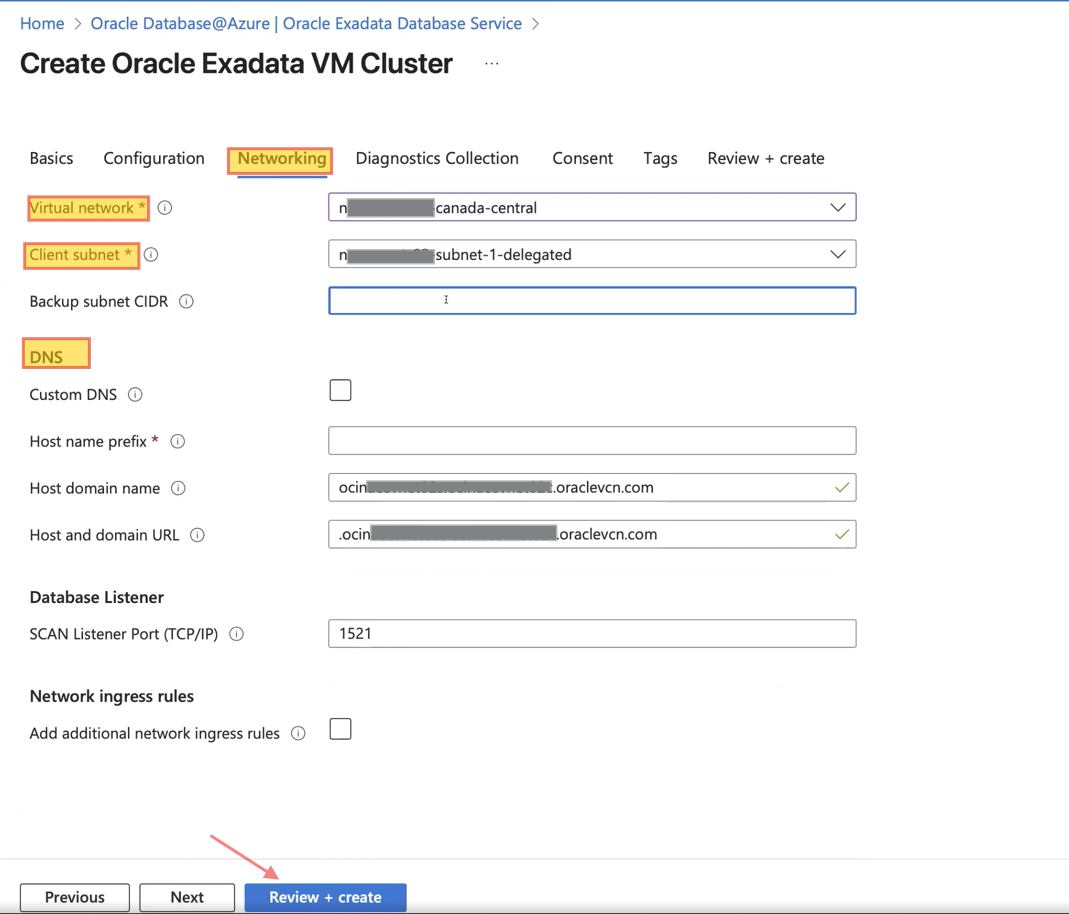
Click “Create” and begin by entering the basic project details, including subscription, resource group, and VM cluster information. Then, click “Next” to proceed to the Networking section, where you will provide the required details such as Virtual Network, Client and Backup subnets, and DNS settings either default or custom, which I will cover in the next section. Please refer to the screenshots below for guidance.
After reviewing and creating the VM cluster, you cannot manage databases directly from Azure. To manage or create a database, you must click ‘Go to OCI’ and complete the process in Oracle Cloud Infrastructure (OCI). Check out the screenshots below.
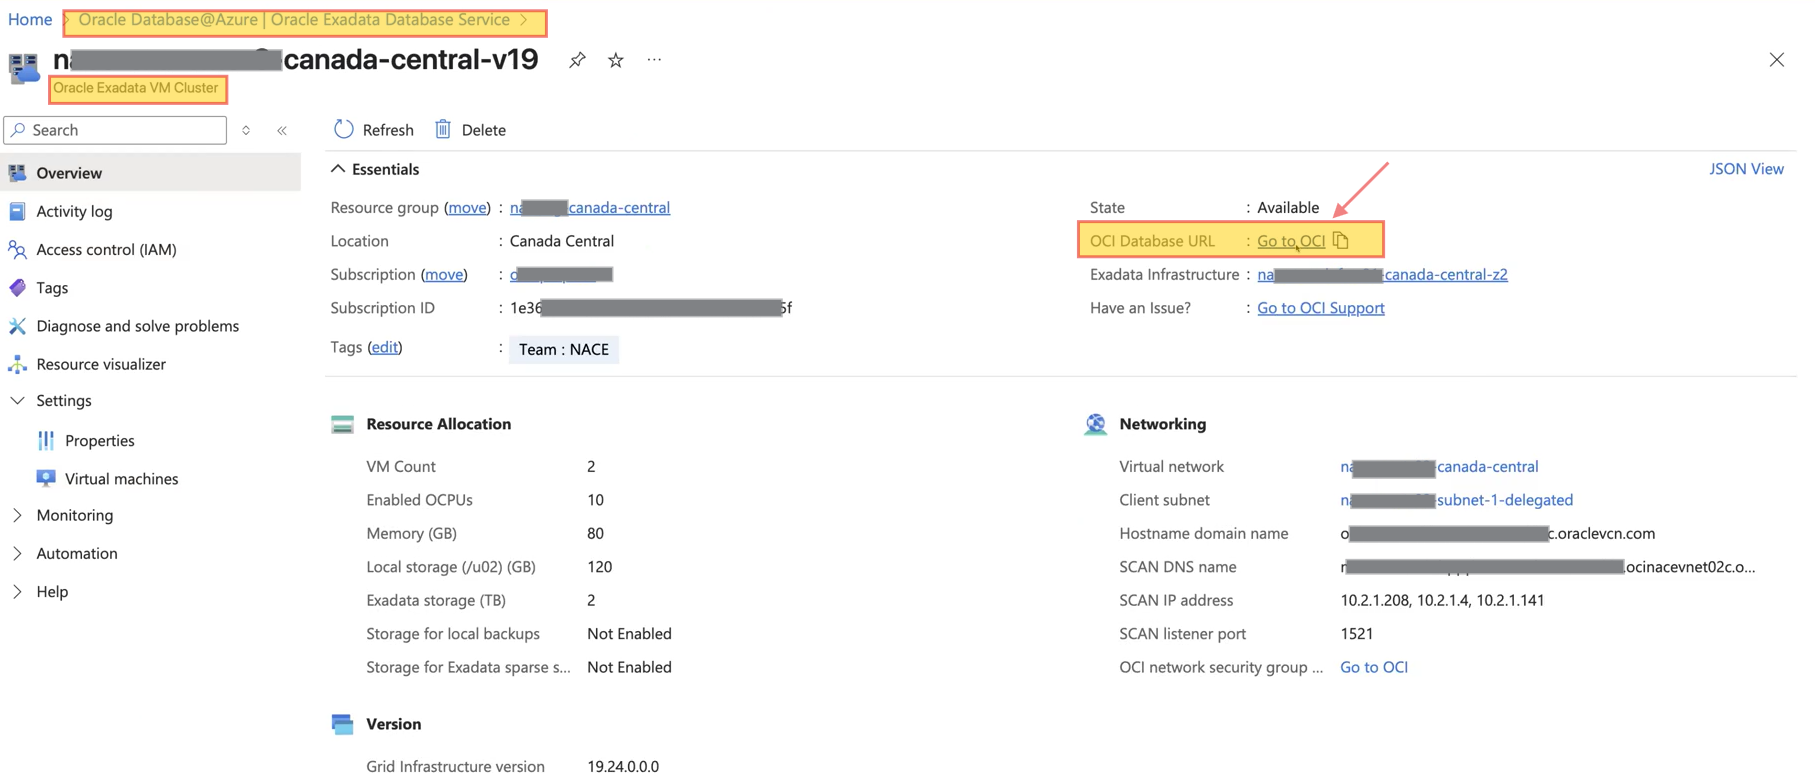
Here is the overview of Exadata VM cluster that we created earlier.
In the Network Security Groups (NSGs) associated with the client and backup subnets, you need to whitelist the relevant NSGs and allow the required ports and protocols. For example, create an ingress rule to allow TCP port 1521 with the source CIDR set to the Azure VNet.
DNS Provisioning
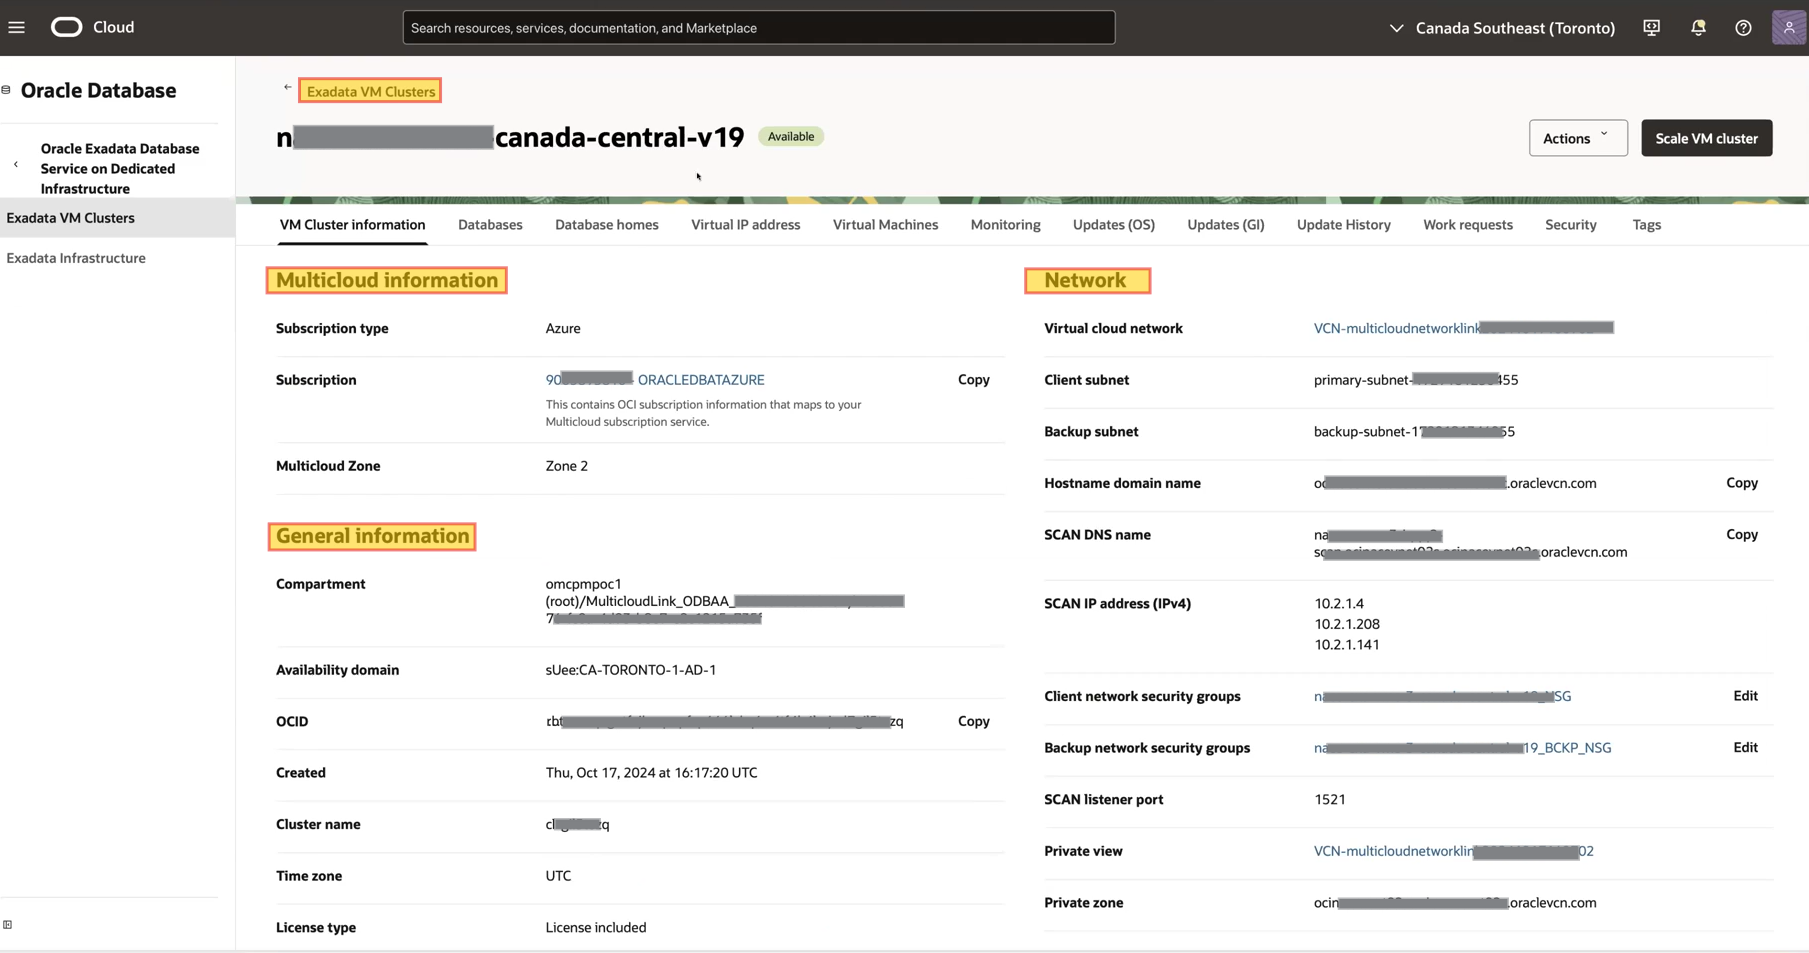
Since Exadata is still connected to the OCI control plane, a private OCI DNS is automatically provisioned during setup. All essential DNS records including SCANs, VM cluster FQDNs, and A records are created by default within the OCI private DNS. To continue check out the diagram below.
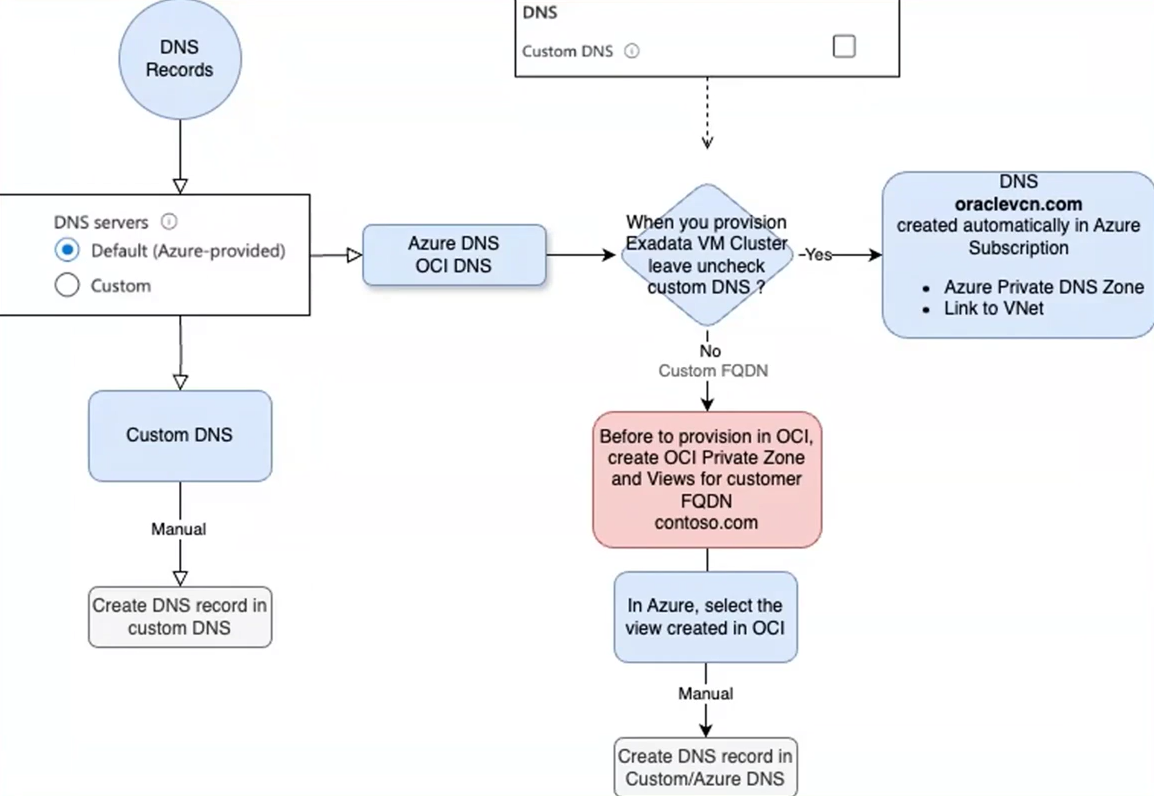
During provisioning, these DNS records are synchronized from OCI to Azure as a one-time process.
This means the same DNS information exists in both locations, Azure and OCI, when you use the Default DNS server option.
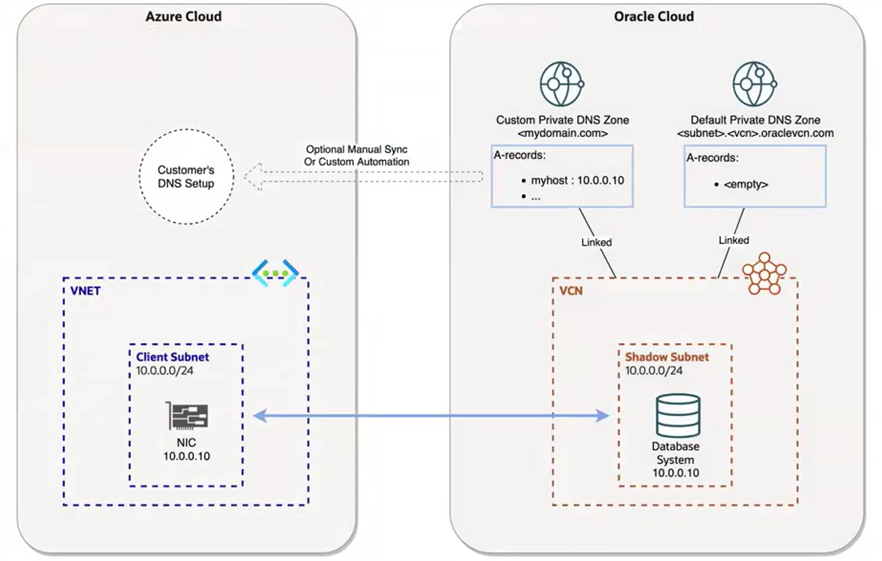
We also offer a Custom FQDN option, which is only available for Exadata Dedicated. Note that Autonomous Database does not support custom FQDNs. With the custom FQDN option, custom FQDN or A records are created only in the OCI DNS, these records are not synchronized to Azure DNS.
This is to avoid breaking configurations when customers manage DNS using a third-party service. Whether Azure, OCI, or a third-party DNS is used depends on the application’s location:
- Applications in Azure use the default, Azure DNS.
- Applications using a third-party DNS will resolve against that service.
If Exadata itself needs to resolve the customer’s FQDN, it queries the OCI DNS directly, not the Azure DNS. You can manually create the necessary FQDN and records in OCI private DNS for local resolution.
For customers with a regular OCI tenancy who utilize other OCI products, you can create a DNS forwarding endpoint in the same VNet as Exadata. This endpoint points to the DNS solution in OCI (DNS listener IP). However, if there is no existing OCI implementation and the environment is solely a multi-cloud tenancy, integrating with On-Premises DNS requires a dedicated tenancy between OCI and that On-Premises, or manually creating the required records since the OCI-Azure link is not transitive for any traffic other than Exadata VNICs. 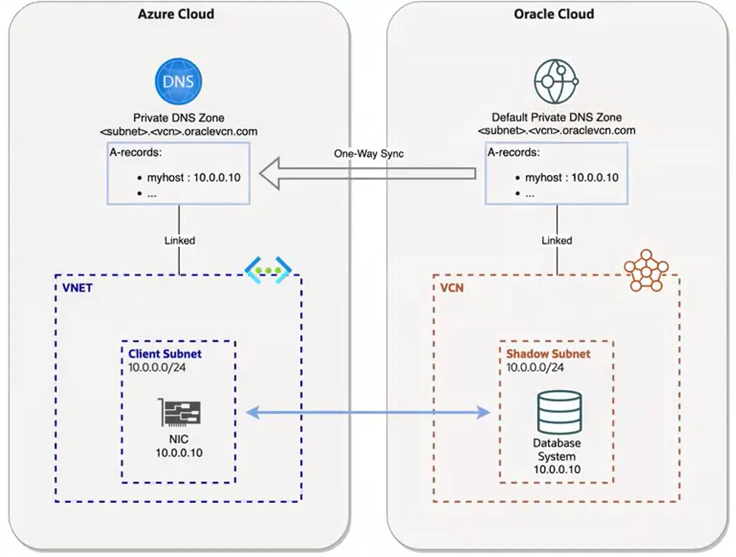
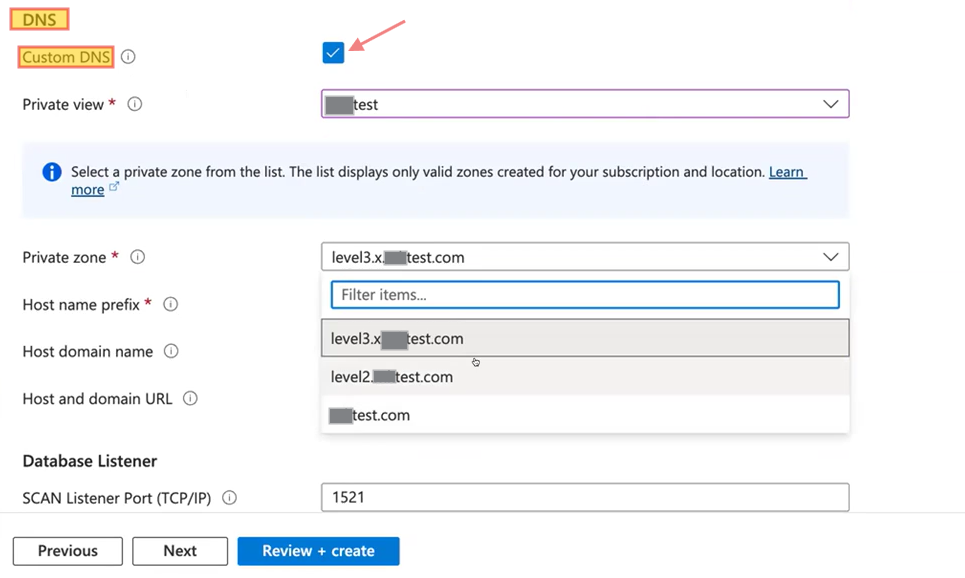
Let’s revisit the VM cluster DNS configuration with this additional information. When you select the custom DNS option, you must first create a custom DNS zone and a view in OCI. Once this is set up, your DNS zone will automatically appear in Azure for selection.
So, the correct process is to create the custom DNS zone and view in OCI before completing the DNS configuration in Azure.
Note: For this service, we support FQDNs up to three levels deep. Please refer to the screenshot below for guidance.
Conclusion
Oracle Database@Azure combines Oracle’s proven database technology with Azure’s flexible cloud platform. By completing the onboarding process and setting up delegated subnets, private connectivity, and proper DNS, you establish a secure and high performing foundation for your workloads.
In this blog, I covered the essentials of networking and deployment preparation. In my next blog, I’ll walk through the supported network topologies for Oracle Database@Azure including connectivity through local VNet, hub-and-spoke, virtual WAN, and multi-region designs to help you build scalable and resilient architecture.
I hope you enjoyed it!