Granting the same level of access to targets to all administrators is against best practices. Also, individually granting access to hundreds or thousands of targets to every new administrator is time consuming. With Enterprise Manager’s Privileges and Role Authorization feature, these tasks can be streamlined and can easily scale as the enterprise grows. Authorization controls the access to secure resources managed by Enterprise Manager via system, target, and object level privileges and roles.
In this blog I will demonstrate setting up privileges and role authorization so that different Enterprise Manager administrators have the appropriate level of access to the appropriate targets as per their role in the enterprise. You can use the scenario demonstrated here as an example and adapt it to meet your specific requirements.
The access control described in this blog applies to Enterprise Manager targets, not the resources themselves. Access to the resources (such as a database or a WebLogic domain) is controlled via Enterprise Manager Named Credentials. For example, the database user in the named credential you use to log in to a database determines the privileges you have in that database, regardless of your access level on the database target in Enterprise Manager.
Scenario
Our Enterprise Manager targets include the following:
- Two applications deployed on Oracle WebLogic domains:
- Oracle Analytics Server (OAS)
- Service Oriented Architecture (SOA)
- Multiple databases including two serving the above applications:
- ORCL/ORCL_ORCLPDB (used by OAS)
- ORCL3/ORCL3_PDB1 (used by SOA)
We have application administrators and database administrators. In our Scenario:
Database Administrators:
- Have no access to the WebLogic domain targets.
- have full access to all database targets.
Application Administrators:
- Have full access to the WebLogic domain targets of the OAS and SOA applications.
- Have view access to the database targets of the applications (ORCL and ORCL3).
In our Enterprise Manager we created a DBA user named “DB Admin” and an Application user named “App Admin”.
Configuration Tasks
- Create Enterprise Manager Groups:
- A database group for the DBAs: This group will include all database systems in Enterprise Manager.
- A second database group for the application administrators: This group will include the databases used by OAS and SOA applications only.
- One group each for the OAS and SOA applications. In most cases you would create one group for applications if they are managed by the same team, which is the case in our scenario. However, we are using separate groups as the SOA group has specific membership criteria not required for the OAS application. More details in the configuration steps below.
- Create Enterprise Manager Roles:
- Create an application and database roles and assign privileges to these roles as per our scenario. Assign the application role to the application administrators and the database role to the database administrators.
We will then test and verify the setup.
Configuration Steps
Task 1: Create Enterprise Manager Groups
In OEM console, navigate to “Targets”->”Groups”, and create the following groups:
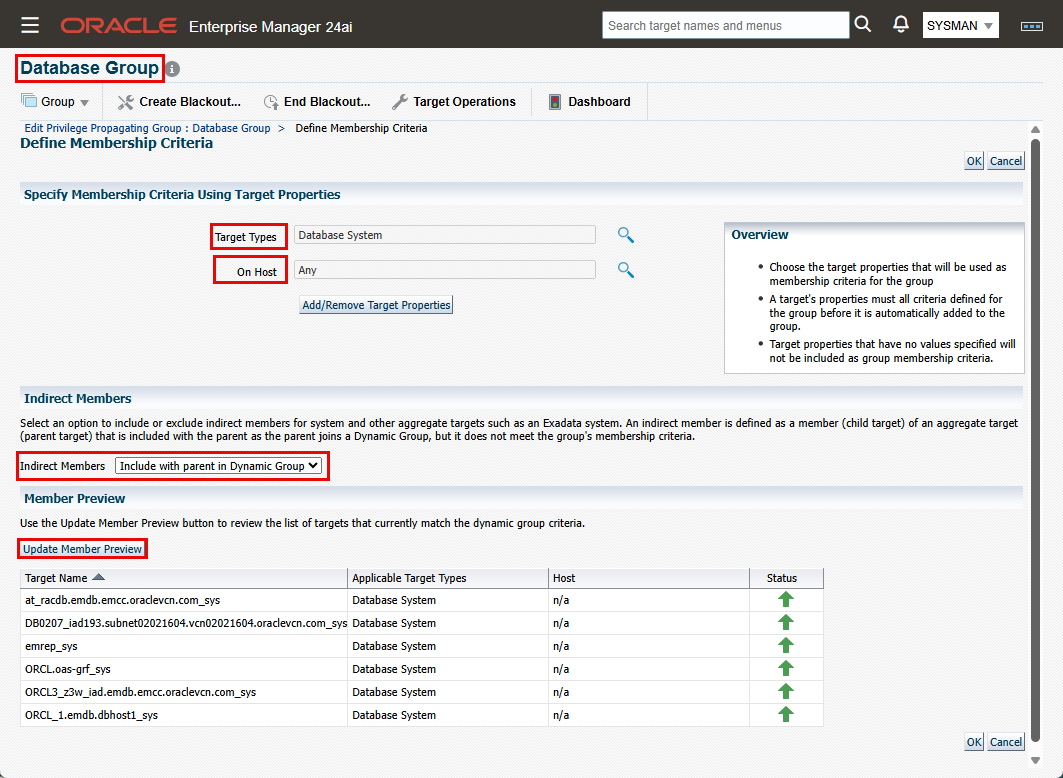
- Database Group:
- Click “Create”->”Dynamic Group”. Enter the group name and enable “Privilege Propagation” checkbox.
- Click on “Define Membership Criteria”. Click on the search icon next to “Target Types”.
- From the Available Target Types, choose “Database System” and move it to “Selected Target Types”. Click “Select”.
- Click “Update Member Preview” to verify your selection, then click “OK” to create the group.
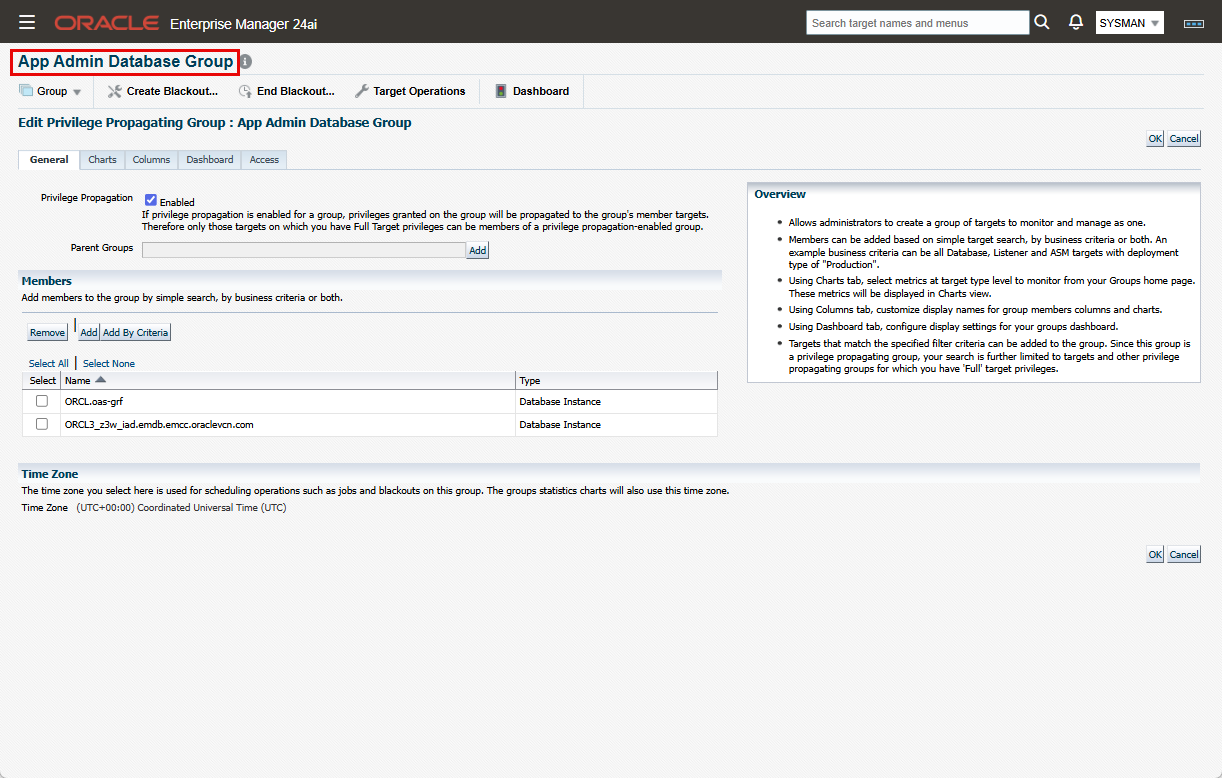
- App Admin Database Group:
- For this group, we’ll use a static group. Click “Create”->”Group” (not “Dynamic Group”).
- Enter the group name and enable “Privilege Propagation” checkbox.
- Under “Members”, click “Add”.
- On the “Search and Select: Targets” screen, choose “Database Instance” and click Go. Select the databases serving the applications and click “Select”.
- Click “Update Member Preview” to verify your selection, then click “OK” to create the group.
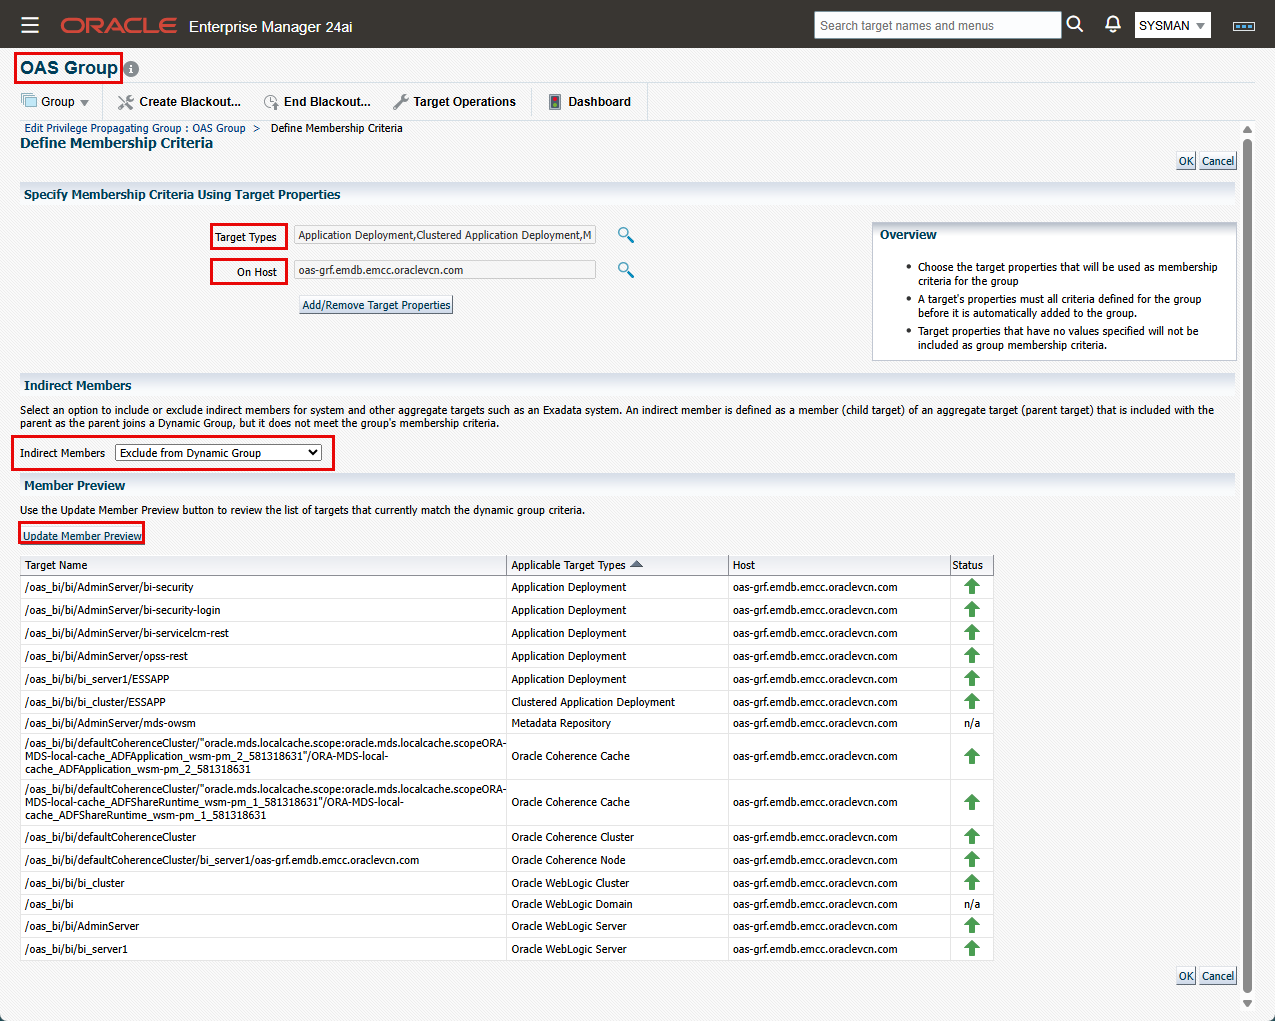
- OAS Group:
- Click “Create”->”Dynamic Group”. Enter the group name and enable “Privilege Propagation” checkbox.
- Click on “Define Membership Criteria”, then click on the search icon next to “Target Types”.
- On this screen, although you can select target type “Oracle WebLogic Domain” and the host where the domain is deployed, the downside is that the group will include the database used by the application. This is not desired in our scenario since we want to give different level of access on the application than that of the database.
- For this reason, choose specific targets from the WebLogic domain, e.g.:
- Application Deployment
- Clustered Application Deployment
- Metadata Repository
- Oracle Coherence Cache
- Oracle Coherence Cluster
- Oracle Coherence Node
- Oracle WebLogic Domain
- Oracle WebLogic Server
- Next, choose the host where the domain is deployed
- Then most importantly, for “Indirect Members” field, choose “Exclude from Dynamic Group”. This is because we added the “WebLogic Domain” as a member, and we already chose the specific member target types from that domain we want in our group.
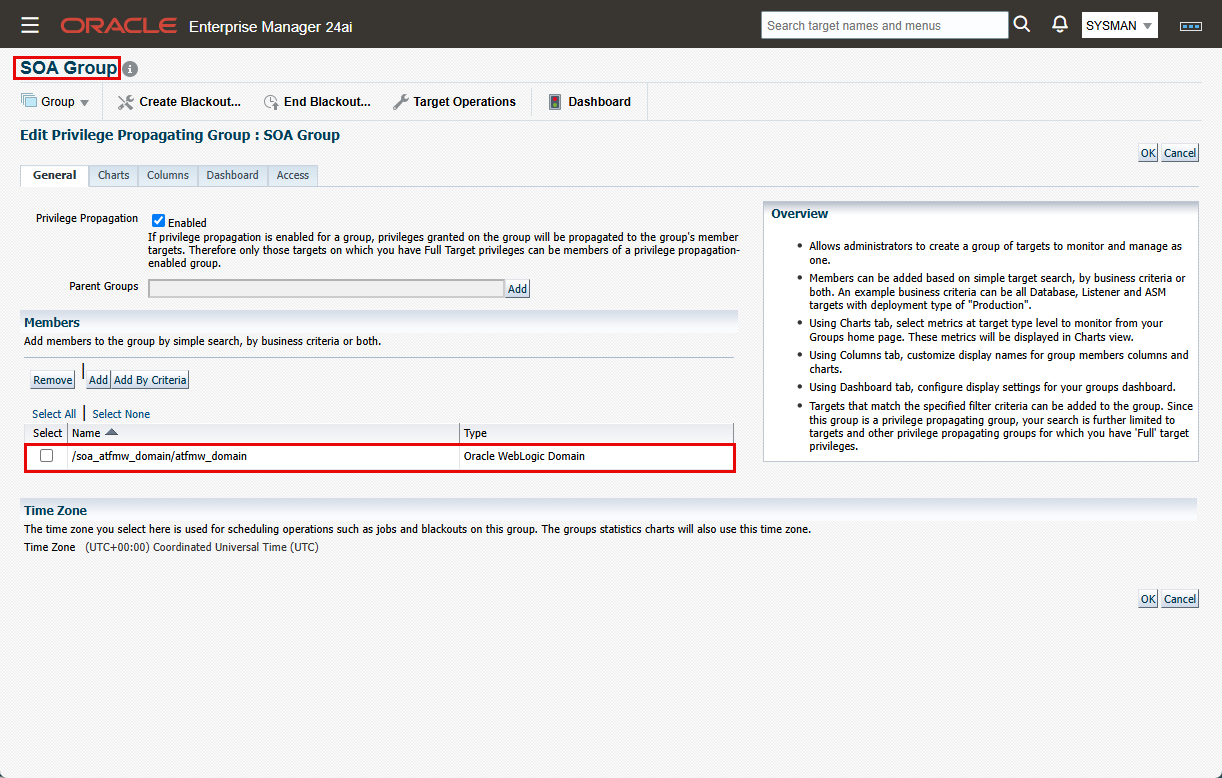
- SOA Group:
- For this group, we’ll use a static group. Click “Create”->”Group” (not “Dynamic Group”).
- Enter the group name and enable “Privilege Propagation” checkbox.
- Under “Members”, click “Add”.
- On the “Search and Select: Targets” screen, choose “Oracle WebLogic Domain” and click Go. Select the SOA domain and click “Select”.
- Click “Update Member Preview” to verify your selection, then click “OK” to create the group.
Task 2: Create Enterprise Manager Roles
In OEM console, navigate to “Setup”->”Security”->”Roles”, and create the following roles:
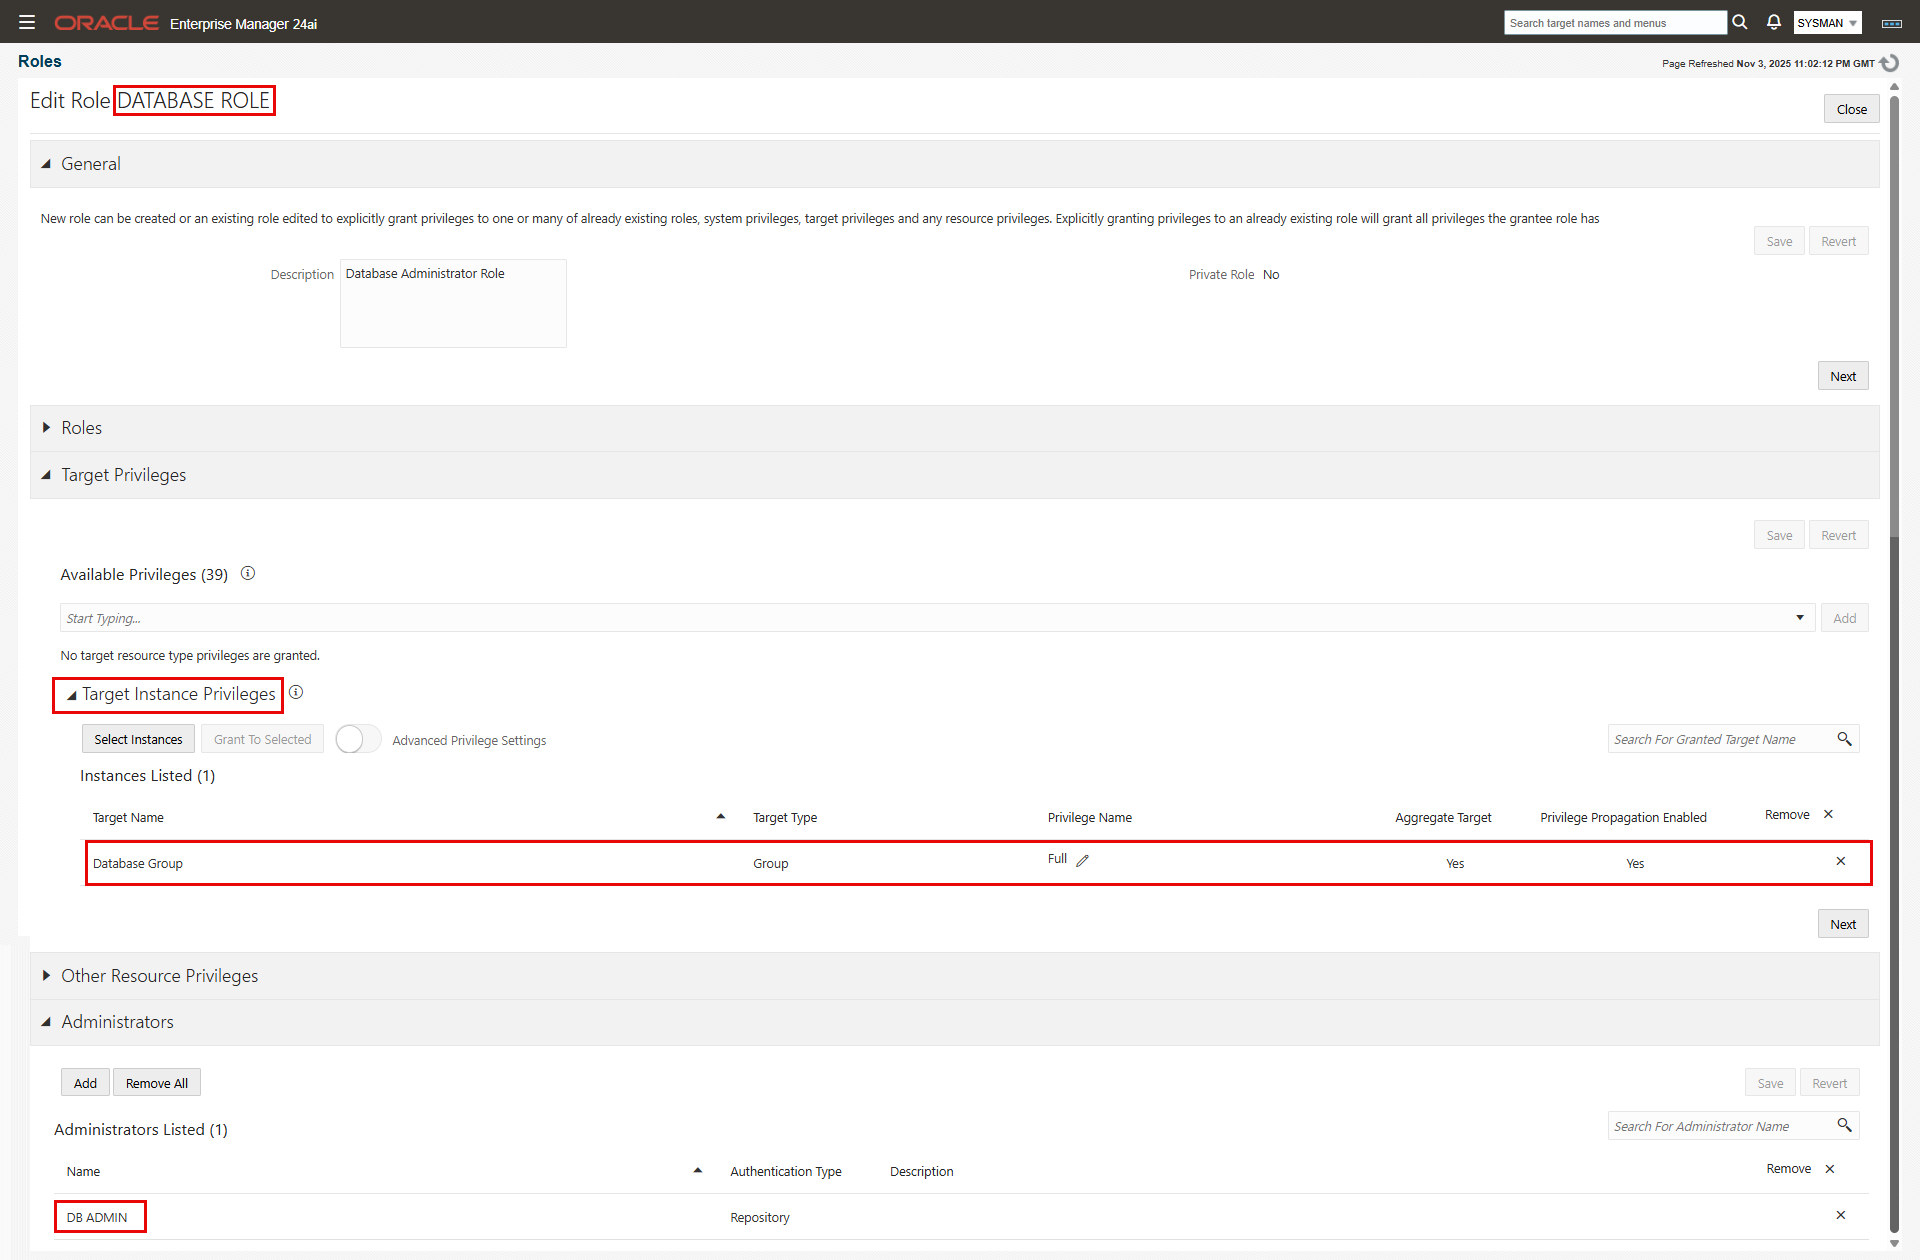
- Database Role:
- Under “General”, enter the role name and a description.
- For our purpose, we’ll skip the “Roles” section since we don’t need to include “child” roles.
- Expand the “Target Privileges” section, then “Target Instance Privileges”. Click “Select Instances”.
- On the “Select Targets” screen, choose “Group” from the “Type” drop-down list, and click search.
- Check “Database Group” and click “Select”. “Database Group” is added under “Instances Listed” with a default privilege level of “View”.
- Click the pencil icon next to “View” privilege.
- On the “Manage Privileges” window, choose “Full” from the drop-down list. Click “Add” on the same row then click “Select”.
- Skip the “Other Resource Privileges” section.
- Expand the “Administrators” and add the administrators who should have to this role. Click “Create” to create the role.
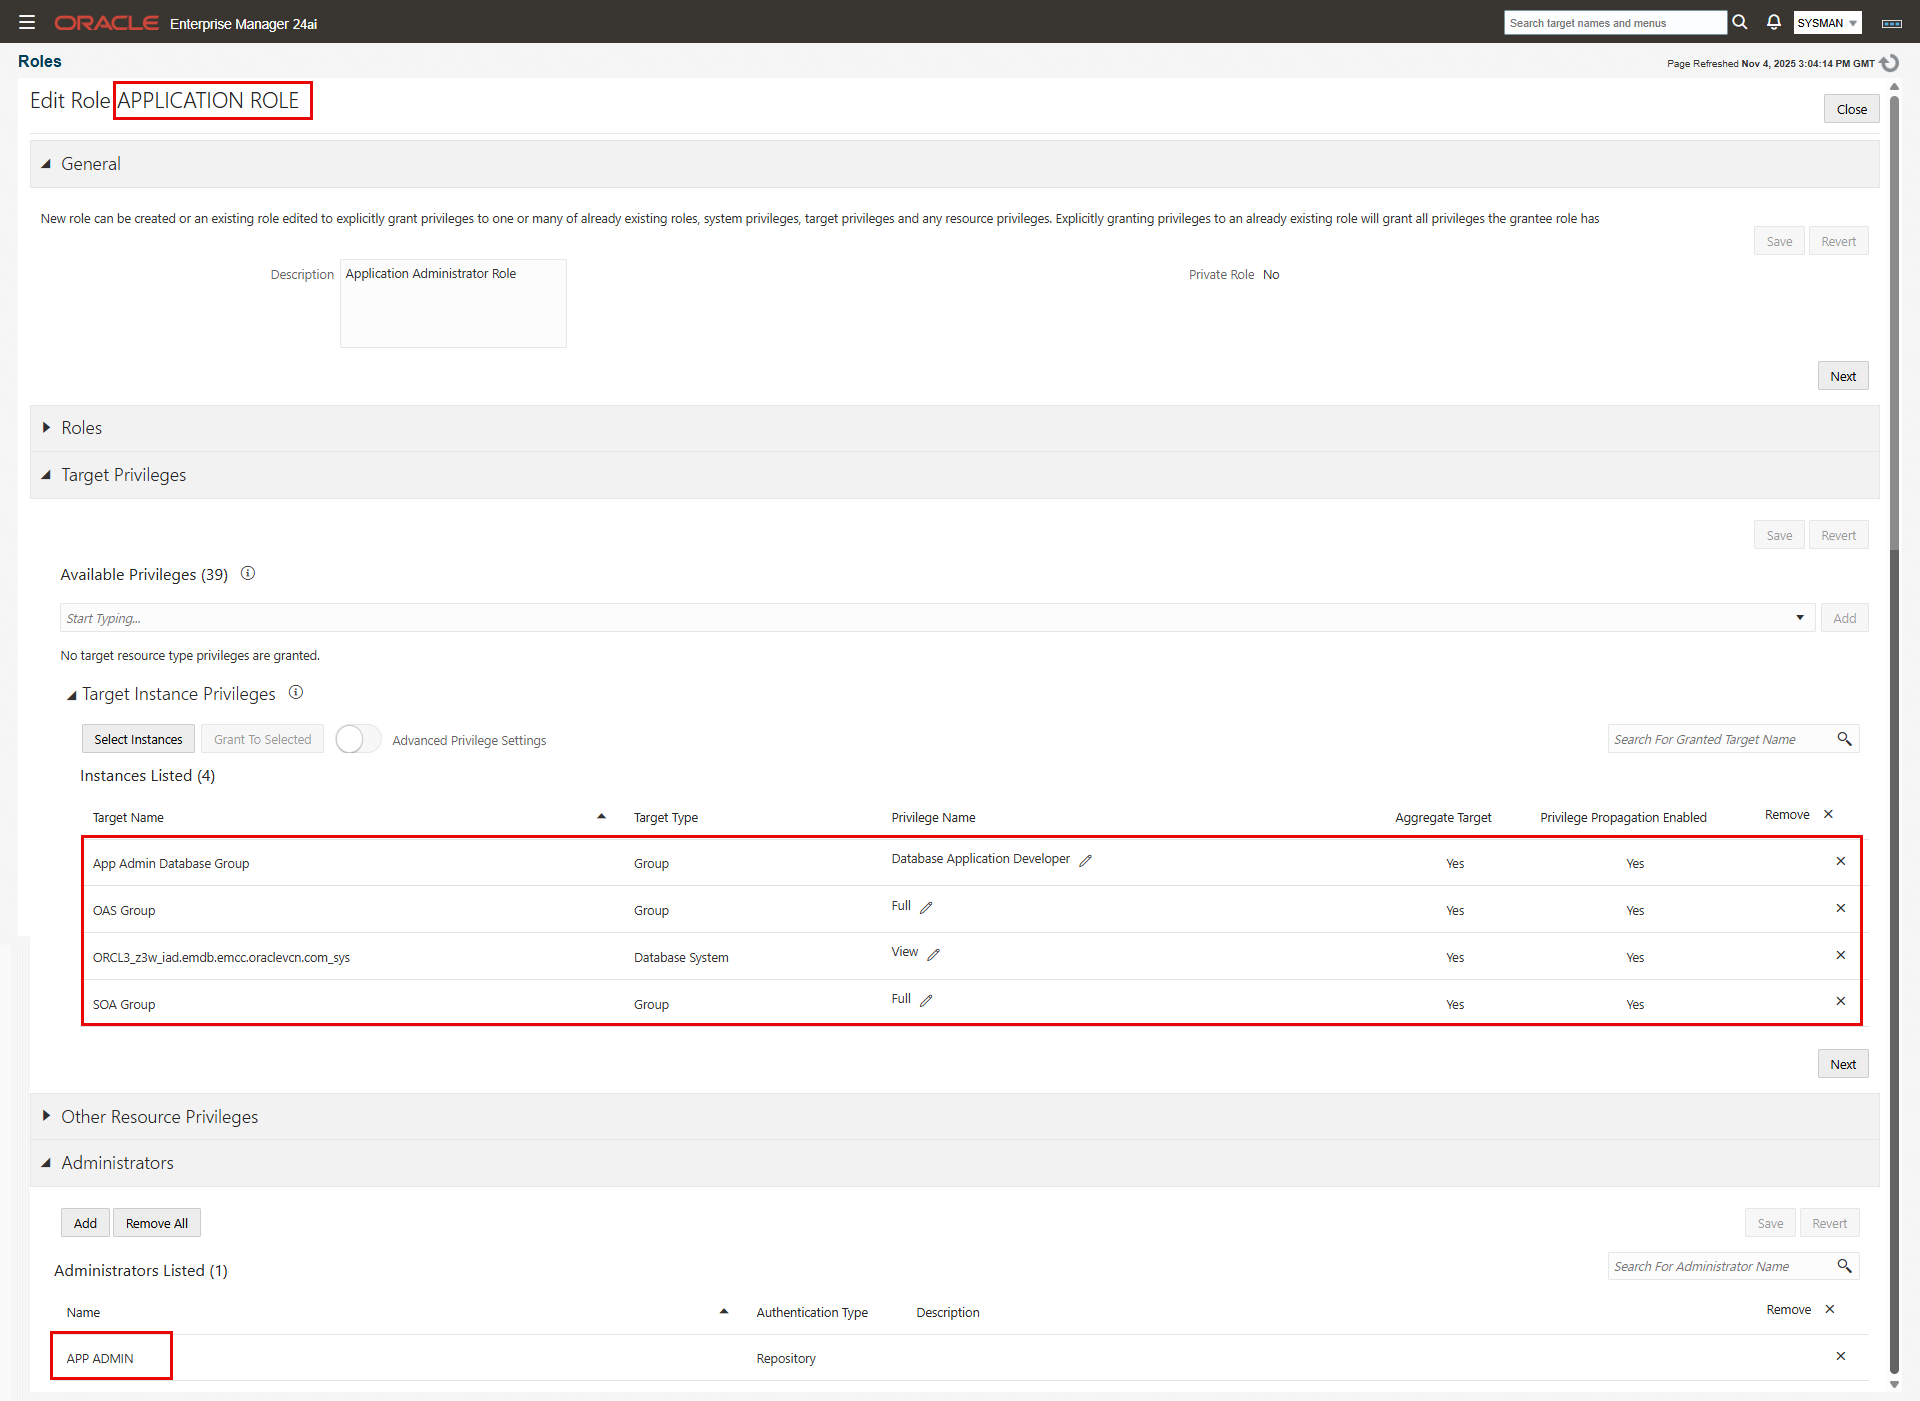
- Application Role:
- Under “General”, enter the role name and a description.
- For our purpose, we’ll skip the “Roles” section since we don’t need to include “child” roles.
- Expand the “Target Privileges” section, then “Target Instance Privileges”. Click “Select Instances”.
- On the “Select Targets” screen, choose “Group” from the “Type” drop-down list, and click search.
- Check “App Admin Database Group, “OAS Group”, and “SOA Group” and click “Select”. the groups are added under “Instances Listed” with a default privilege level of “View”.
- Click the pencil icon next to “View” privilege on each of the “OAS Group” and “SOA Group” rows. On the “Manage Privileges” window, choose “Full” from the drop-down list. Click “Add” on the same row then click “Select”.
- Click the pencil icon next to “View” privilege on each of the “App Admin Database Group” row. Since the members of this group are database instance targets, not database systems, we have access to additional fine-grained privileges relevant to the database instance target type, which are not available for database system target type. We’ll choose “Database Application Developer” privilege. The description for this privilege states: “Application developer can view the database performance in EM but cannot make any changes to the database“.
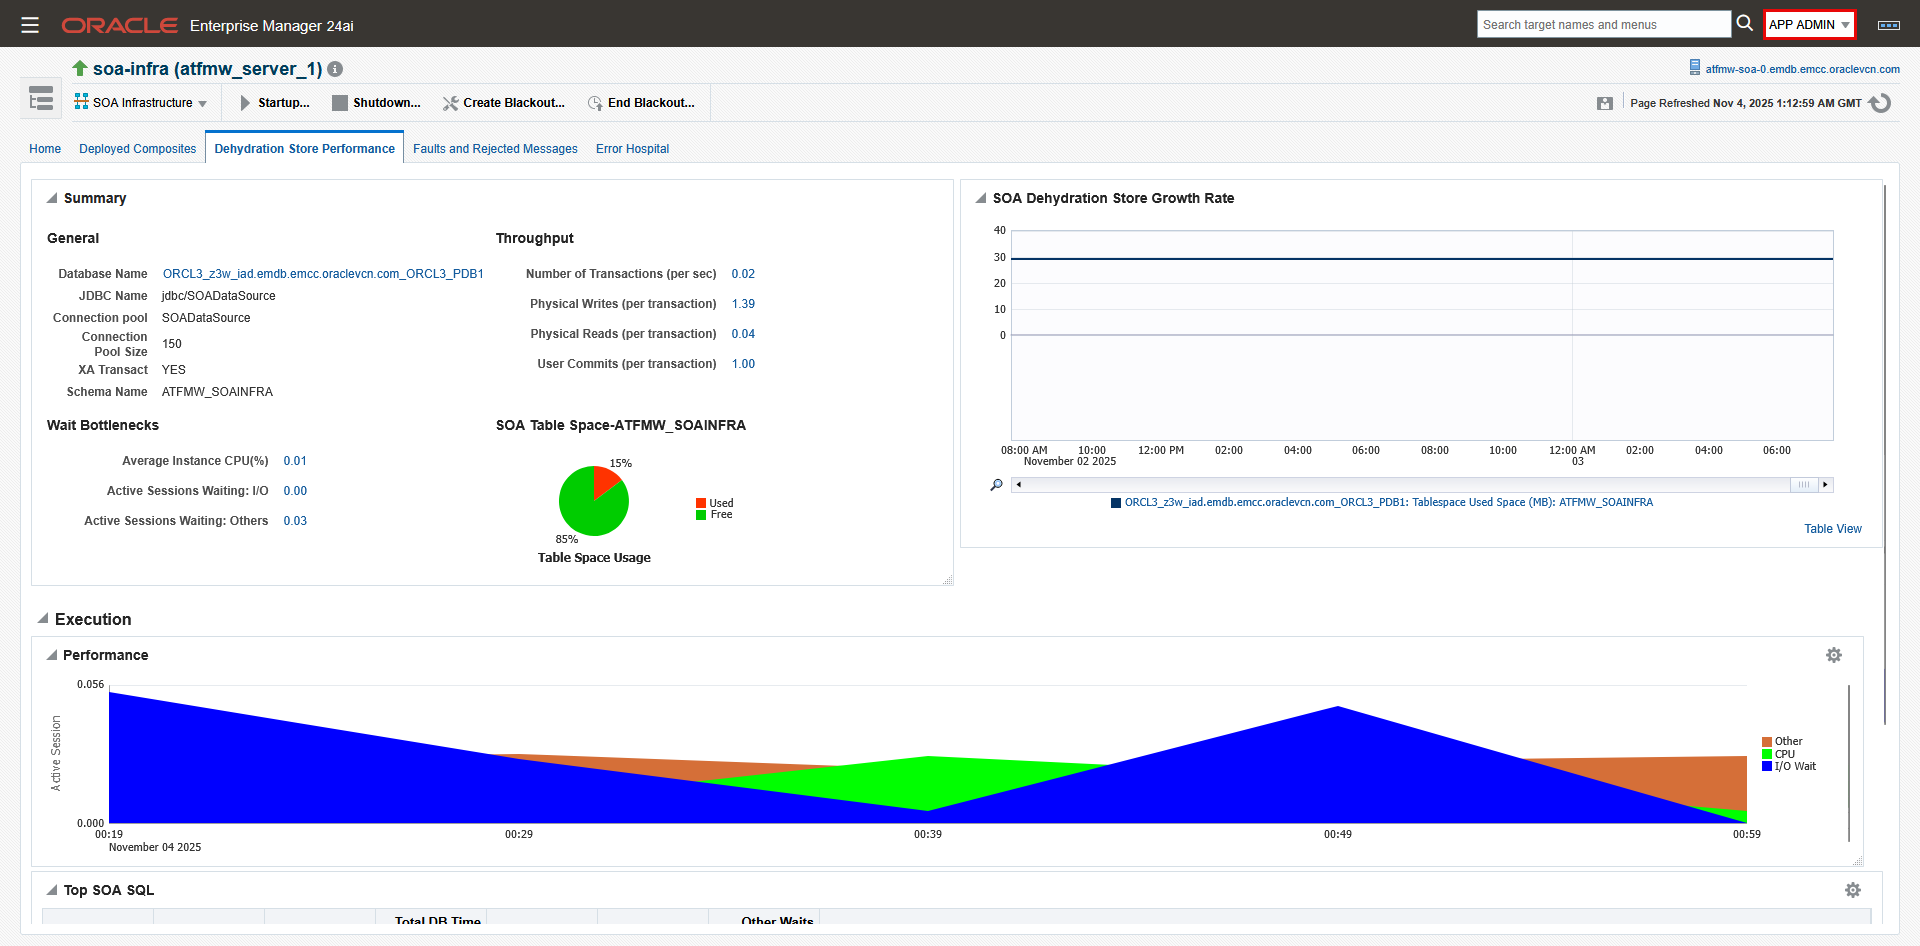
- In addition, for the SOA application only, we’ll add the database system “ORCL3_z3w_iad” with “View” privilege. This requirement is specific to SOA so that SOA administrators can see the metrics on “Dehydration Store Performance” tab of the “SOA Infrastructure” target. Refer to MOS Doc ID 1989381.1 for details.
- Skip the “Other Resource Privileges” section.
- Expand the “Administrators” and add the administrators who should have to this role. Click “Create” to create the role.
Testing the Setup
Database Administrator Access
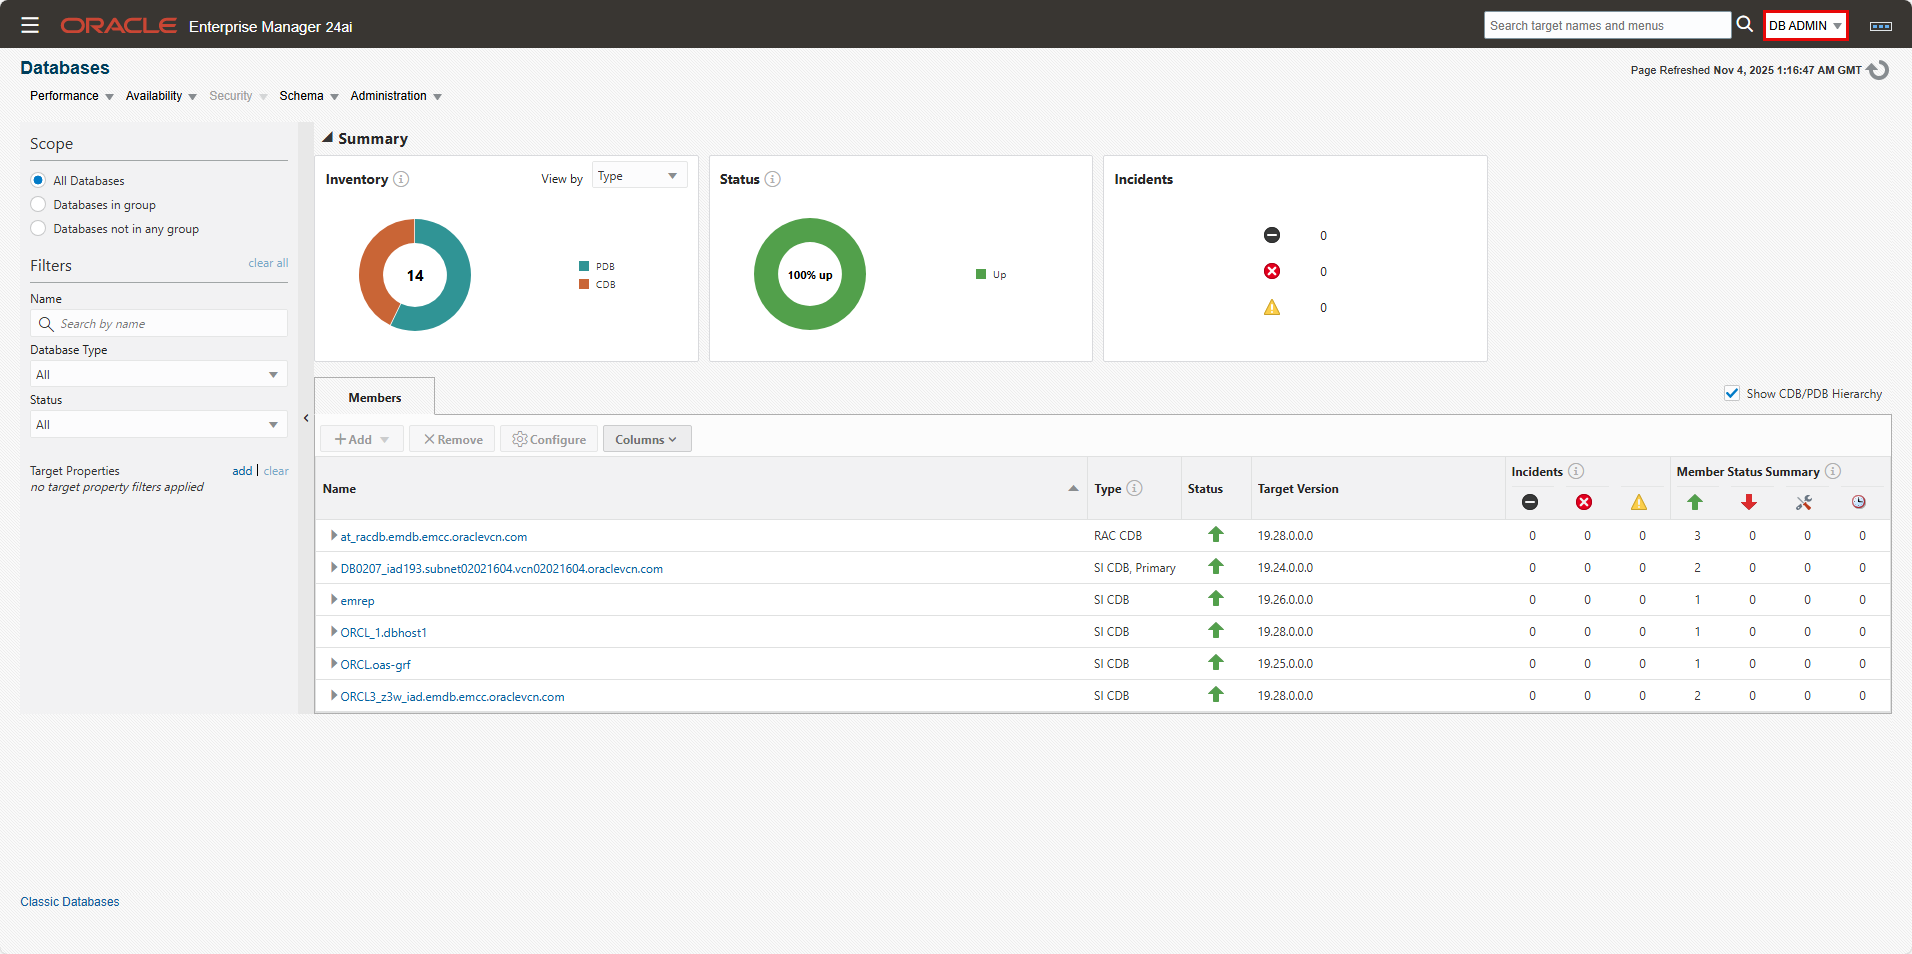
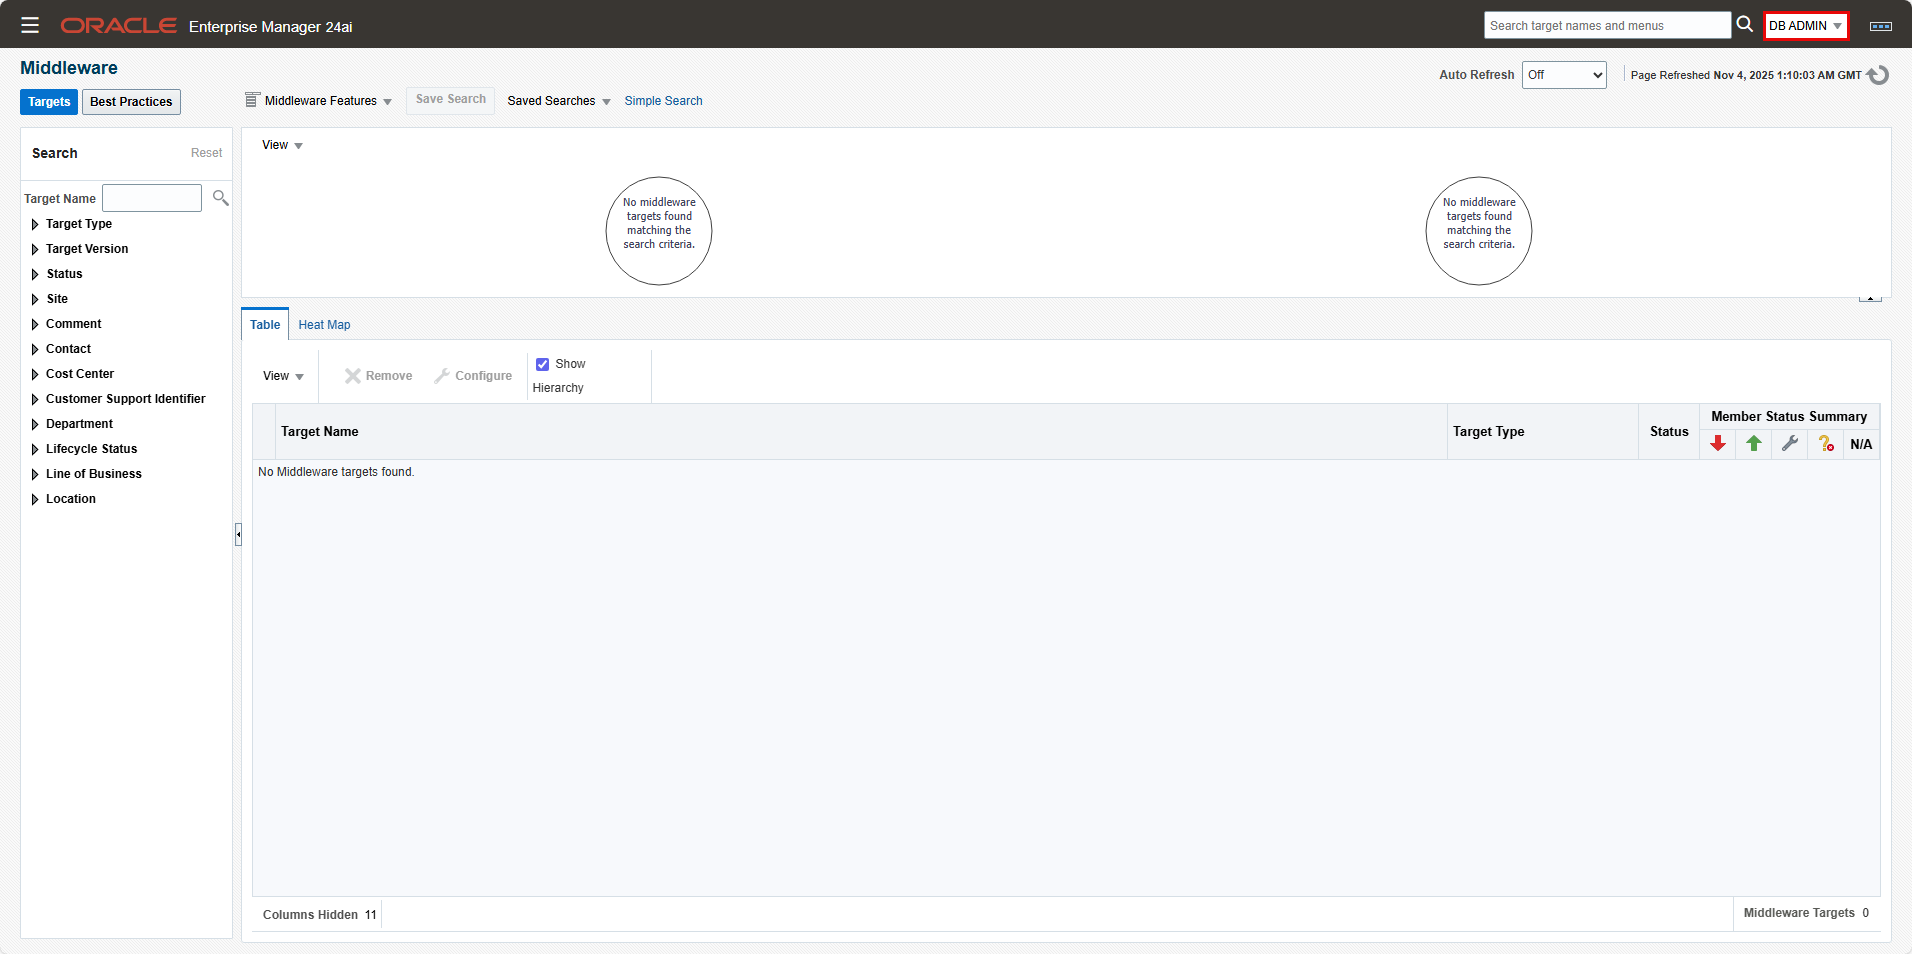
- Login to the OEM console as user “DB Admin”.
- Navigate to “Targets”->”Databases”: All databases are visible. Click on the various databases to verify you have full access.
- Navigate to “Targets”->”Middleware”: You should get “No Middleware targets found.”
Application Administrator Access
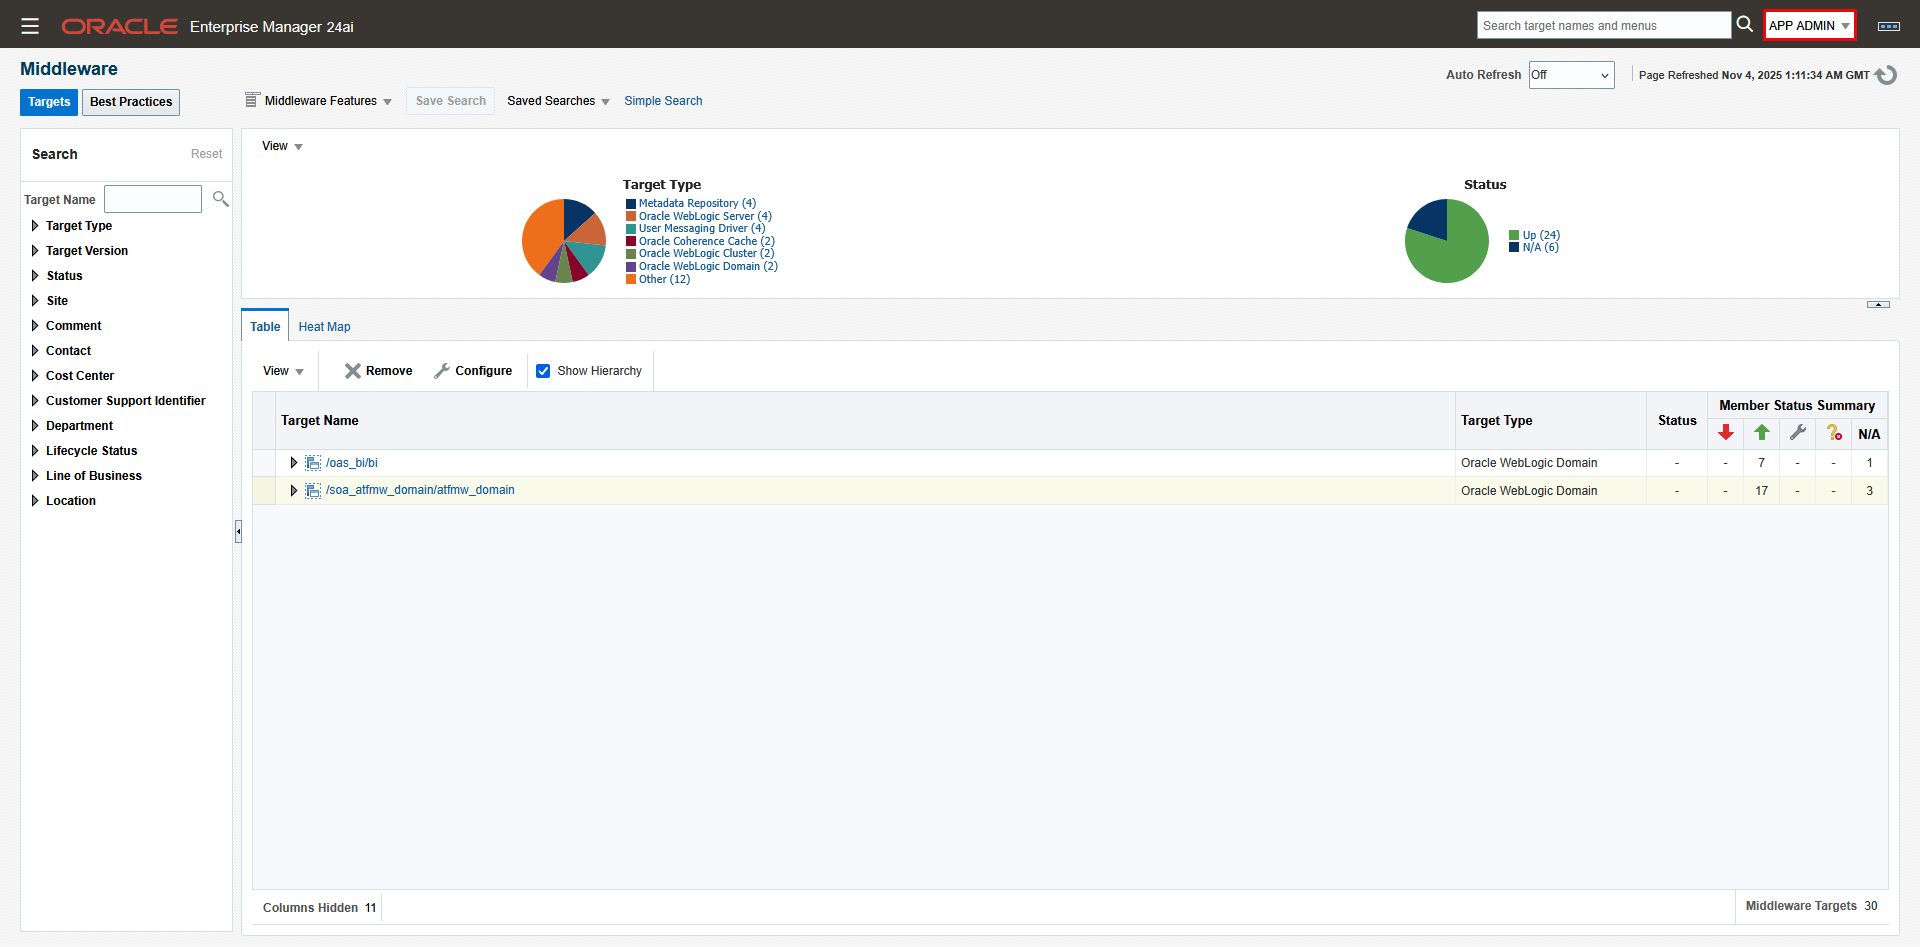
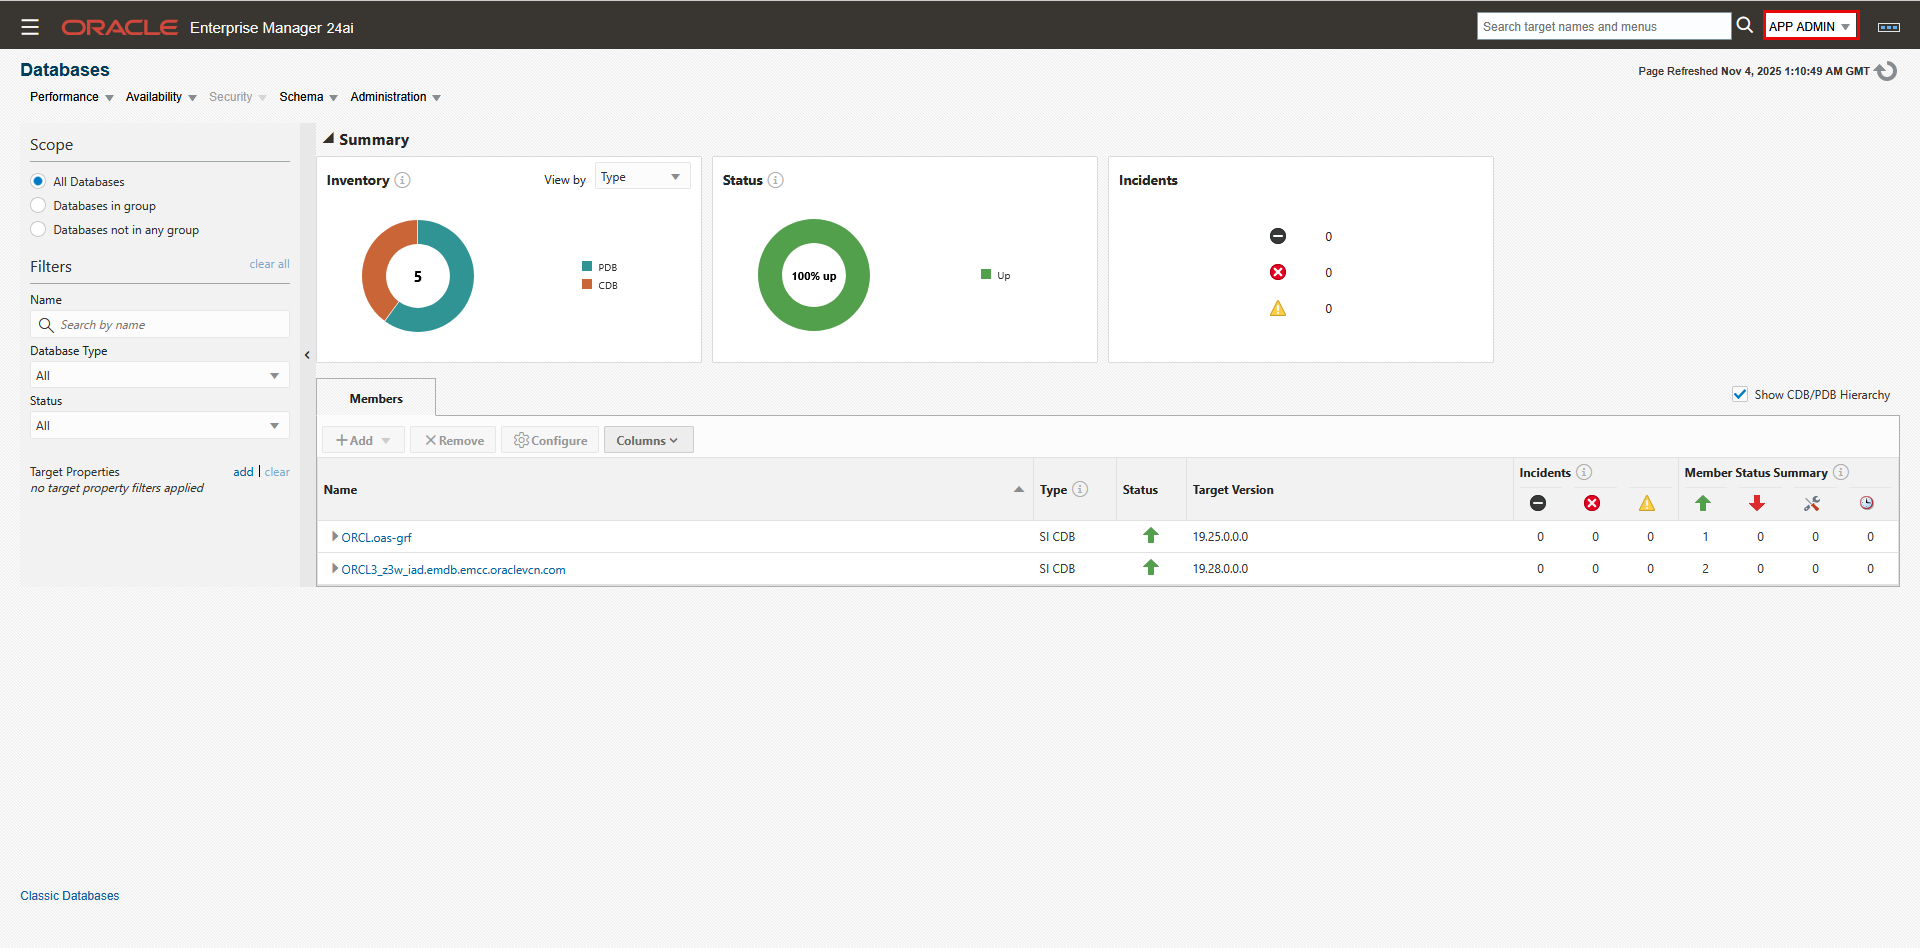
- Login to the OEM console as user “App Admin”.
- Navigate to “Targets”->”Middleware”: The WebLogic domains for OAS and SOA are visible. Click on each domain and its member targets to verify you have full access. Note that you only see the WebLogic domains that are part of the Application Group. For example, in our environment, the 2 WebLogic domains for OEM itself are not visible to App Admin.
- Navigate to “Databases”->”: We only see the OAS database (ORCL), and the SOA database (ORCL3).
- Click on either databases then navigate to “Monitoring”->”Metrics and Collection Settings”. You can view the page but cannot make any modifications.
- Navigate to the SOA Infrastructure target and click on the “Dehydration Store Performance” tab. Metrics are visible.