
Introduction
Organizations need a reliable and secure way to provide remote access to resources and applications hosted on private subnets in Oracle Cloud Infrastructure (OCI). In cases where all employees / clients are at a single (or a small number of) offices, an IPsec VPN tunnel from these offices to the Dynamic Routing Gateway (DRG) can provide this connectivity to all users. However, with employees / clients increasingly working remotely and with on-premises footprint shrinking, the requirement for secure, remote access from workstations, directly into OCI has become important.
One method for establishing such remote-access connectivity is via an OpenVPN server. This method has been discussed in depth here. In this blog, we will be discussing how the connectivity can be established using Cloudflare’s Zero Trust Network Access solution. Cloudflare’s service is quite broad, with capabilities extending much beyond VPN. This blog however will only focus on the remote-access VPN use-case.
It should be noted that this solution IS NOT an alternative for Site-to-site IPSec VPN which is used for establishing secure connectivity between two networks (sites) such as an OCI VCN and a datacenter / office network.
Solution Overview
The essential components of this solution include –
- A VM in OCI running the cloudflared daemon (This will be referred to this as the connector VM in the rest of this blog)
- Cloudflare One (WARP) client on the client machine
- A subscription to Cloudflare Zero Trust service plan
- OCI NAT Gateway
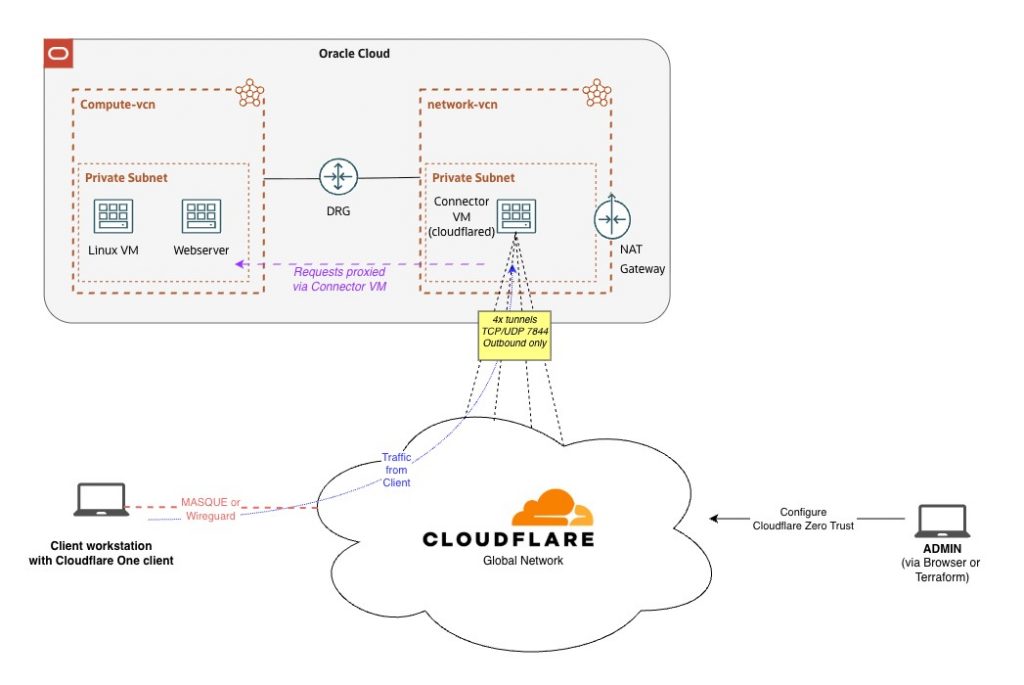
The organization admin uses the Cloudflare Zero Trust portal to define an organization (team) and create a tunnel object. This generates a unique token which can be used for configuration of the tunnel on the connector VM. Furthermore, the admin also specifies which CIDRs can be reached through the tunnel.
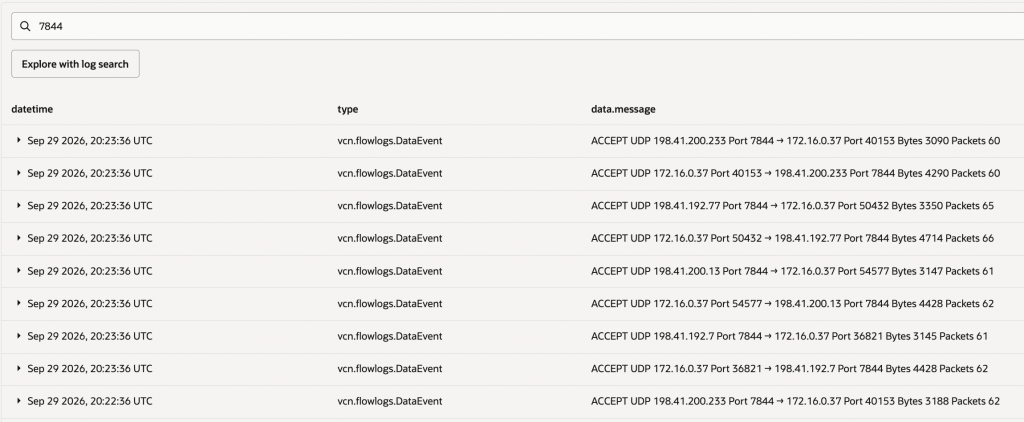
In OCI, the Cloudflare connector VM is deployed with a fixed IP in a private subnet in the network VCN. The VCN only has a NAT Gateway and has no internet gateway. The cloudflared daemon on this VM creates outbound-only connections to Cloudflare’s global network using QUIC over UDP 7844 (preferred) or HTTP/2 over TCP 7844 (fallback). A total of 4 connections are established.
On the users’ workstations, the Cloudflare One (WARP) client is installed. A user logs in using the organization (team) name and their credentials. The user needs to have been pre-defined in the Cloudflare Zero-trust portal. The WARP client establishes a tunnel using WireGuard or MASQUE and split-tunnels traffic once the administrator has configured Split Tunnel mode to Include Only in the Zero Trust dashboard (Prerequisite 6 below). Only OCI-bound traffic routes through the tunnel; all other internet traffic goes direct.
Configuration Steps
Pre-requisites
The following pre-requisite configuration in Cloudflare should be completed prior to configuring the OCI side:
- A subscription to Cloudflare Zero Trust service. (The free tier (up to 50 users) is sufficient — includes Tunnel, WARP, and Gateway Network policies. Paid plans required for device posture, advanced IdP integrations, and > 50 users. See: https://www.cloudflare.com/plans/zero-trust-services/)
- An Organization / Team defined in Cloudflare portal.
- A Zero Trust organization [team] is scoped to a single Cloudflare account. Organizations requiring separate tenants [e.g. separate business units] need separate Cloudflare accounts.
- A Tunnel defined in the Cloudflare portal with networks reachable via the tunnel.
- Tunnel type should be cloudflared
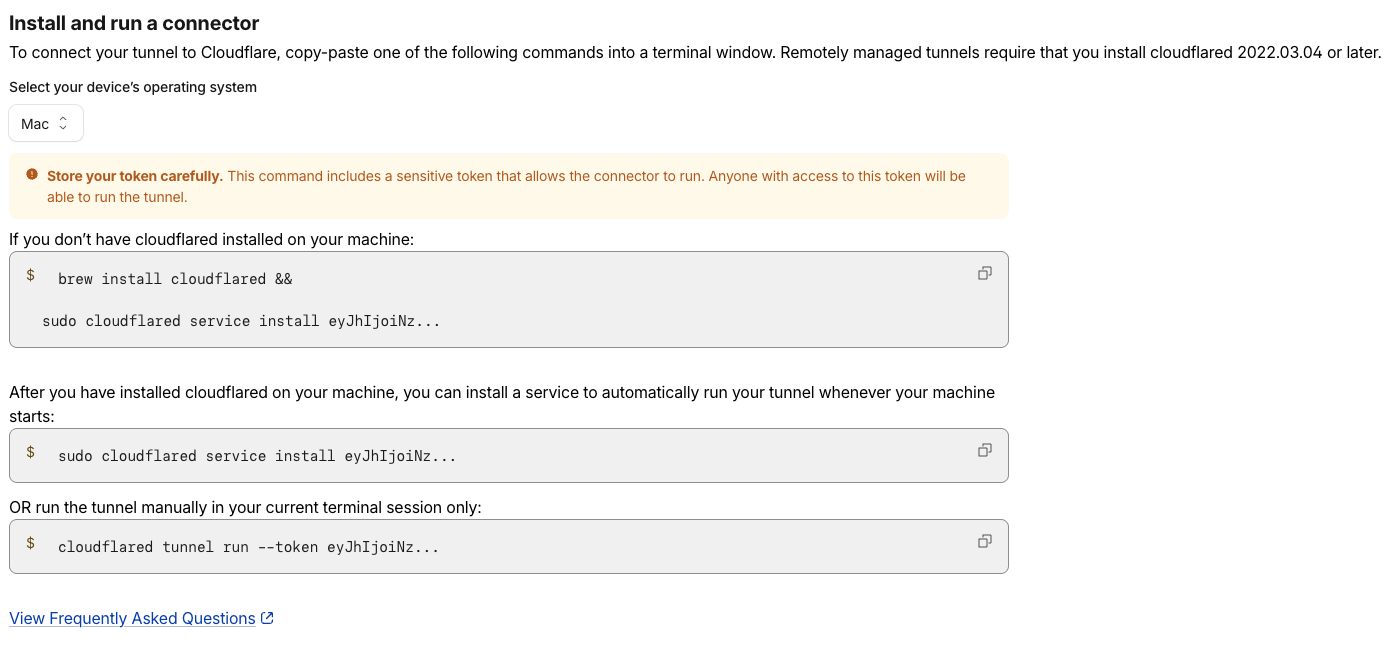
- This tunnel definition will also provide the configuration to be applied on the Cloudflare connector VM in OCI as seen in this sample screenshot. Save the configuration script for configuring the VM later.
- Users configured in the Cloudflare Zero Trust portal with an authentication method.
- For this demo, users authenticate via One-Time Pin [OTP]; email-based, no external IdP required [ref: https://developers.cloudflare.com/cloudflare-one/identity/one-time-pin/].
- For production, connect a corporate IdP (Okta, Azure AD, Google Workspace, or any SAML/OIDC provider) for MFA, SSO, and automated user lifecycle management [ref: https://developers.cloudflare.com/cloudflare-one/identity/idp-integration/].
- Cloudflare One agent installed on the client machines with the Organization / Team name (from step-2) configured and user logged in using credentials configured in step-4
- Configure Split Tunnels — Include Only mode (Zero Trust dashboard)
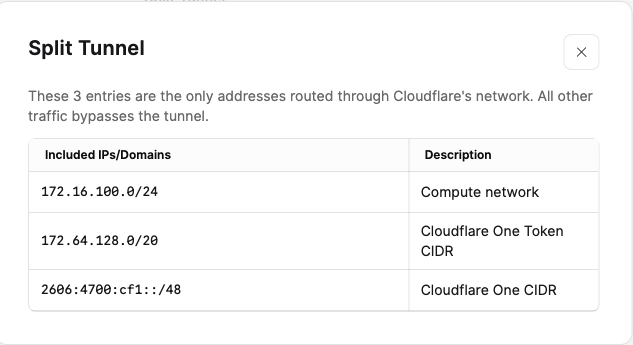
- Zero Trust → Settings → WARP Client → Device profiles → Split Tunnels → Set mode to Include Only → Add OCI CIDR ranges (e.g. 172.16.0.0/16).
- Only OCI-bound traffic routes through the tunnel; all other internet traffic goes direct. [Ref: https://developers.cloudflare.com/cloudflare-one/connections/connect-devices/warp/configure-warp/route-traffic/split-tunnels/]
- Configure Gateway Network policies — access control (Zero Trust dashboard)
- By default, all enrolled devices reach all tunnel-defined CIDRs. To enforce least-privilege access:
- Enable Gateway proxy: Zero Trust → Settings → Network → Proxy → Enable (TCP and UDP)
- Catch-all block policy (lowest priority): Destination IP = OCI VCN CIDR → Block
- Per-group allow policies (higher priority): e.g. group = “engineering”, Dest IP = 172.16.100.0/24, Port 22 → Allow
- [Ref: https://developers.cloudflare.com/cloudflare-one/policies/gateway/network-policies/]
- By default, all enrolled devices reach all tunnel-defined CIDRs. To enforce least-privilege access:
OCI-site configuration
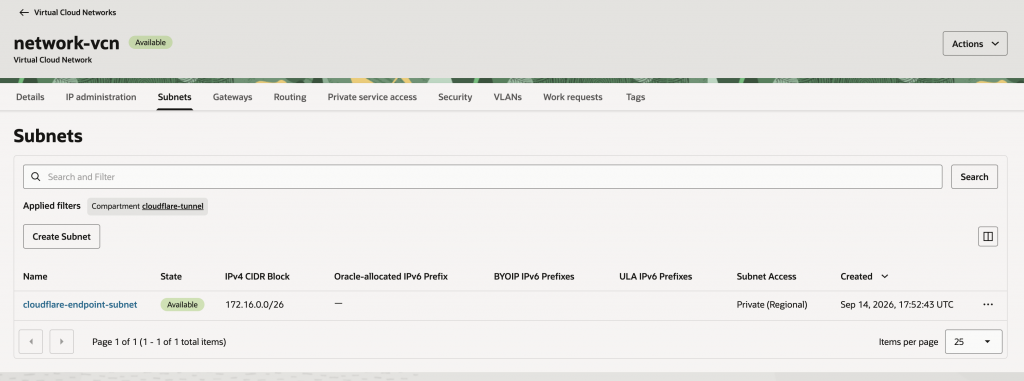
- Create a VCN with a private subnet in it
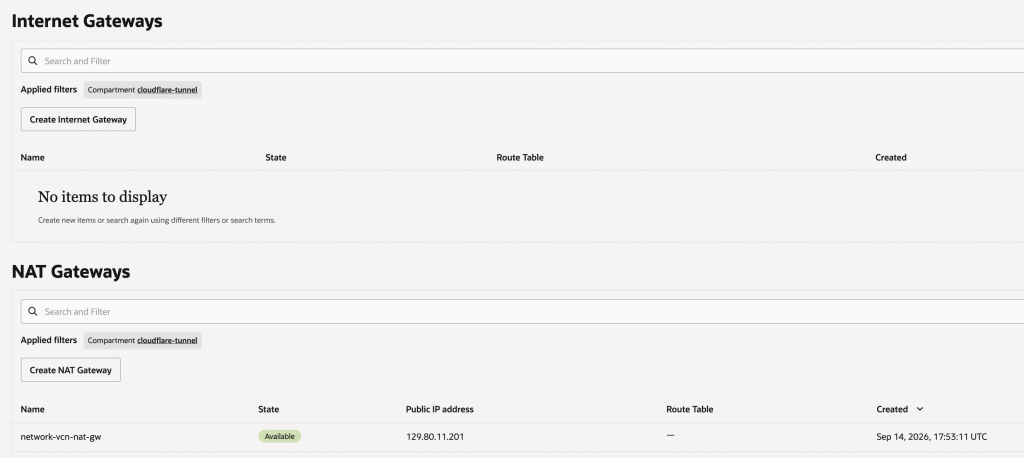
2. Create a NAT Gateway for the VCN. There is no need of an internet gateway
3. Edit the route-table for the private subnet to send internet outbound traffic via the NAT gateway
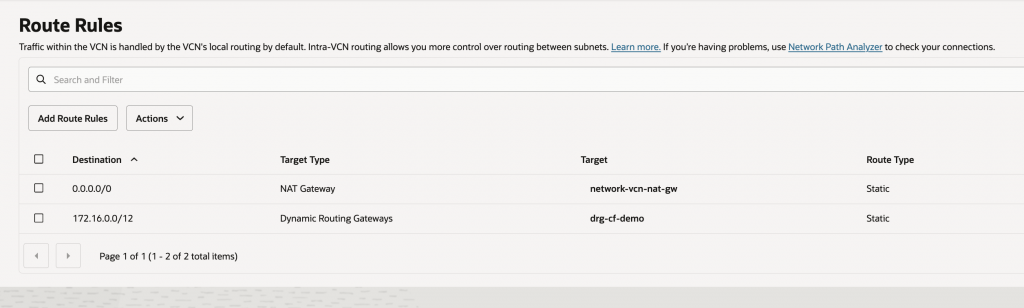
4. If your target resources are in the same VCN, you can create additional subnets in the same VCN for them and you will not need to attach this VCN to a dynamic routing gateway (DRG). If the target resources are to be in another VCN, you can attach the network-vcn and the other VCNs to a DRG and route between them. You will have to add routes to the VCN route-tables and the DRG route tables to enable routing between the VCNs:
5. Confirm that security lists allow egress for TCP/UDP 7844.
6. Deploy a VM instance in the private subnet in the network-vcn. The system requirements are outlined at https://developers.cloudflare.com/tunnel/platform/system-requirements/.
7. Install cloudflared on this VM
# Add cloudflared.repo to /etc/yum.repos.d/
curl -fsSl https://pkg.cloudflare.com/cloudflared.repo | sudo tee /etc/yum.repos.d/cloudflared.repo

#update repo
sudo yum update

# install cloudflared
sudo yum install cloudflared
8. Run the service install command from Prerequisite step 3:
#Install cloudflared as a systemd service persisting across VM reboots
sudo cloudflared service install <YOUR_TUNNEL_TOKEN>

#Verify and enable on boot:
sudo systemctl status cloudflared
sudo systemctl enable cloudflared
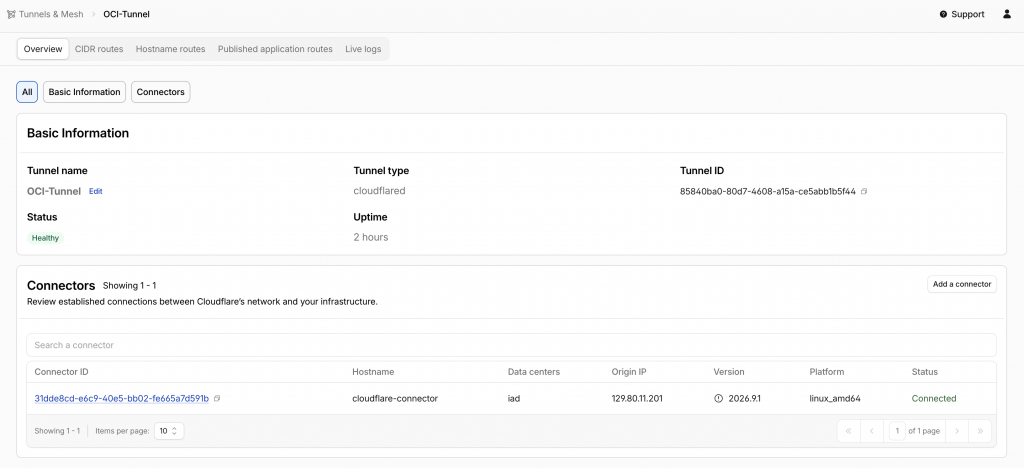
9. Once the tunnel is established, you should see it in the Cloudflare portal similar to the sample screenshot shown below:
Client Workstation / Laptop
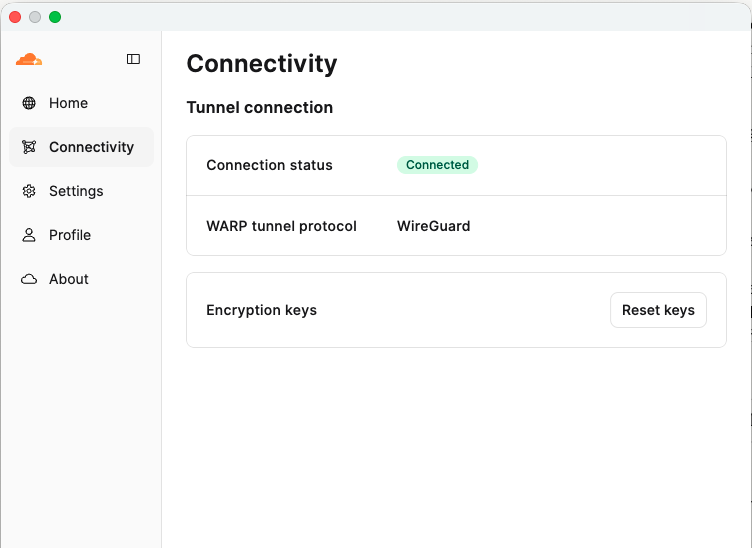
Confirm that the Cloudflare One client is installed and that the user has logged in. The tunnel should show as established.
You will also be able to view the split-tunnel config on the client under Settings → Split Tunnel. Note: this view is read-only — routes are configured in the Zero Trust dashboard (Settings → WARP Client → Device profiles → Split Tunnels) and pushed to the client automatically.
From the laptop’s CLI, look at the interface table and routes. There should be a new interface representing the tunnel to Cloudflare and a route for the OCI CIDRs pointing to that tunnel interface. The following is an example snippet but the interface name and routes will differ depending on the machine and OS.
➜  ~ ifconfig utun4
utun4: flags=8051<UP,POINTOPOINT,RUNNING,MULTICAST> mtu 1280
inet 100.96.0.1 --> 100.96.0.1 netmask 0xffffffff
inet6 fe80::feb2:14ff:feac:4941%utun4 prefixlen 64 scopeid 0x1a
inet6 2606:4700:cf1:1000::1 prefixlen 128
nd6 options=201<PERFORMNUD,DAD>

➜  ~ netstat -r | grep 172.16.100
172.16.100/24      utun4              Uc                  utun4
Observations and Testing
Client-side
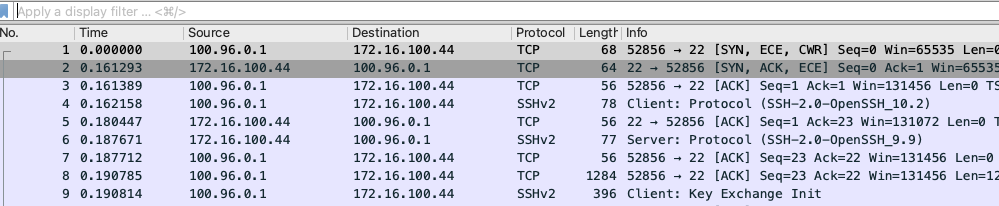
In the following example, the client is trying to SSH to a target VM 172.16.100.44 from a laptop. This network is reachable via the Cloudflare Zero Trust tunnel (refer the route snippet from the previous section). Traffic from the client’s laptop is sourced from the tunnel endpoint IP (100.96.0.1 in this case) with destination address as 172.16.100.44
Cloudflare Connector VM
The traffic routes via the Cloudflare global network and is sent to the Cloudflare connector VM in OCI. The connector VM maintains a tunnel to Cloudflare’s global network on UDP 7844. In the VCN flow logs below, 172.16.0.37 is the private IP address of the connector VM. As you can see, it has persistent outbound traffic to a Cloudflare public IP on port 7844.
Target VM logs
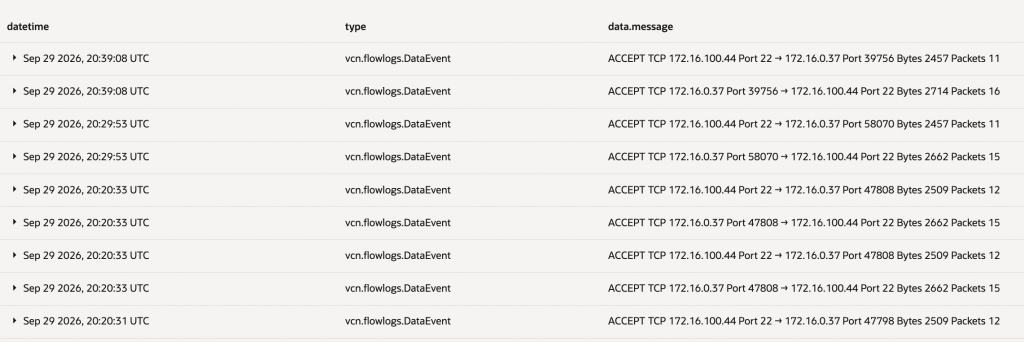
Flow logs for the target VM resource (the VM to which we SSHed remotely) show that incoming traffic arrives with a source IP address of the Cloudflare Connector VM. In the screenshot below, you can see the SSH sessions originating from 172.16.0.37 even when the client was remote.
Conclusion
Cloudflare provides an easy and quick method for remote access into a private OCI environment — no inbound access or public addressing required. The solution can be expanded across multiple VCNs via DRGs and routed through OCI Network Firewall for inspection.
Key points –
- All traffic is proxied through the Cloudflare connector VM. The target resource only sees the address of the connector VM and never sees the actual source IP address of the client.
- Connections can only be initiated from the client towards OCI resources. OCI resources cannot initiate connections back to the client.
- No additional client IP addressing needed — simplifies OCI routing (no extra routes, security list rules, or NSG entries).
- Depending on traffic volume, additional cloudflared VMs may be needed. They appear as additional connectors in the Cloudflare portal.
- High availability: Run two or more cloudflared instances on separate OCI VMs (ideally separate availability domains) under the same tunnel. Each replica adds 4 connections; traffic load-balances automatically.

Nelson Espinal
Principal Partner Architect, Cloudflare