
Suppose your organization manages employee identities in one OCI IAM identity domain, while a separate domain controls access to a set of applications. Users should be able to sign in with their existing credentials instead of maintaining another password.
SAML federation connects those domains. One domain authenticates the user and sends a signed assertion to the other, which establishes a session for the corresponding user. This post walks through that configuration in a numbered order, then tests the complete sign-in flow.
Prerequisites
- An account on OCI in the Administrators group or another group with
manage domainsin the chosen compartment(s) - Two identity domains
What We Are Building
We will use these names throughout:
| Domain | SAML role | Purpose |
|---|---|---|
| Domain A | Identity provider (IdP) | Authenticates users with their existing credentials. |
| Domain B | Service provider (SP) | Trusts Domain A and provides access to its applications. |
The browser flow is:
User opens an application protected by Domain B
    → Domain B redirects the browser to Domain A
    → Domain A authenticates the user
    → Domain A returns a signed SAML assertion to Domain B
    → Domain B identifies the local user and establishes a session
This trust is directional. Configuring B to accept authentication from A does not configure A to accept authentication from B. It also does not merge the domains or copy application permissions between them.
1. Prepare Both Domains and a Test User
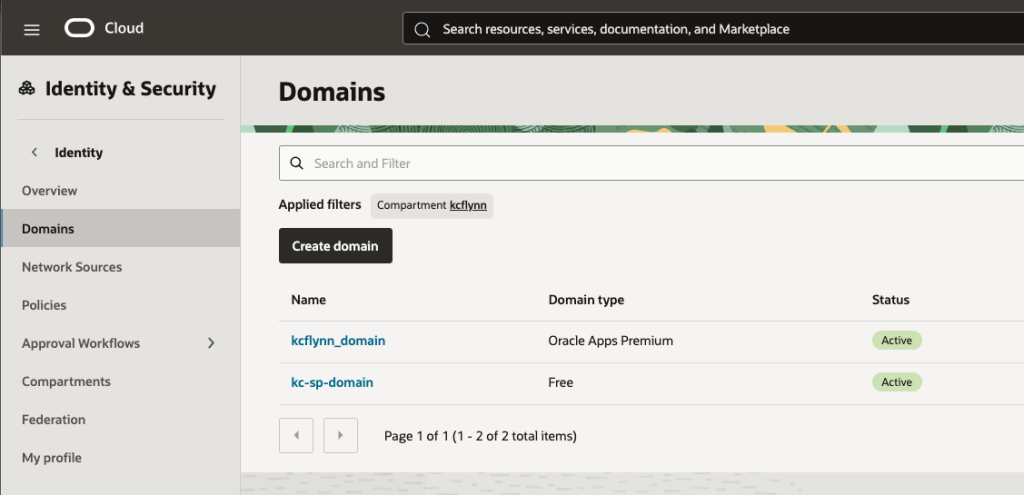
Open Identity & Security → Domains in the OCI Console and locate both domains. Use administrator accounts with permission to manage SAML applications in A and identity providers and IdP policies in B. Keep an administrator session open in B while testing, and retain a working local administrator sign-in route.
For this walkthrough, create or identify an active test account in each domain with the same username, such as alex@example.com. The credentials used during federation belong to the account in A; the account in B supplies the destination identity and its access assignments.
We will match users by username and pre-create the destination account. Automatic account creation through SCIM (System for Cross-Domain Identity Management) will be addressed in another article.
2. Get the IdP Metadata URL in Domain A
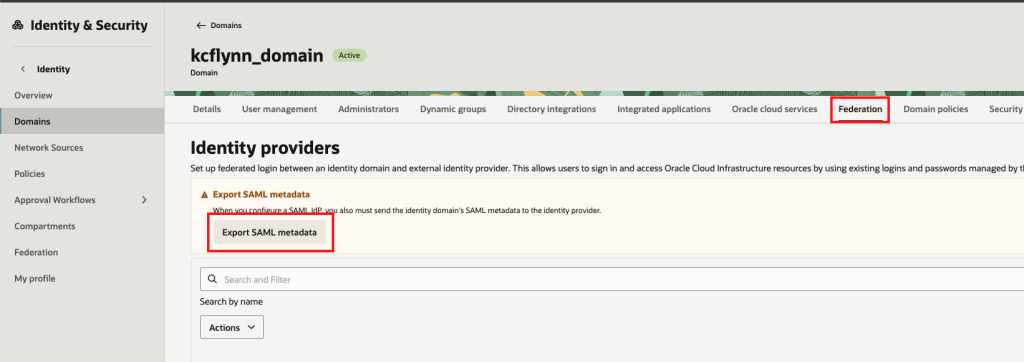
- In the domain details menu, select Federation from the top menu.
- Click the Export SAML metadata button to open a modal with the SAML metadata options.
- Select Metadata URL, check the Access metadata URL or signing certificate box if it is not active, and Copy the Metadata URL.
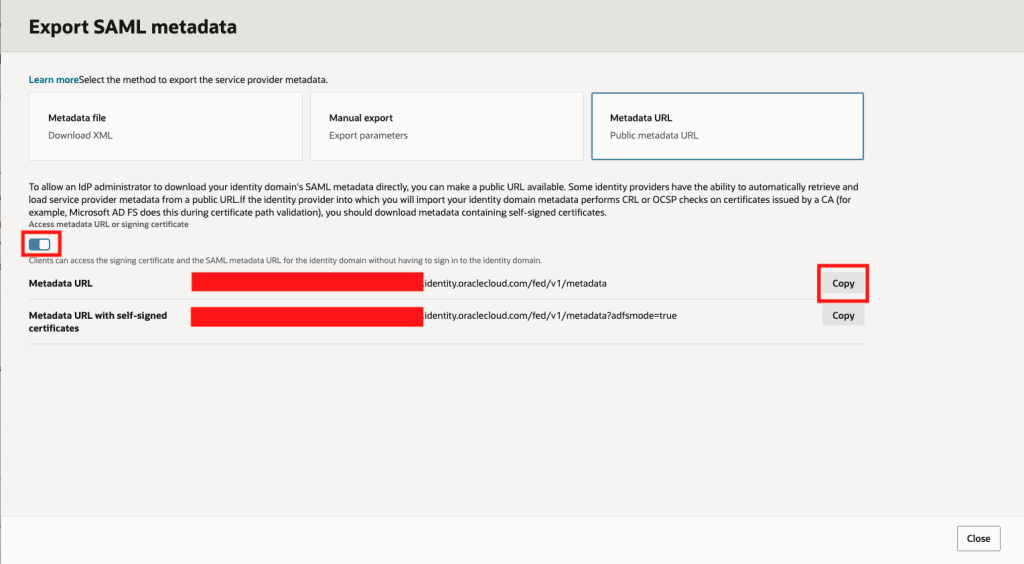
- Record the metadata URL and close the modal window.
3. Add an Identity Provider in Domain B
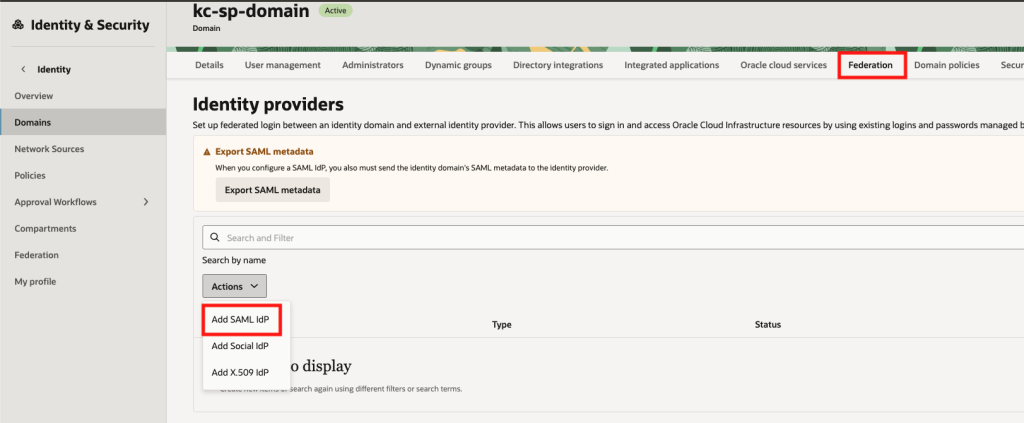
- From the Domain details, select Federation from the top menu.
- From the Actions dropdown, select Add SAML IdP.
- Give the SAML identity provider a name and description. Click Next.
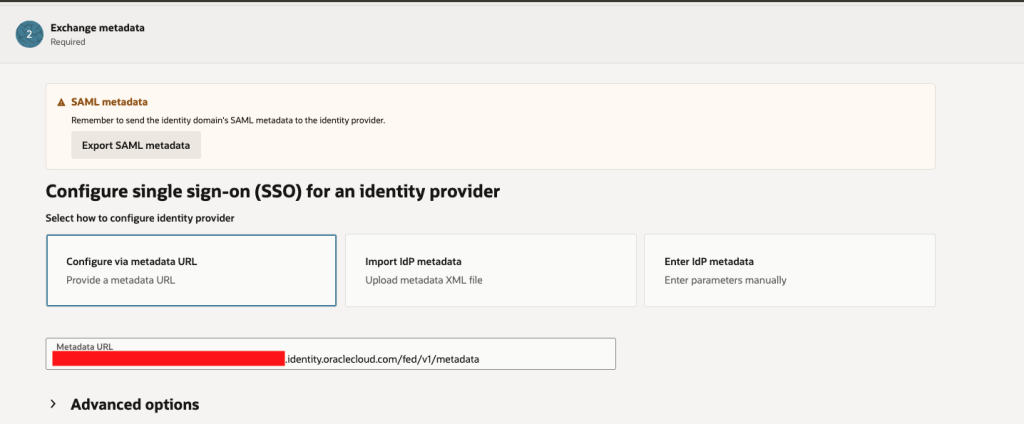
- From the options, select Configure via metadata URL and enter the URL copied in the previous section into the Metadata URL field.
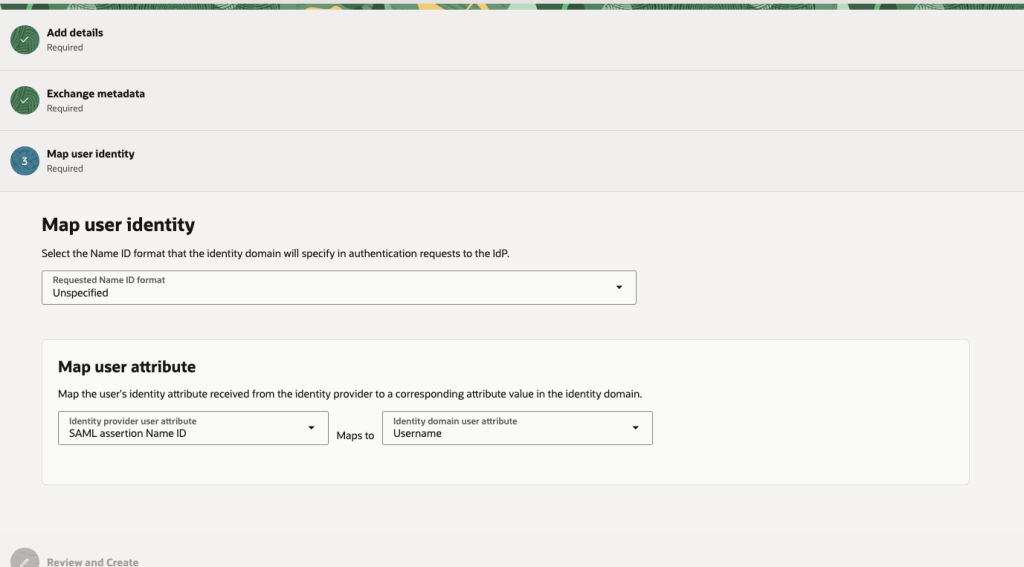
- In the Requested Name ID format dropdown, select Unspecified. Click Next.
- Review the settings before clicking Create IdP.
- Back at the Federation menu, click the three dots next to the new Identity Provider and select Activate IdP. Click Activate IdP to confirm. The new identity provider should have an Activated status.
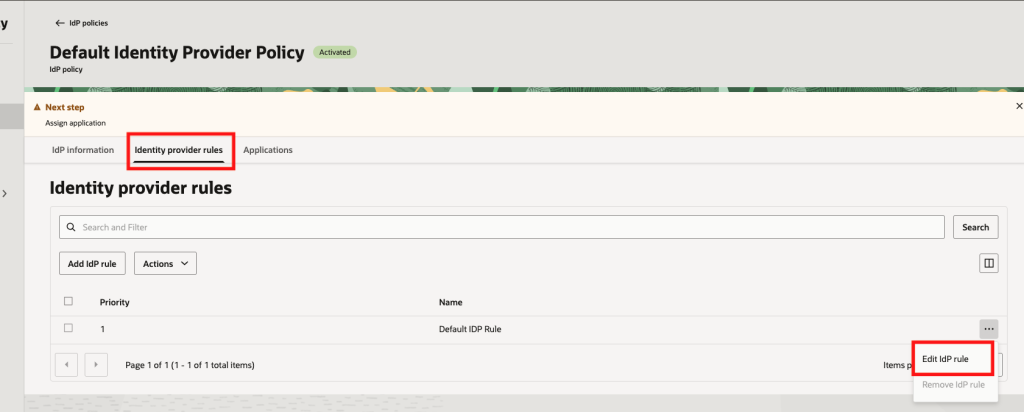
- Under Identity provider policies in the Federation menu, click Default Identity Provider Policy.
- Select Identity provider rules from the top menu, then click the three dots next to Default IDP Rule and select Edit IdP rule.
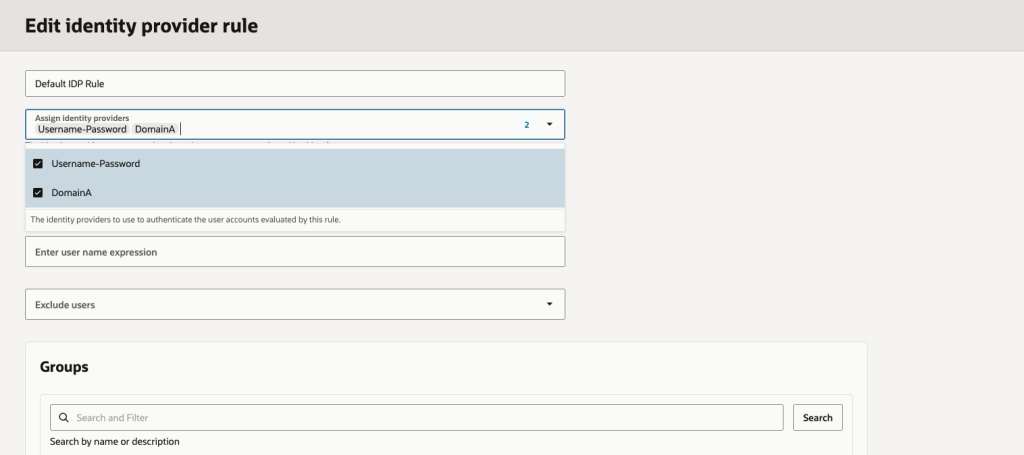
- In the Assign Identity providers field, click on the whitespace next to Username-Password. This will open a dropdown of active identity providers. Select the new federated Identity Provider. Save the changes.
4. Create a SAML Application in Domain A
- In the domain details menu, select Integrated applications from the top menu.
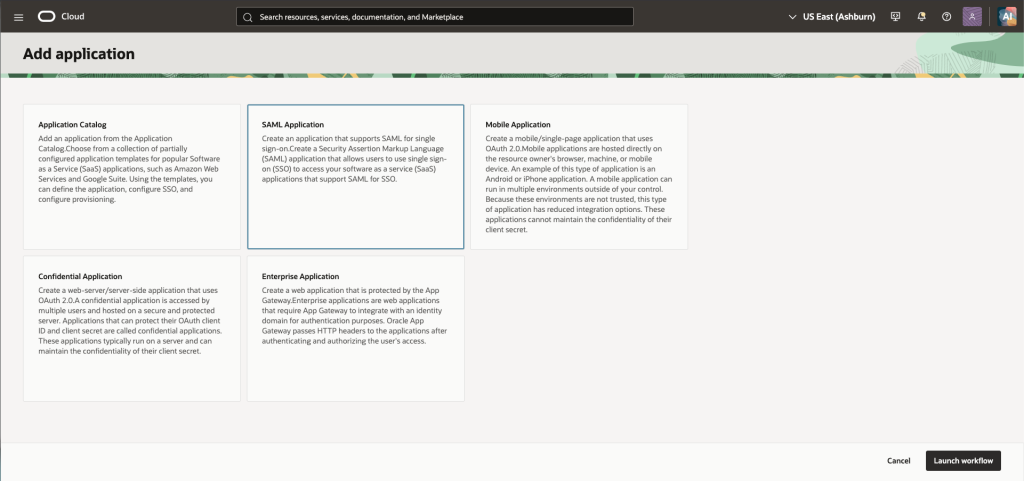
- Click the Add application button and select SAML Application as the application type. Click the Launch workflow button.
- Enter a name and description for the application.
- Optional: Deselect Enforce grants as authorization to allow all users to authenticate to this domain.
- Click Submit to create the unconfigured app.
5. Configure the SAML Application in Domain A
For this step, it is useful to open a separate browser window to have a side-by-side view of the Identity Provider (Domain A) and Service Provider (Domain B).
- (Domain B) Open the Federation tab from the top menu of the domain details.
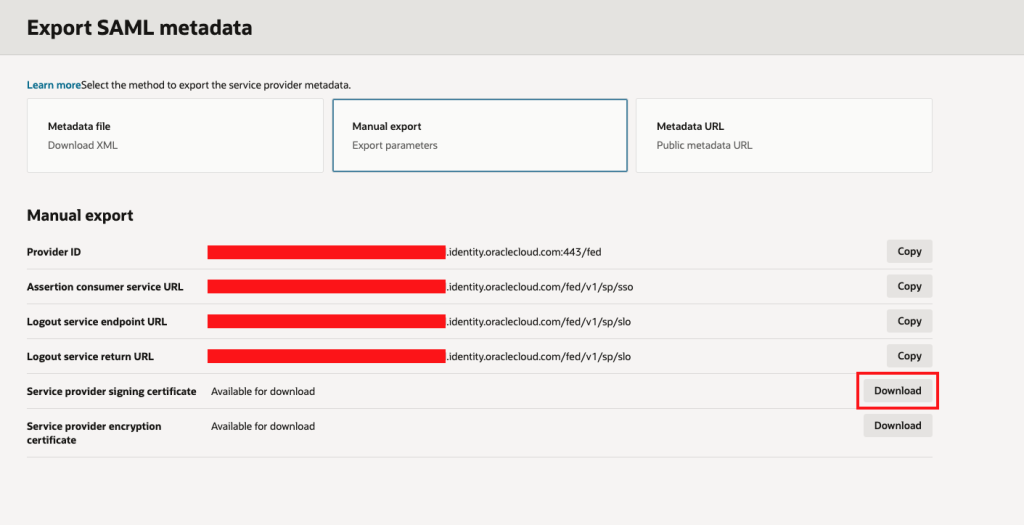
- (Domain B) Click on Export SAML metadata and select Manual export to view the SAML parameters for the domain.
- (Domain B) Download the Service provider signing certificate.
- (Domain A) In the details menu of the new SAML application, select SAML SSO configuration from the top menu. Click Edit SSO configuration to begin entering the details of the SP domain.
- (Domain B -> A) Copy the Provider ID value from Domain B and enter it into the Entity ID field in Domain A.
- (Domain B -> A) Copy the Assertion consumer service URL from Domain B and enter it into the Assertion consumer URL field in Domain A.
- (Domain A) In Name ID format, enter Unspecified.
- (Domain A) In Name ID value, enter Username.
- (Domain A) Drop the certificate downloaded earlier from Domain B into the Signing certificate field.
- (Domain A) Check the Enable single logout box if it is not enabled.
- (Domain B -> A) Copy the Logout service endpoint URL value from Domain B and enter it into the Single logout URL field in Domain A.
- (Domain B -> A) Copy the Logout service return URL value from Domain B and enter it into the Logout response URL field in Domain A.
- (Domain A) Click Save changes.
- (Domain A) In the Actions menu in the top-right corner of the GUI, select Activate to change the app status to Active.
6. Test the Federation
This step requires a user with the same username in both Domain A and Domain B. If the test user does not have a matching account in both domains, the authentication will fail.
Note: Multi-factor authentication will be applied to both domains as defined by each domain’s sign-on policies.
- Open an incognito, private, or alternate browser window. There should be no possibility of having an active session with Domain B while testing the federation.
- Enter the following URL, changing the parameters for your tenant and the name of Domain B:
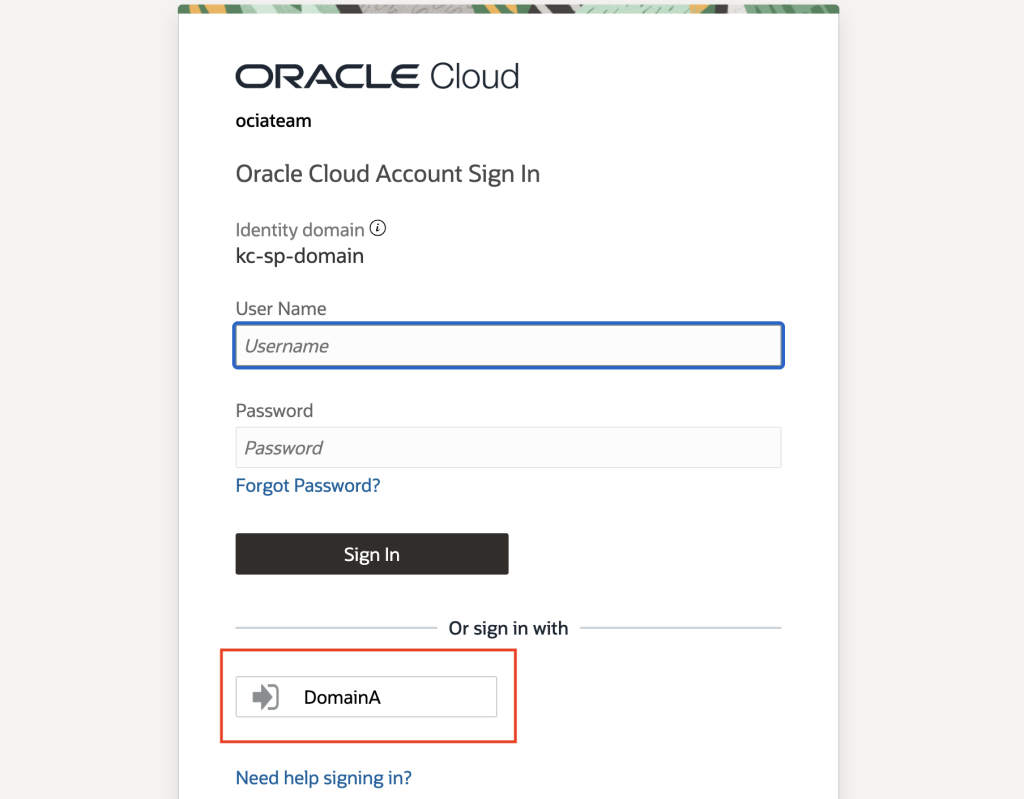
https://cloud.oracle.com/?tenant=YOUR_TENANT&domain=DOMAIN_B_NAME - If all went well, there should be a button beneath the Or sign in with divider for the federated identity provider created in step 3. Click it to be sent to Domain A.
- Enter the username and password for the test user.
- Barring any MFA requirements, the test user will be signed into the OCI Console home page.
Closing Thoughts
With the sign-in flow tested, Domain B now trusts Domain A to authenticate users. Users can sign in with their existing credentials in A, while their accounts and access assignments in B determine what they can do after signing in. The metadata exchange establishes that trust, the Name ID mapping connects the two accounts, and the identity provider policy makes the federated sign-in option available.
Federation handles authentication, but this walkthrough still relies on a matching account already existing in Domain B. Keep that distinction in mind as you extend the setup beyond a test user: account provisioning and access assignments need their own lifecycle. In a follow-up article, we will look at SCIM provisioning to automate account creation and management across the domains.