
Customers often run workloads across multiple clouds. These workloads need a secure way to communicate and access services across cloud boundaries.
OCI Workload Identity Federation (WIF) lets applications running on AWS EC2 call OCI APIs without storing a long-lived OCI API signing key. The application uses its AWS identity to get a temporary OCI token and access OCI services.
This post walks through the AWS setup, OCI configuration and token exchange flow.
How the integration works
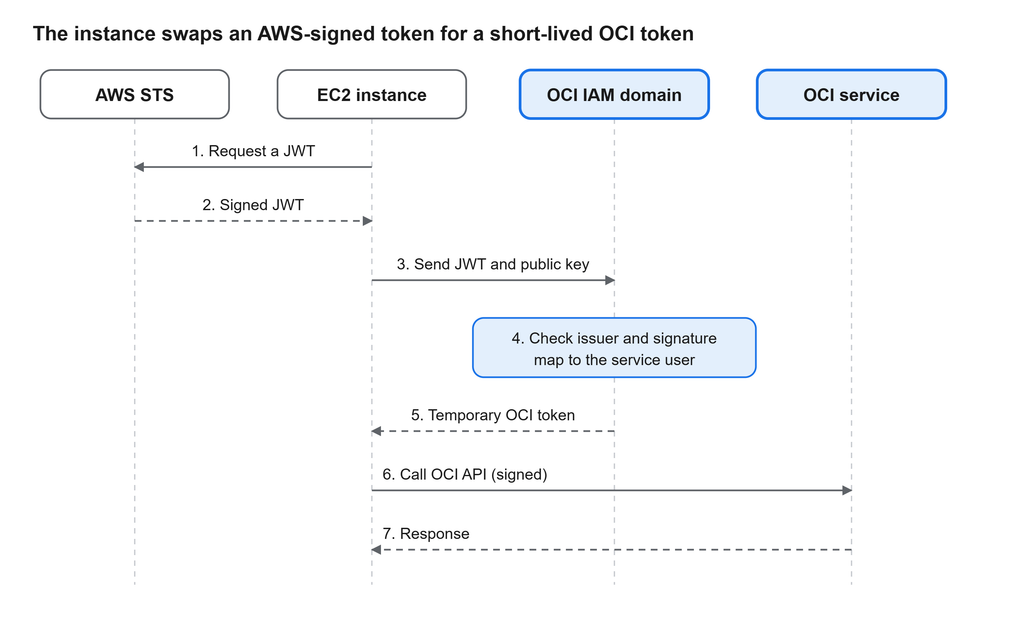
The EC2 instance requests a signed token from AWS Security Token Service (STS). It sends this token and a public key to the OCI IAM identity domain.
OCI validates the AWS token and maps the AWS identity to an OCI service user. It then returns a temporary OCI token that the application uses to call OCI APIs.
Before you begin
You need an AWS account with permission to manage IAM roles and policies. On the OCI side you need access to configure an identity domain and grant access to OCI resources.
You also need an EC2 instance with the AWS CLI and OCI CLI installed. The instance must be able to reach the required AWS and OCI endpoints.
In AWS, your permissions should cover enabling account-level IAM settings, creating IAM roles and policies, launching EC2 and using Systems Manager (SSM). Amazon Linux 2023 already includes an AWS CLI that supports the token command. The OCI CLI is not preinstalled, so install it on the instance with pip3 install oci-cli. If you do not have an instance yet, step 1.6 shows how to launch one.
Run the AWS commands in this post from AWS CloudShell, which already has the AWS CLI, jq and your console credentials. Set these variables once. The names are examples, so change them to fit your own naming. Every later command reads these variables, so this is the only block you need to edit.
export AWS_PAGER=""
export AWS_REGION=us-east-1
export ROLE_NAME=oci-wif-ec2-role
export POLICY_NAME=OutboundFederationOCI
export SG_NAME=oci-wif-ec2-sg
export AUDIENCE=oci-wif
export ACCOUNT_ID=$(aws sts get-caller-identity --query Account --output text)
The audience is a string you choose. It identifies the intended recipient of the token. AWS does not check it against anything, so it only has to be the same in the IAM policy and in the token request. OCI matches on the issuer, so the audience does not need to be configured in OCI.
Step 1: Configure AWS
1.1 Enable outbound identity federation
Start by enabling outbound identity federation for your AWS account. This allows AWS to issue signed identity tokens that OCI can validate. It is a one-time, account-level switch.
aws iam enable-outbound-web-identity-federationRecord the issuer URL returned during setup. You will use it when configuring trust in OCI. If you lose it, retrieve it with aws iam get-outbound-web-identity-federation-info.
Check that the issuer publishes its discovery and signing keys. OCI uses them to validate the token signature.
export ISSUER=<issuer-url-from-output>
curl -s $ISSUER/.well-known/openid-configuration
curl -s $ISSUER/.well-known/jwks.json
1.2 Create the IAM policy
Next, create an IAM policy that allows the EC2 role to request tokens through sts:GetWebIdentityToken. Set the audience to a value such as oci-wif and limit the token lifetime to 300 seconds. Use the same audience when requesting the token.
cat > outbound-policy.json <<EOF
{
  "Version": "2012-10-17",
  "Statement": [{
    "Effect": "Allow",
    "Action": ["sts:GetWebIdentityToken", "sts:TagGetWebIdentityToken"],
    "Resource": "*",
    "Condition": {
      "ForAllValues:StringEquals": { "sts:IdentityTokenAudience": "$AUDIENCE" },
      "NumericLessThanEquals": { "sts:DurationSeconds": 300 }
    }
  }]
}
EOF

aws iam create-policy --policy-name $POLICY_NAME \
  --policy-document file://outbound-policy.json
The policy also allows sts:TagGetWebIdentityToken. You only need it if you pass --tags on the token request, but without it those requests fail with AccessDenied.
1.3 Create the role and instance profile
Create an IAM role for EC2 and attach the token issuance policy. Add the role to an instance profile and associate it with your EC2 instance.
The role is what the EC2 instance runs as. Its ARN becomes the token’s sub claim.
cat > trust.json <<'EOF'
{
  "Version": "2012-10-17",
  "Statement": [{
    "Effect": "Allow",
    "Principal": { "Service": "ec2.amazonaws.com" },
    "Action": "sts:AssumeRole"
  }]
}
EOF

aws iam create-role --role-name $ROLE_NAME \
  --assume-role-policy-document file://trust.json

aws iam attach-role-policy --role-name $ROLE_NAME \
  --policy-arn arn:aws:iam::$ACCOUNT_ID:policy/$POLICY_NAME
aws iam attach-role-policy --role-name $ROLE_NAME \
  --policy-arn arn:aws:iam::aws:policy/AmazonSSMManagedInstanceCore
The second attachment, AmazonSSMManagedInstanceCore, lets you run commands on the instance through SSM.
Tagging the role is optional. Role tags travel inside the token as principal_tags, so a downstream service can see which team and environment the workload belongs to. AWS adds them automatically, so the token request needs no extra flag.
aws iam tag-role --role-name $ROLE_NAME \
  --tags Key=environment,Value=prod Key=team,Value=data-platform Key=cost-center,Value=cc-1042
1.4 Create the instance profile
An EC2 instance cannot use an IAM role directly. The instance profile is the wrapper that attaches the role to the instance, so software running on it can get the role’s credentials. Without it, the instance has no AWS identity to request a token with.
aws iam create-instance-profile --instance-profile-name $ROLE_NAME
aws iam add-role-to-instance-profile --instance-profile-name $ROLE_NAME --role-name $ROLE_NAME
1.5 Create a security group
A security group is the instance’s firewall. This one has no inbound rules, so nothing on the internet can connect to the instance. You still reach it through SSM, which only needs outbound access.
VPC_ID=$(aws ec2 describe-vpcs --filters Name=isDefault,Values=true \
  --query 'Vpcs[0].VpcId' --output text --region $AWS_REGION)

SG_ID=$(aws ec2 create-security-group --group-name $SG_NAME \
  --description "OCI WIF, no inbound" --vpc-id $VPC_ID \
  --region $AWS_REGION --query GroupId --output text)
echo $SG_ID
IAM changes can take a few seconds to propagate. If the next step says the instance profile does not exist, wait 10 seconds and retry.
1.6 Launch the instance
In this walkthrough I launch a new instance so every step is easy to follow. If you already have an EC2 instance, skip the launch. Attach the instance profile to it instead (EC2, Actions, Security, Modify IAM role) and continue with the token request.
Note: This walkthrough uses an Amazon Linux 2023 arm64 instance (t4g.micro). Very small instance types such as t4g.nano can run into memory issues, for example while installing or updating the CLI, so avoid them.
AMI_ID=$(aws ssm get-parameter \
  --name /aws/service/ami-amazon-linux-latest/al2023-ami-kernel-default-arm64 \
  --region $AWS_REGION --query 'Parameter.Value' --output text)

INSTANCE_ID=$(aws ec2 run-instances \
  --image-id $AMI_ID \
  --instance-type t4g.micro \
  --iam-instance-profile Name=$ROLE_NAME \
  --security-group-ids $SG_ID \
  --associate-public-ip-address \
  --metadata-options HttpTokens=required,HttpEndpoint=enabled \
  --tag-specifications "ResourceType=instance,Tags=[{Key=Name,Value=oci-wif-test}]" \
  --region $AWS_REGION \
  --query 'Instances[0].InstanceId' --output text)

echo INSTANCE_ID=$INSTANCE_ID
Continue only if the ID starts with i-. Then wait for the instance and for the SSM agent to come online.
aws ec2 wait instance-running --instance-ids $INSTANCE_ID --region $AWS_REGION

until aws ssm describe-instance-information --region $AWS_REGION \
  --filters Key=InstanceIds,Values=$INSTANCE_ID \
  --query 'InstanceInformationList[0].PingStatus' --output text | grep -q Online; do
  echo "waiting for SSM agent..."; sleep 10
done; echo "SSM online"
The public IP lets the SSM agent reach AWS endpoints. If your subnet has no internet route, create SSM VPC endpoints instead.
1.7 Request a token from the instance
From the instance, request an AWS token and record its iss and sub claims. The issuer identifies the token provider. The subject identifies the AWS workload that OCI will map to a service user.
I run the commands on the instance with SSM Run Command instead of SSH, for three reasons. The instance needs no open inbound port and no SSH key. The commands run as the instance itself, so they use the role’s credentials and the token reflects the EC2 role, not my own login. And SSM keeps an audit trail of every command.
This script prints only the decoded claims, not the raw token, because SSM output is stored in your account.
cat > claims.sh <<EOF
aws sts get-web-identity-token --audience $AUDIENCE --signing-algorithm RS256 --duration-seconds 300 --region $AWS_REGION --output json | python3 -c "import sys,json,base64; d=json.load(sys.stdin); t=d.get('IdentityToken') or d.get('WebIdentityToken'); p=t.split('.')[1]; p+='='*(-len(p)%4); print(json.dumps(json.loads(base64.urlsafe_b64decode(p)),indent=2))"
EOF

jq -Rs '{commands: split("\n")}' claims.sh > params.json

CMD_ID=$(aws ssm send-command --instance-ids $INSTANCE_ID \
  --document-name AWS-RunShellScript --parameters file://params.json \
  --region $AWS_REGION --query 'Command.CommandId' --output text)

sleep 15
aws ssm get-command-invocation --command-id $CMD_ID --instance-id $INSTANCE_ID \
  --region $AWS_REGION --query '[Status,StandardOutputContent,StandardErrorContent]' --output text
If the status is InProgress, wait 30 seconds and rerun only the last command. The script tries both field names the CLI can return for the token, IdentityToken and WebIdentityToken.
On the instance itself, the core command is:
aws sts get-web-identity-token --audience oci-wif \
  --signing-algorithm RS256 --duration-seconds 300 --region us-east-1
To add per-request values to the token, pass --tags Key=env,Value=prod. They appear under request_tags.
AWS places its identity claims under a nested https://sts.amazonaws.com/ key, not at the top level. Not every claim appears in every token, so treat your decoded output as the source of truth.
| Claim | Location | What it holds |
|---|---|---|
iss | Top level | Your account’s AWS issuer URL. This is what OCI trusts. |
aud | Top level | The audience you requested, such as oci-wif |
sub | Top level | The ARN of the IAM principal that requested the token. OCI maps this to a service user. |
iat, exp | Top level | Issue and expiry times, 300 seconds apart in this setup |
aws_account, source_region, org_id, principal_tags, request_tags | Nested | Account, region, organization (if any), role tags and request tags (if you passed --tags) |
ec2_source_instance_arn, ec2_instance_source_vpc, ec2_instance_source_private_ipv4, ec2_role_delivery | Nested | Added automatically when the request comes from an EC2 instance |
Use the values from the actual token when configuring OCI.
Values to carry from AWS to OCI
| Value | Where it comes from | Where it is used in OCI |
|---|---|---|
| Issuer URL | Output of enable-outbound-web-identity-federation | Identity Propagation Trust issuer |
| JWKS URL | <issuer>/.well-known/jwks.json | Trust public key endpoint |
sub value | The decoded token | Service user mapping rule |
| Audience | You choose it (oci-wif) | Not used in OCI. It must match in the AWS policy and the token request. |
Step 2: Configure OCI
OCI needs to trust the AWS token issuer and map the workload to an OCI service user.
You can use the Terraform project described in Automating OCI Workload Identity Federation with Terraform and Resource Manager to create the required configuration.
The project sets up an application for token exchange and an Identity Propagation Trust. It can also create the service users used by the integration.
2.1 Deploy the Terraform project
Follow that blog and the project’s GitHub repository for the full setup, including how to deploy the stack through OCI Resource Manager, the required variables and the service_users.json mapping rules. Use user impersonation mode for this setup.
Two AWS-specific values go into the configuration. The first is the issuer URL you recorded in step 1.1, which the trust uses as its issuer. The second is the public key endpoint, <issuer>/.well-known/jwks.json. The mapping rule matches the AWS token’s sub claim to the target OCI service user, so use the sub value from your decoded token.
For a single EC2 role, use an exact match for the subject value, which means the eq operator with the full sub from your token. A broader match, such as a wildcard that accepts any AWS principal, would let every identity from your AWS issuer map to this service user.
2.2 Record the client credentials
After deployment, record the application’s client ID and client secret. You can find them in the OCI Console under Identity & Security, Domains, your domain, Integrated applications.
2.3 Grant access in OCI IAM
Add the service user to an OCI group (Identity & Security, Domains, your domain, Groups) and grant that group access to the resources the workload needs. The service user starts with no permissions. This example allows reading objects in one compartment:
Allow group 'Default'/'aws-workloads' to read objects in compartment <compartment-name>If your domain is not the Default domain, replace 'Default' with your domain name.
Step 3: Exchange the AWS token
With both sides configured, the EC2 application can request temporary OCI credentials.
The application generates a key pair and requests a short-lived AWS token. It then sends the AWS token and public key to the OCI identity domain’s token endpoint. The application uses its client ID and client secret to authenticate the exchange.
3.1 Run the token exchange
The script below does all of this on the instance in one go, so the raw AWS token never leaves it or lands in SSM output. It creates the key pair, gets the AWS token, calls the token endpoint at /oauth2/v1/token, and saves the OCI token.
cat > exchange.sh <<'EOF'
set -e
# DOMAIN_URL, CLIENT_ID, CLIENT_SECRET, AUDIENCE and AWS_REGION are exported by run.sh
mkdir -p ~/.oci && cd ~/.oci

# 1. Key pair for proof of possession (the public key is embedded in the OCI token)
openssl genrsa -out oci_key.pem 2048 2>/dev/null
chmod 600 oci_key.pem
openssl rsa -in oci_key.pem -pubout -out oci_key_public.pem 2>/dev/null
PUB=$(grep -v 'PUBLIC KEY' oci_key_public.pem | tr -d '\n')

# 2. Get the AWS token
JWT=$(aws sts get-web-identity-token --audience $AUDIENCE --signing-algorithm RS256 \
  --duration-seconds 300 --region $AWS_REGION --query 'IdentityToken' --output text)

# 3. Exchange it at the OCI identity domain
curl -s -X POST "$DOMAIN_URL/oauth2/v1/token" \
  -u "$CLIENT_ID:$CLIENT_SECRET" \
  -H 'Content-Type: application/x-www-form-urlencoded' \
  --data-urlencode 'grant_type=urn:ietf:params:oauth:grant-type:token-exchange' \
  --data-urlencode 'requested_token_type=urn:oci:token-type:oci-upst' \
  --data-urlencode "public_key=$PUB" \
  --data-urlencode "subject_token=$JWT" \
  --data-urlencode 'subject_token_type=jwt' > resp.json

python3 -c "import json; print(json.load(open('resp.json'))['token'])" > session_token
echo "OCI token saved to ~/.oci/session_token"
EOF
Set your identity domain URL (shown on the domain’s details page in the OCI Console) and the client credentials from the previous section, then run the script on the instance through SSM:
export DOMAIN_URL=https://idcs-<id>.identity.oraclecloud.com

{ echo "export DOMAIN_URL=$DOMAIN_URL CLIENT_ID=<client-id> CLIENT_SECRET=<client-secret> AUDIENCE=$AUDIENCE AWS_REGION=$AWS_REGION"; cat exchange.sh; } > run.sh
jq -Rs '{commands: split("\n")}' run.sh > params.json

CMD_ID=$(aws ssm send-command --instance-ids $INSTANCE_ID \
  --document-name AWS-RunShellScript --parameters file://params.json \
  --region $AWS_REGION --query 'Command.CommandId' --output text)

sleep 20
aws ssm get-command-invocation --command-id $CMD_ID --instance-id $INSTANCE_ID \
  --region $AWS_REGION --query '[Status,StandardOutputContent,StandardErrorContent]' --output text
SSM runs commands as root, so the files land in /root/.oci. A successful run prints OCI token saved to ~/.oci/session_token. A failure prints the OCI error response.
OCI validates the request and returns a temporary OCI token.
3.2 Use the OCI token
Configure the OCI CLI or application to use this token and the generated key. On the instance, add this to ~/.oci/config:
[DEFAULT]
region=<oci-region>
tenancy=<tenancy-ocid>
security_token_file=~/.oci/session_token
key_file=~/.oci/oci_key.pem
You can then test the connection with a simple OCI API call such as retrieving the Object Storage namespace. Run it as root so the CLI finds /root/.oci:
oci os ns get --auth security_tokenThe OCI SDKs and Terraform pick up the same token and key.
Applications that run continuously need to renew their credentials before they expire. The OCI token is valid for 60 minutes and is not renewed automatically, so rerun the exchange before then.
Troubleshooting
If AWS denies the token request, check the EC2 role and its token issuance policy. Confirm that the audience and token lifetime match the policy.
If OCI rejects the exchange, check the issuer URL, public key endpoint and subject mapping. Also confirm that the application is allowed in the trust configuration.
If the exchange succeeds but an OCI API call fails, check the service user’s group membership and resource permissions.
The table lists the specific errors you are most likely to see.
| Symptom | Likely cause | Fix |
|---|---|---|
Bus error, or the CLI install fills /tmp | t4g.nano is too small | Use t4g.micro or larger |
SSM instance never shows Online | AmazonSSMManagedInstanceCore is missing, or the instance cannot reach SSM endpoints | Attach the policy, or give the subnet internet access or SSM VPC endpoints. Allow a few minutes. |
Unable to locate credentials on the instance | Instance profile not attached | EC2, Actions, Security, Modify IAM role |
AccessDenied on GetWebIdentityToken | Policy not attached, or the audience or duration is outside the policy condition | Check the audience matches and the duration is 300 or less |
AccessDenied mentioning TagGetWebIdentityToken | Passed --tags without that permission | Add the action to the policy, or drop --tags |
| Feature not enabled error | Outbound federation is not enabled in this account | Enable it in step 1.1 |
| Endpoint error on the token call | Calling the global STS endpoint | Add --region |
None returned by --query 'IdentityToken' | The field has a different name in your CLI version | Run without --query and look for WebIdentityToken |
principal_tags missing or stale | The role session was issued before the tags were added | Tag the role first, then start a new session or reboot the instance |
| OCI returns an invalid-token or no-trust error | The trust issuer does not match the token iss exactly | Decode a token and copy iss exactly, including any trailing slash |
| OCI error about signature or keys | The public key endpoint is wrong or unreachable | Rerun the curl checks against the JWKS URL |
| OCI error that no mapping rule matched | sub does not match the rule | Align claim_value with the exact sub from a decoded token |
| OCI error that the client is not allowed | The application’s client ID is not allowed in the trust | Rerun the Terraform apply so the application is listed in the trust |
| The exchange works but API calls are denied | The service user has no group or policy | Add it to a group and grant a policy |
| SSM output is empty | The command is still running | Wait 30 seconds and rerun only get-command-invocation |
The OCI identity domain also has diagnostics that show which trust validation step failed. Turn them on if the exchange error is unclear.
Running in production
Store the application’s client secret in a managed secret store such as AWS Secrets Manager. Protect the local token and key files and keep credentials out of logs.
Grant the service user only the access the workload needs. Automate credential renewal so the application can keep running when its token expires.
A few more habits keep the setup tight:
- Keep the AWS token lifetime short. 60 to 300 seconds is enough for an immediate exchange.
- Attach the token issuance policy only to roles that need it. Anyone who can request tokens with that role can act as the mapped OCI service user.
- Never print the raw AWS token or the OCI token through SSM output or logs. Both are stored and readable by anyone with access.
- The client secret appears in SSM command history when you pass it as a variable, as this walkthrough does for simplicity. Read it from Secrets Manager instead.
Conclusion
OCI Workload Identity Federation gives AWS EC2 applications a way to access OCI services using their AWS identity. Once trust and permissions are configured, the application can obtain temporary OCI credentials and call OCI APIs without a long-lived OCI API signing key.