Introduction
A popular approach to securing OIC endpoints is leveraging an API Gateway, which acts as the first line of defense. It ensures that only authenticated callers can access backend services, preventing unauthorized or anonymous requests. Beyond authentication, the gateway also enforces authorization policies, verifying whether the caller has the necessary permissions. Additionally, it enhances security and performance with features like throttling, which controls request rates to prevent abuse and ensure system stability.
This blog explores how to leverage custom scopes to enforce fine-grained access control on OIC REST endpoints. By integrating OCI IAM with API Gateway authentication and authorization—enhanced by an Authorizer Function—you can ensure secure and controlled access to your APIs.
In this blog, we’ll walk through a real-world scenario where a company implements API Gateway to protect OIC APIs using JWTs with scopes and claims, catering to different teams with distinct access levels. Let’s dive in!
The Challenge: Securing OIC APIs with Scope-Based Access Control
Meet Rohit, a lead cloud architect at XYZ Corp. His company has multiple teams—Finance, HR, and IT—each requiring different levels of access to OIC APIs. He needs a way to:
- Ensure only authorized users can access APIs.
- Enforce role-based and team-based access control.
Rohit decides to implement an API Gateway in front of his OIC APIs, leveraging JWT-based authentication with team-specific scopes.
Solution
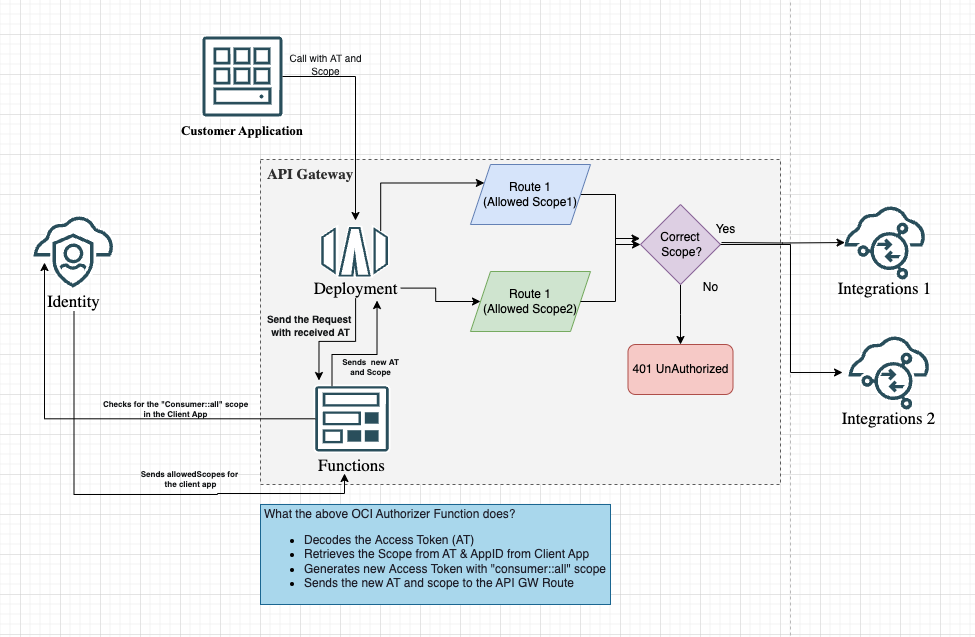
This architecture represents an OCI API Gateway with a Custom Authorizer Function that validates access tokens and scopes before allowing access to backend integrations. Here’s how the flow works:
-
Customer Application Initiates Request
- A request is sent from the customer application to the API Gateway with an Access Token (AT) containing the Custom Scope.
-
API Gateway Routes the Request
- The API Gateway receives the request and forwards it to the Deployment.
- The Deployment sends the received AT to the OCI Function (Custom Authorizer Function) for validation.
-
Custom Authorizer Function Validates AT & the Scope
- The function decodes the AT to extract the Scope and App ID of the client application.
- It queries the OCI IAM to check the allowed scopes for the client application.
- If the scope includes
"consumer::all", the function generates a new AT with the"urn:opc:resource:consumer::all"scope. - The new AT along with the custom scope (what the client initially requests) are sent back to the API Gateway.
-
API Gateway Enforces Access Control
- The API Gateway evaluates whether the custom scope matches the allowed scopes for the requested route.
- If the scope is correct, the request is forwarded to the appropriate backend integration (e.g., Integrations 1 or Integrations 2).
- If the scope is invalid, the request is rejected with a 404 Not Found response.
Execution
Setting Up OCI IAM for Resource Server and Client Application
Rohit first ensures that all his team’s scopes for the OIC app are defined as resource in OCI IAM so that access tokens are validated before access is granted. Here’s how he does it:
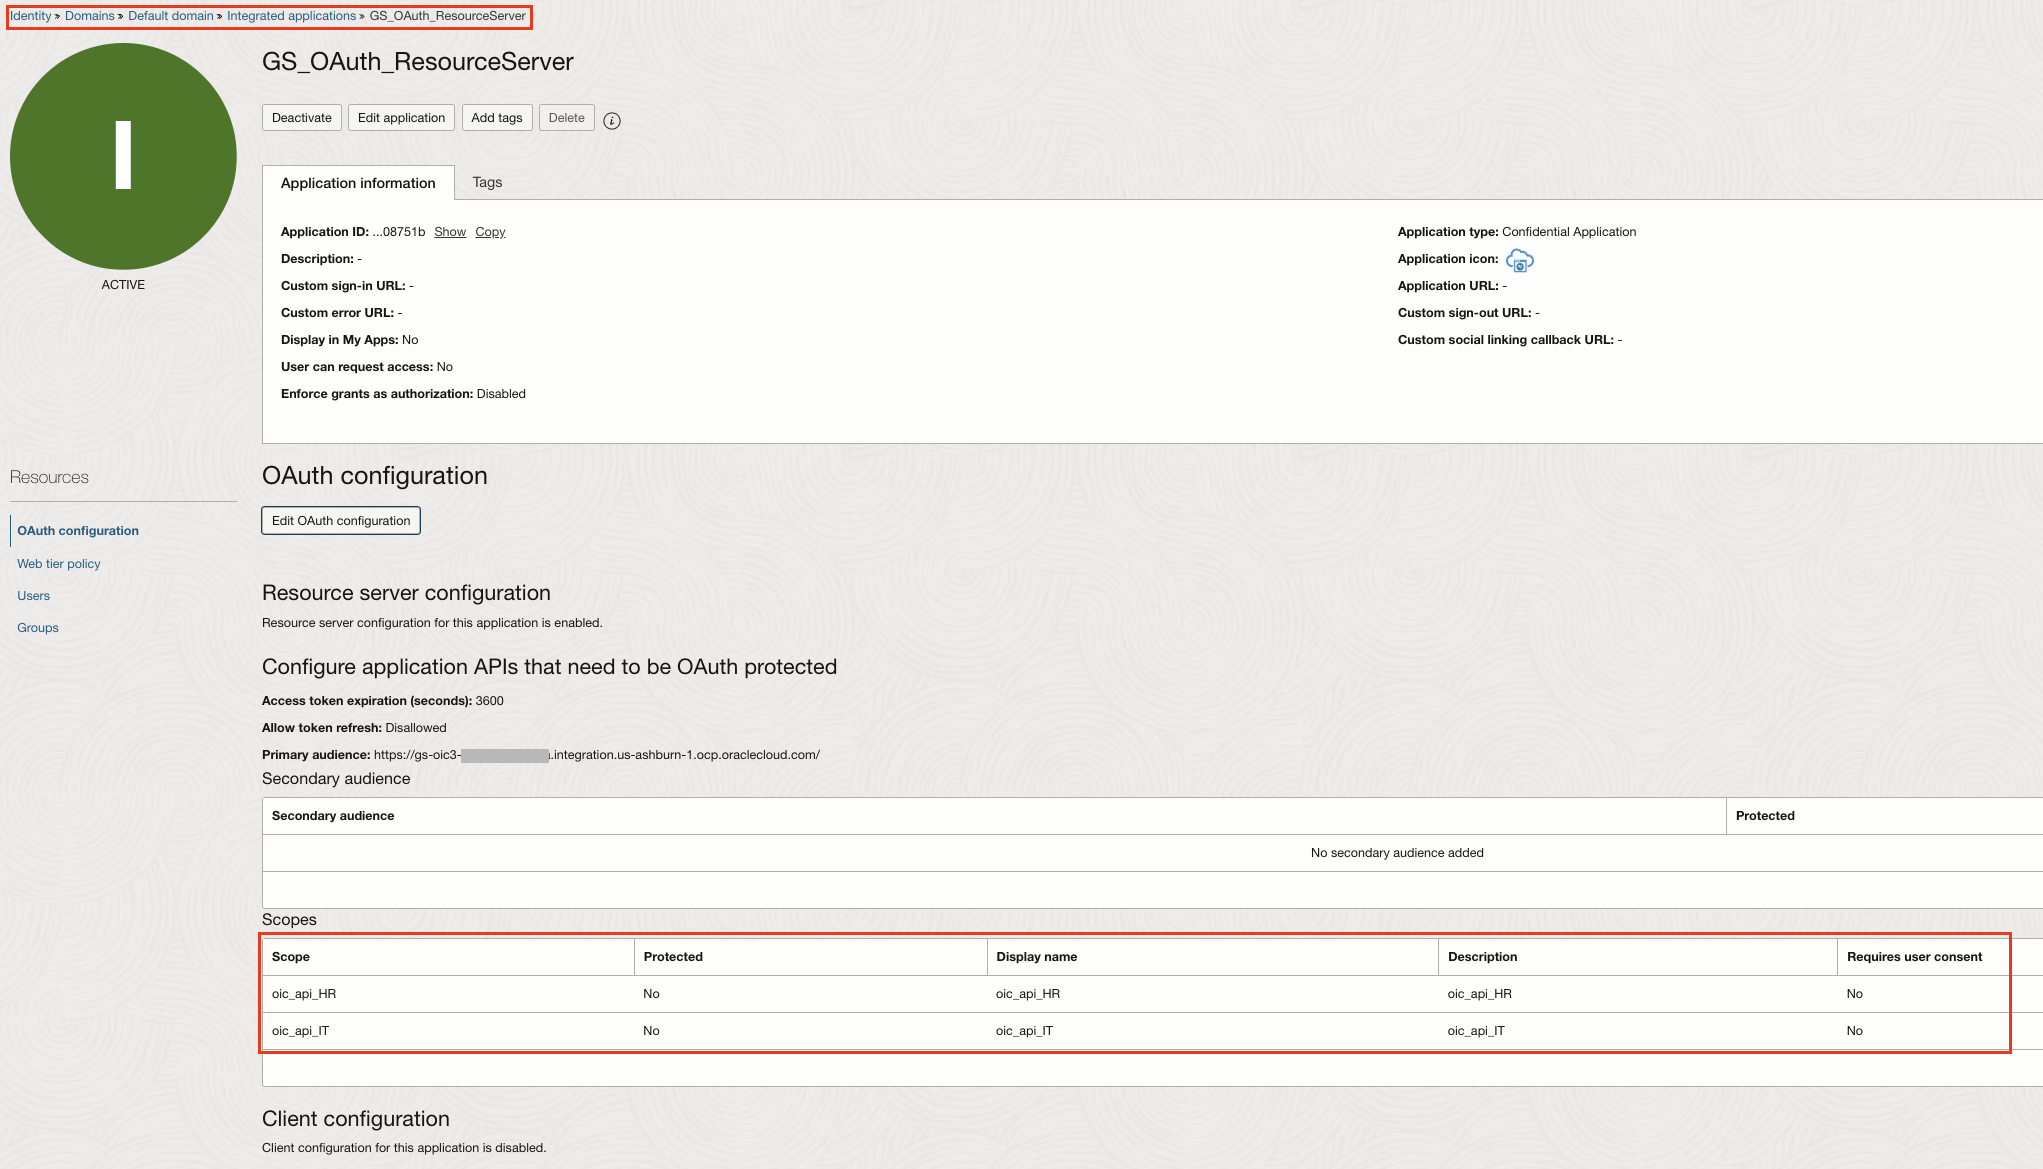
1. Creates an OCI IAM Confidential Application for Resource Server Configuration
-
In the OCI Console, navigate to Identity & Security > Domains > Integrated Applications.
-
Click Add Application > Confidential Application > Launch App Catalog.
-
Provide a Name and click Next to Configure OAuth section.
-
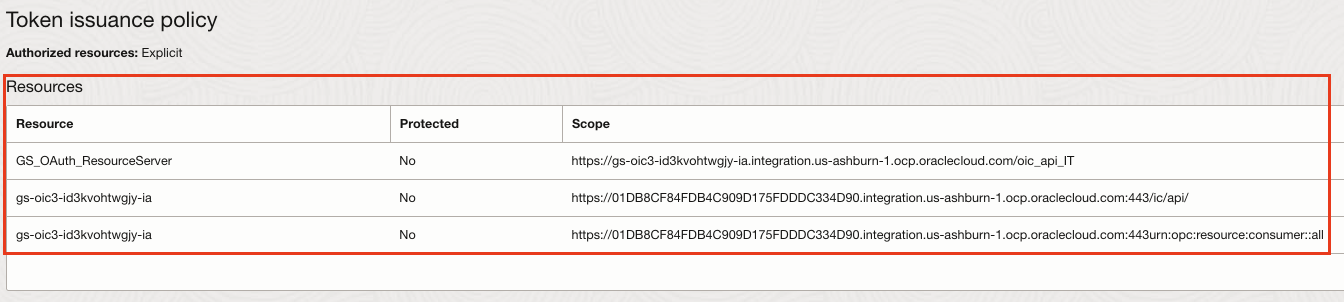
Under Resource server configuration provide the OIC URL (eg https://gs-oic3-###########-ia.integration.us-ashburn-1.ocp.oraclecloud.com/) in the Primary audience.
-
Under Add Scopes, define team-specific scopes:
-
oic_api_HR
-
oic_api_IT
-
-
Skip the Client configuration section.
-
After saving, Activate the Application.
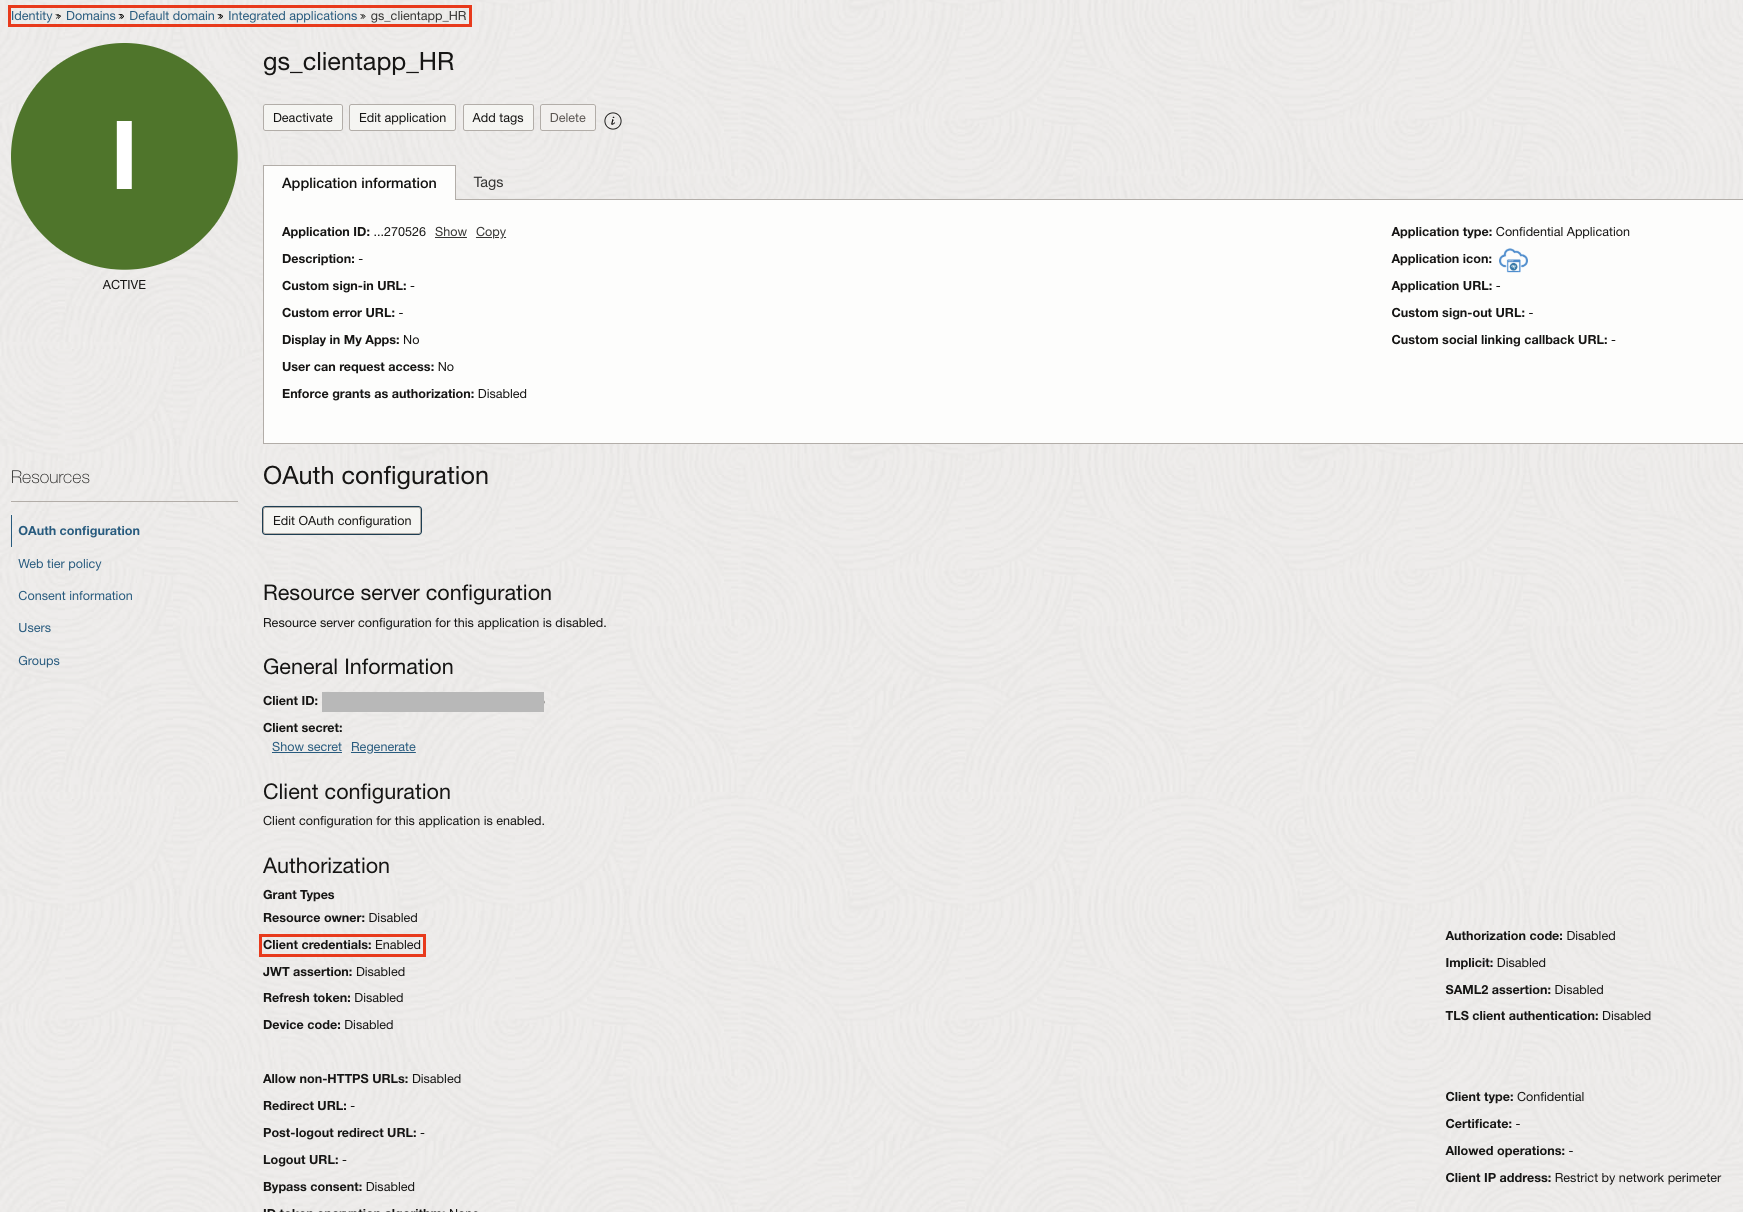
2. Creates the OCI IAM Confidential Applications as an OAuth Client for the OIC app with different scopes.
Rohit now defines two different confidential applications that requests for the access tokens. Required when the apps needs to act on behalf of itself (e.g., automation, backend services).
- Carry out the steps 1, 2 and 3 as mentioned above.
- Skip the Resource server configuration section.
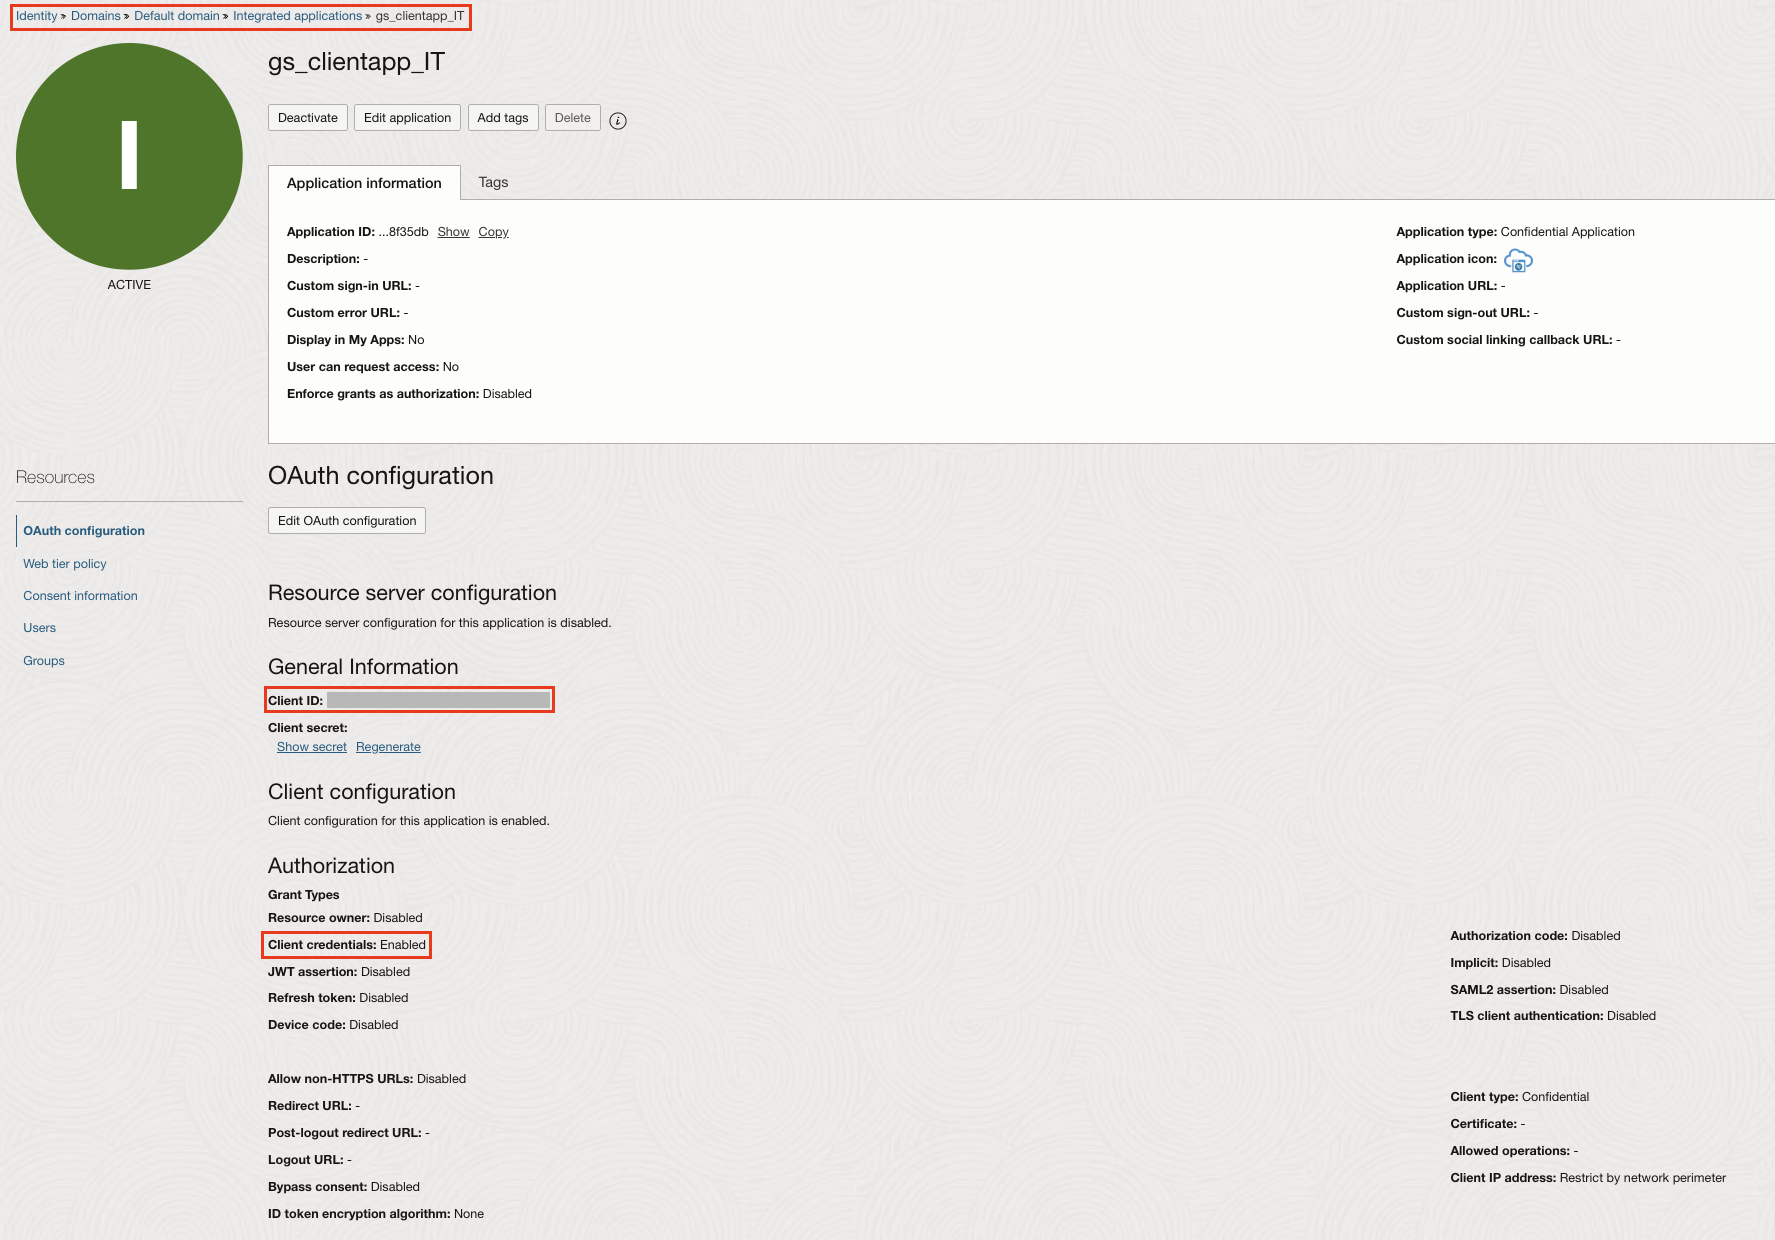
- Under Client configuration, select Client credentials as the Allowed Grant types.
- Click Add Scopes to add one of the custom scope from the resource server application as well the OIC scopes(PaaS Scope and OIC REST endpoint scope).
- Save and Activate the app.
- Similarly creates another Confidential application as an OAuth client and adds the other custom scope from the resource server application as well as the OIC scopes.
3. Assign Application roles to the Auth Client app.
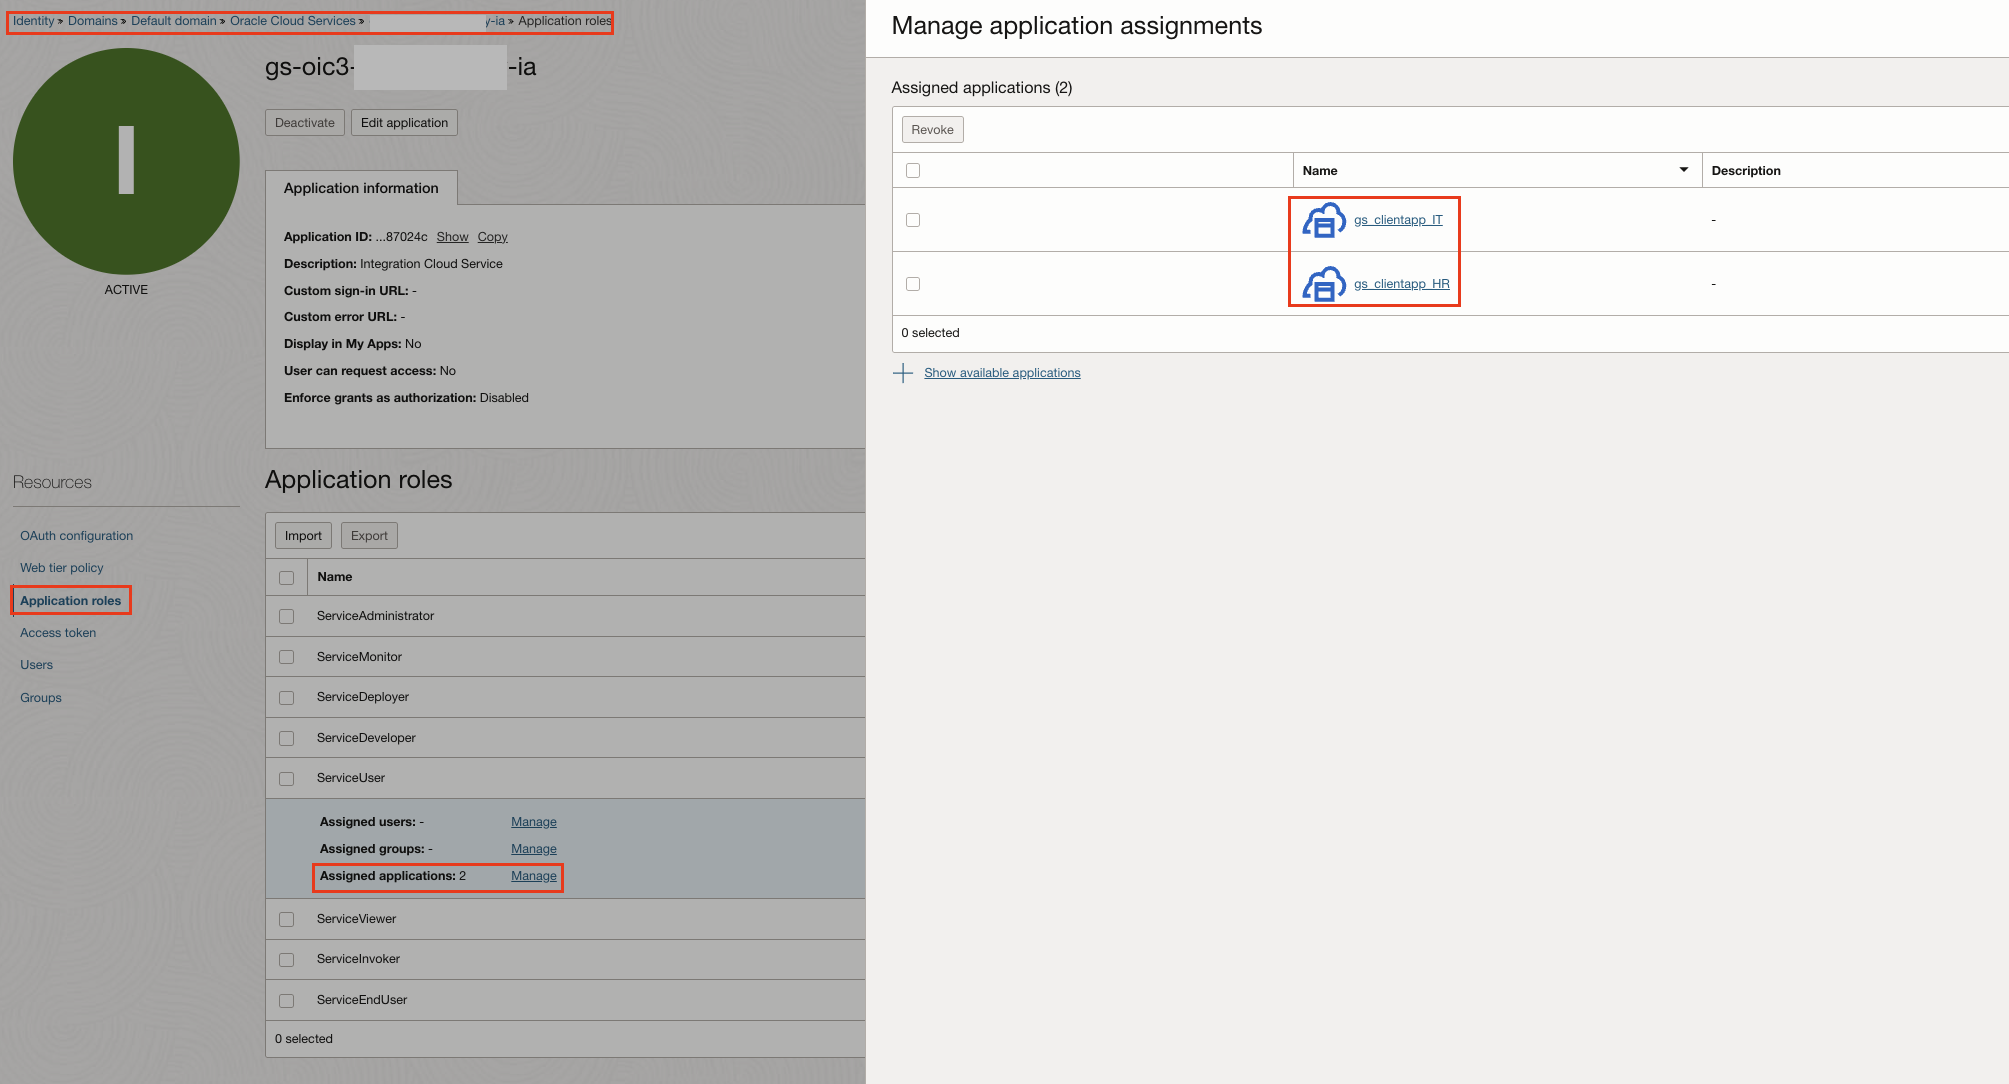
- In the OCI Console, navigate to Identity & Security > Domains > Oracle Cloud Services.
- Open the respective Integration Cloud Service application.
- Under Application Roles, expand the ServiceUser role to assign both of the OAuth Client Confidential applications.
- Save.
4. Creates an OCI IAM Confidential Application with Application Administrator Role
This is required for the Authorizer function to retrieve OAuth client app information from OCI IAM and also to handle scenarios where customer can have multiple OAuth client apps for different OIC instances.
- Carry out the steps 1, 2 and 3 as mentioned above in step 2.
- Select Introspect under Allowed Operations.
- Under App Roles , click Add Roles to select Application Administrator.
- Save and Activate the app.
- Copy the Client ID and Secret in a notepad.
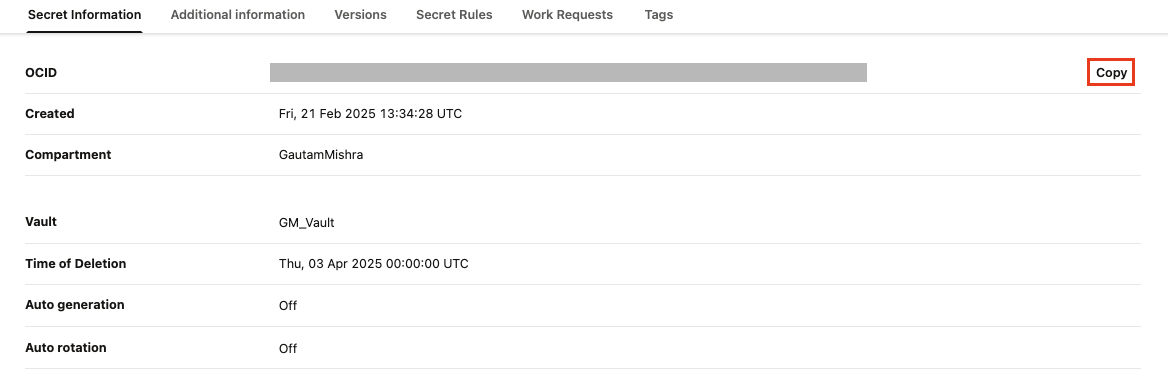
Create the Secrets in OCI Vault –
Now as a best practise Rohit stores the OAuth client’s secrets in the OCI vault. He used OCI Vault manual secret generation option to store the secret collected from Step 1.4. Grabbed the secret OCID once the secret is ready to use. For more information, see Creating a Secret in a Vault.
Create and configure the authorizer function
Before configuring the API Gateway, Rohit creates an Authorizer function to carry out the token exchange for the received Access Token (AT) in the incoming request to Gateway. The OCI Authorizer function decodes the AT to extract the scope and retrieves AppID from the client application. It then generates a new AT with the “urn:opc:resource:consumer::all ” scope and sends this token along with the scope to the API Gateway route, ensuring secure and authorized access. This is how its done!
- Rohit created an application, which serves as a logical grouping of functions in OCI Functions. The application’s properties define resource allocation and configuration for all functions within it. For detailed instructions, refer to Creating Applications. Note: Provisioned concurrency can be be enabled to reduce initial provisioning time and ensure “hot starts“.
-
After creating the application, configured it by adding the necessary settings. This allows the function code to dynamically retrieve key parameters, enhancing portability and flexibility without requiring code modifications. The Client ID from Step 1.4 , secret OCID from Step 2 and the Domain URL from the Domain Information.

-
To create the function, navigate to Getting Started and selected Launch OCI Cloud Shell to open an interactive, Linux-based shell in your browser. Once loaded, you can seamlessly create, develop, and deploy the custom authorizer function directly from the OCI Cloud Shell.
-
To create the function using the Fn Project CLI, run the following command for a Python function:
fn init --runtime python MyCustomAuthorizer, then press Enter. -
The foundation of the function is now set, ready to be tailored with your custom authorizer logic. Navigate to the function directory, open the
func.pyfile, and seamlessly replace the existing code with the func.py from the git repo. -
Also copy
ociVault.pyfile from the git repo in the same folder. This utility function reads the secrets from the OCI Vault service. -
Also include the
requirements.txtfile before deploying the functions application. -
Navigate to the function folder and run the following command
fn -v deploy --app MyCustomAuthorizerto deploy it.
Create and configure the OCI API Gateway
When exposing OIC integrations to external clients, API Gateway enforces authentication and authorization, ensuring only authorized users can access sensitive data.
- Created a new API gateway and then creating a new deployment on the API gateway using the doc.
- Provided the Basic Information such as Name and Path prefix.
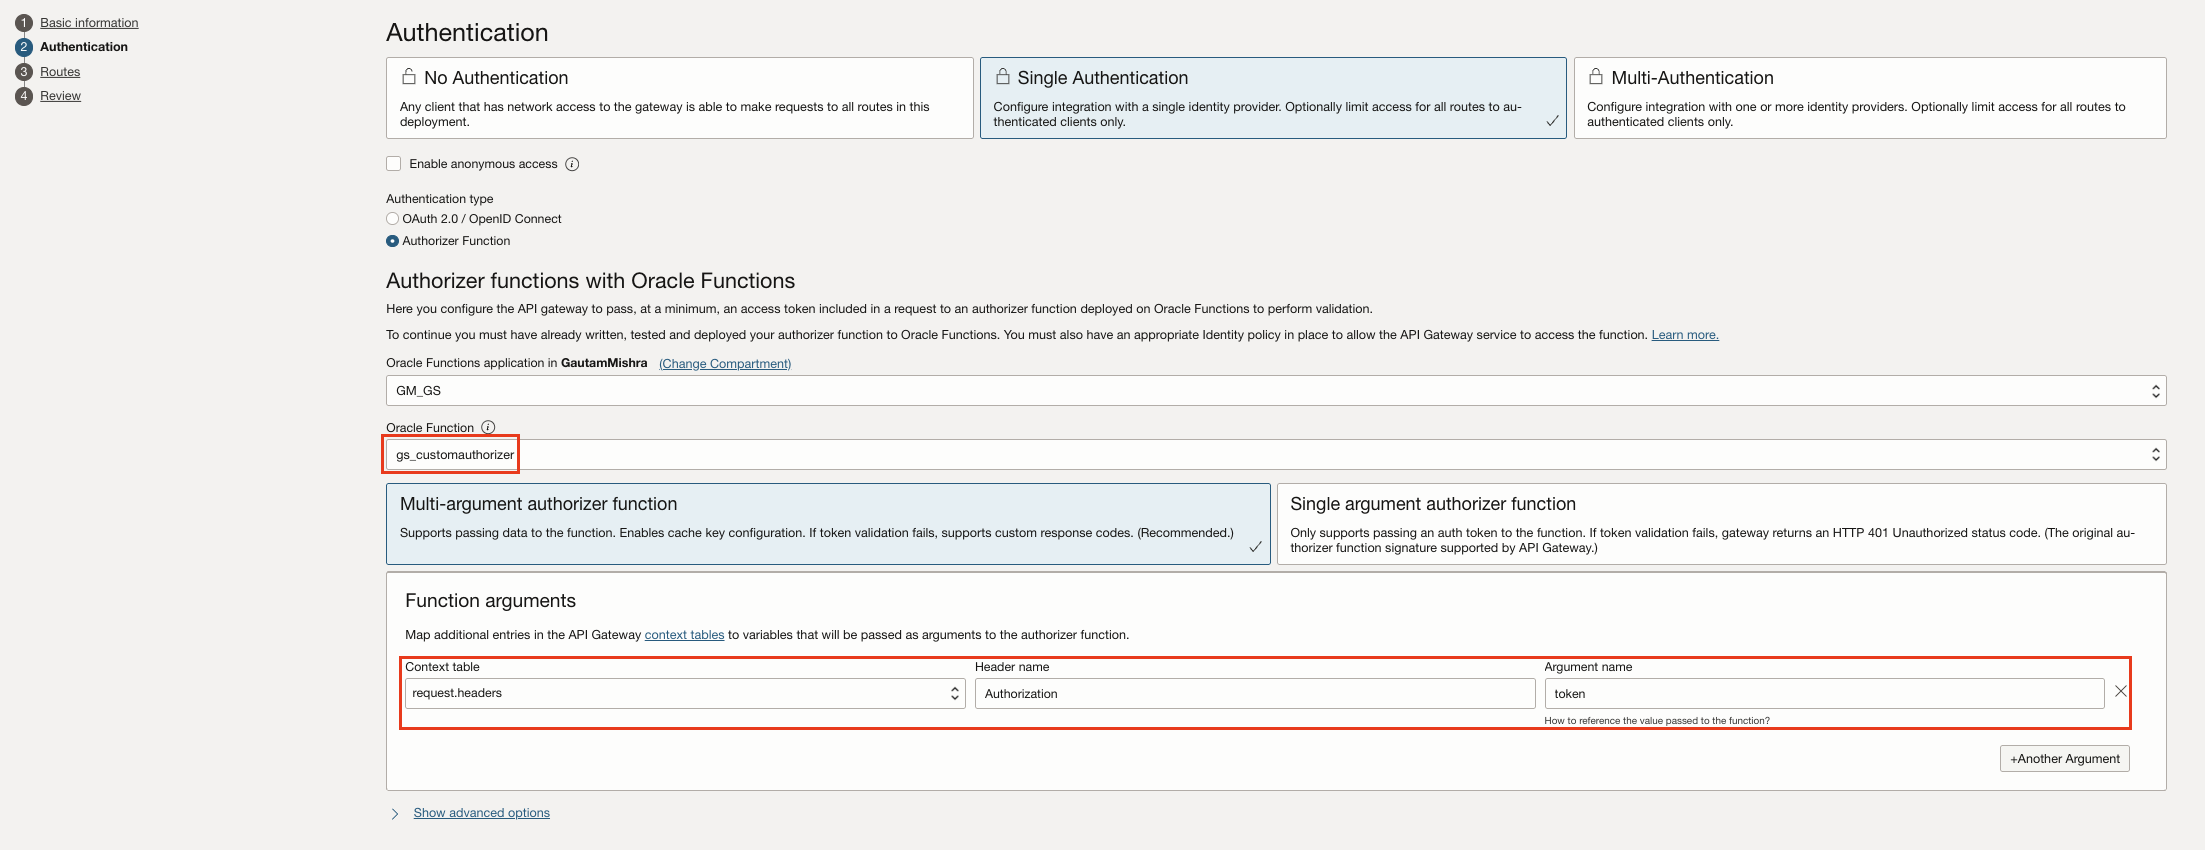
- Proceeds with Authentication section to configure the API gateway to pass, at a minimum, an access token included in a request to the configured authorizer function for validation. Here we also pass the request.path as argument to the authorizer function.
- Defines different Routes for different OIC Integrations.
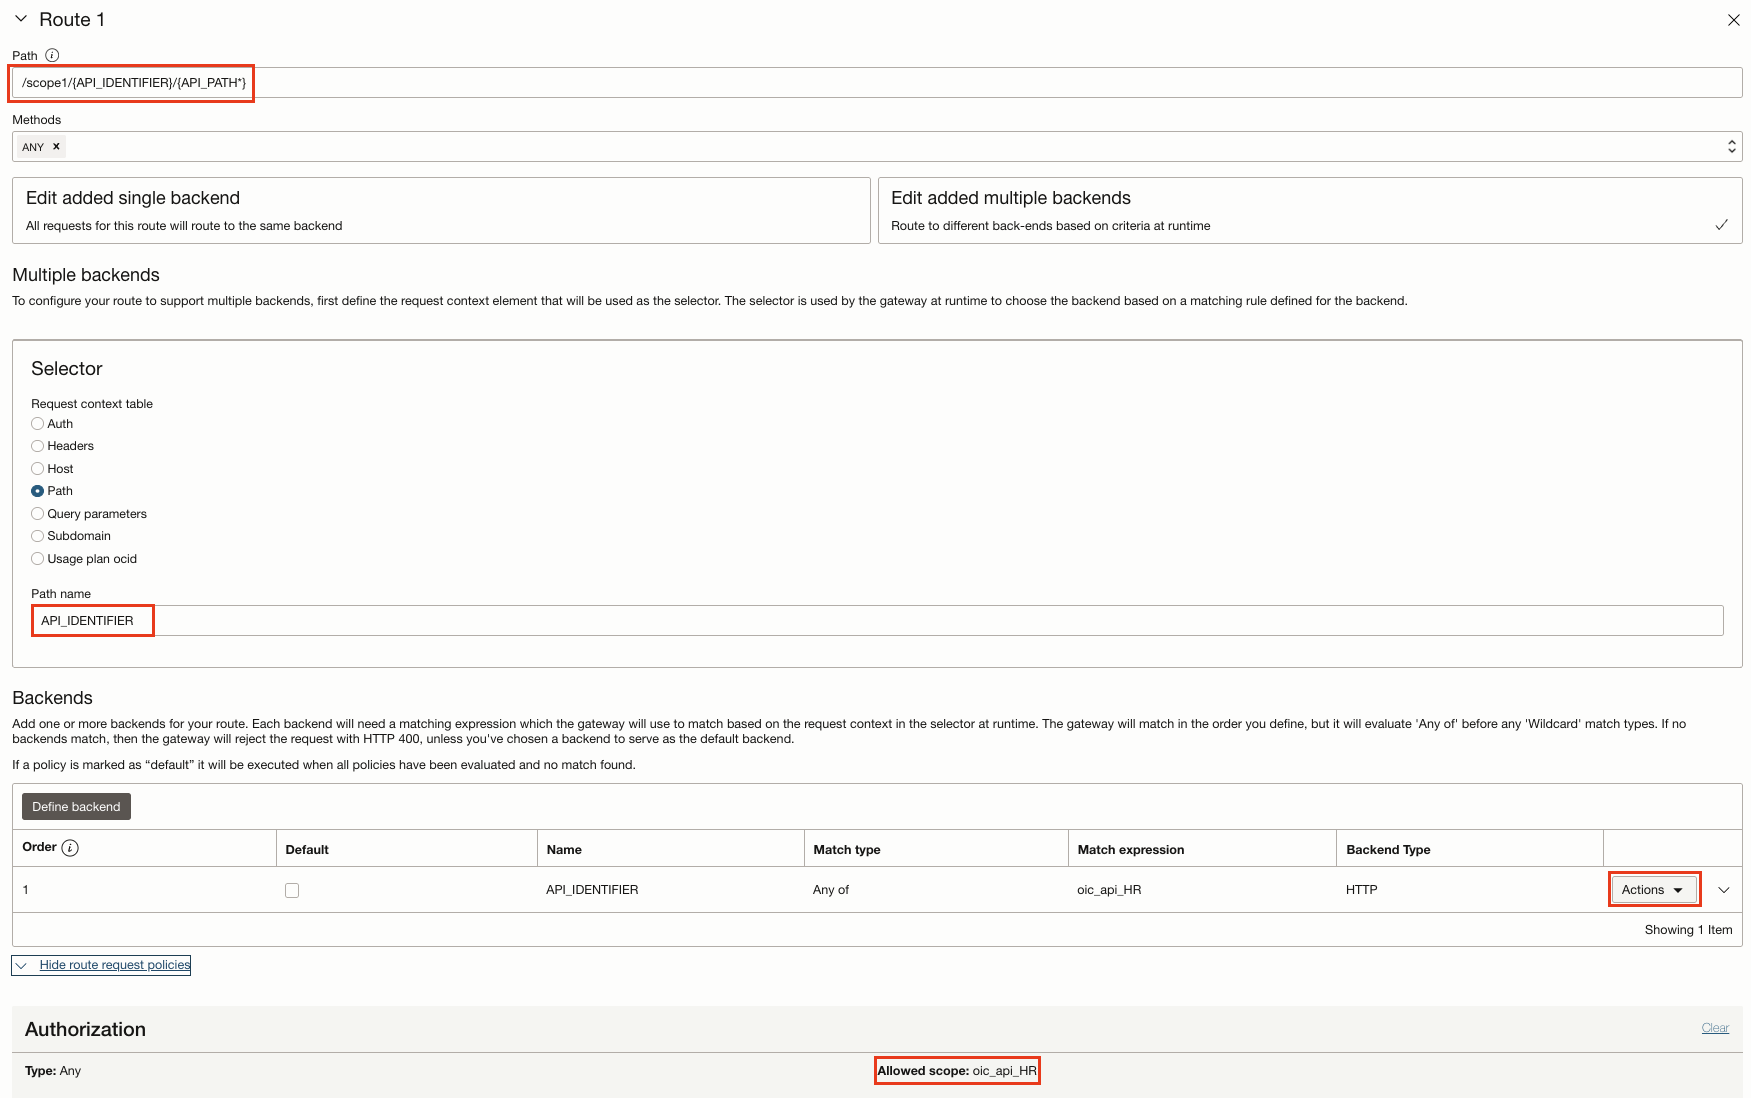
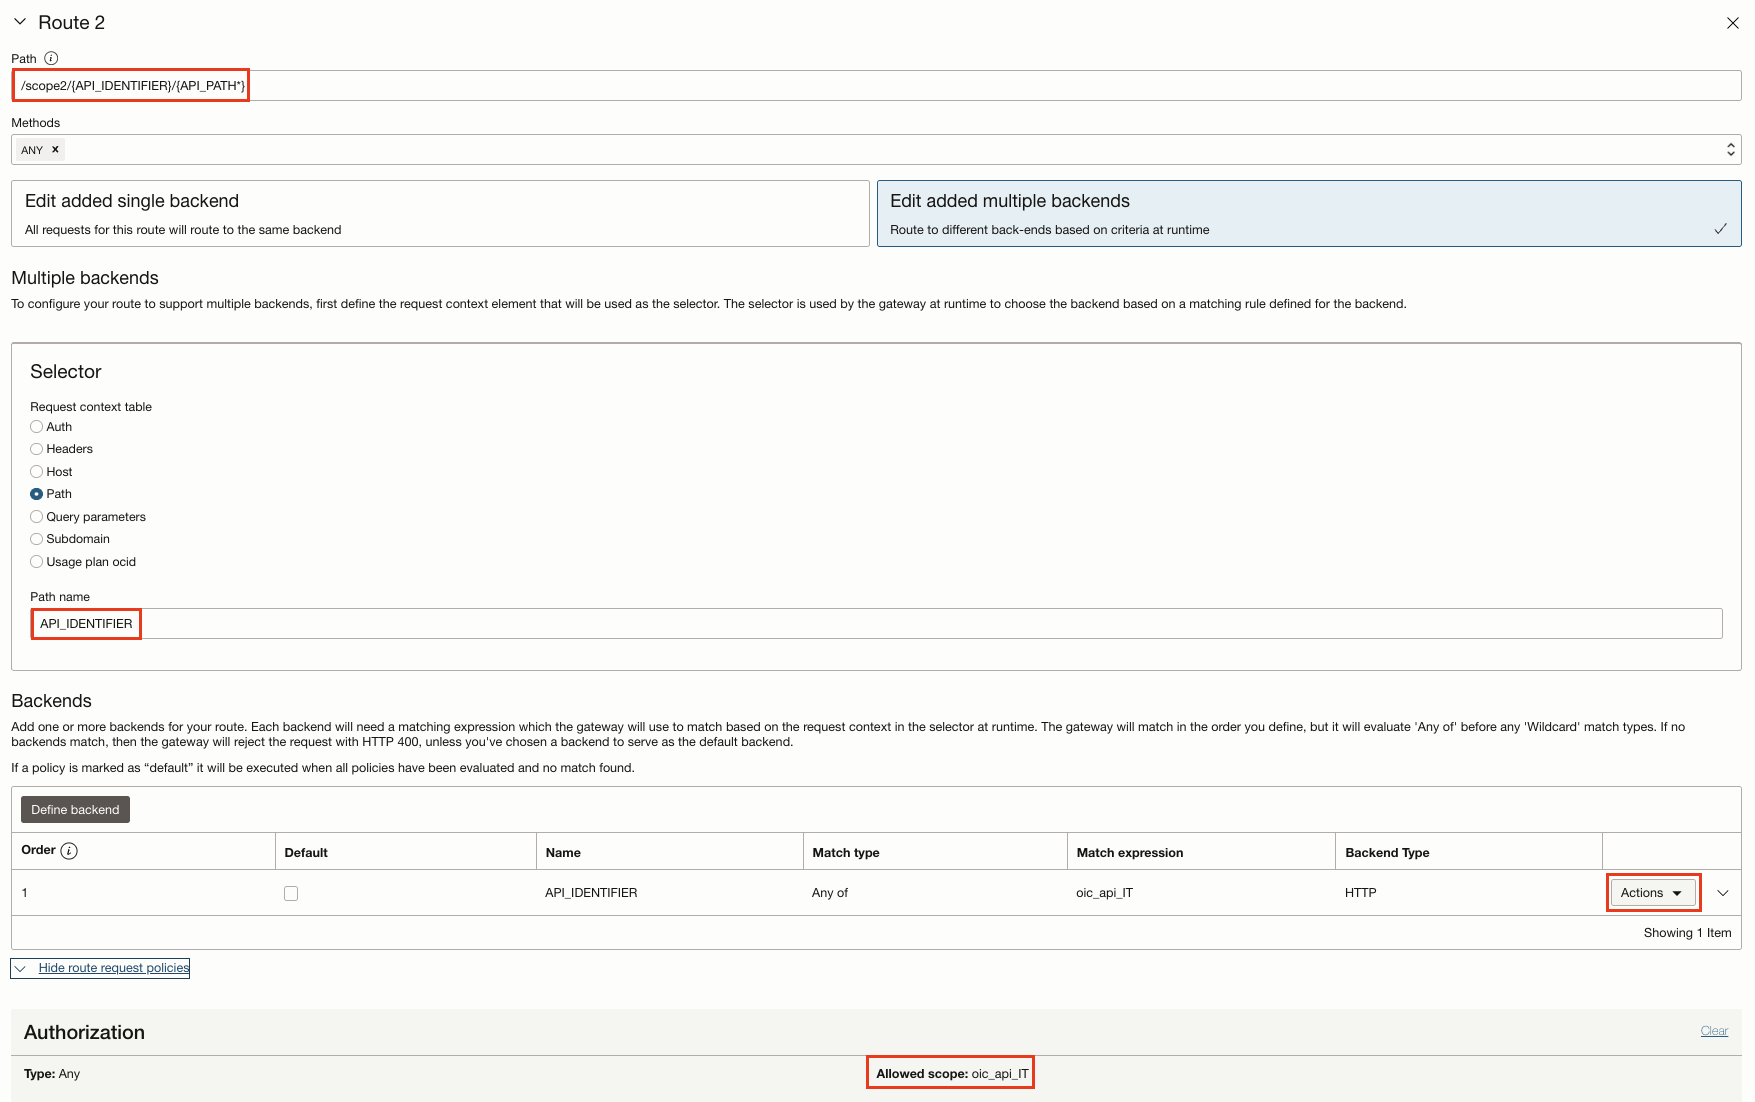
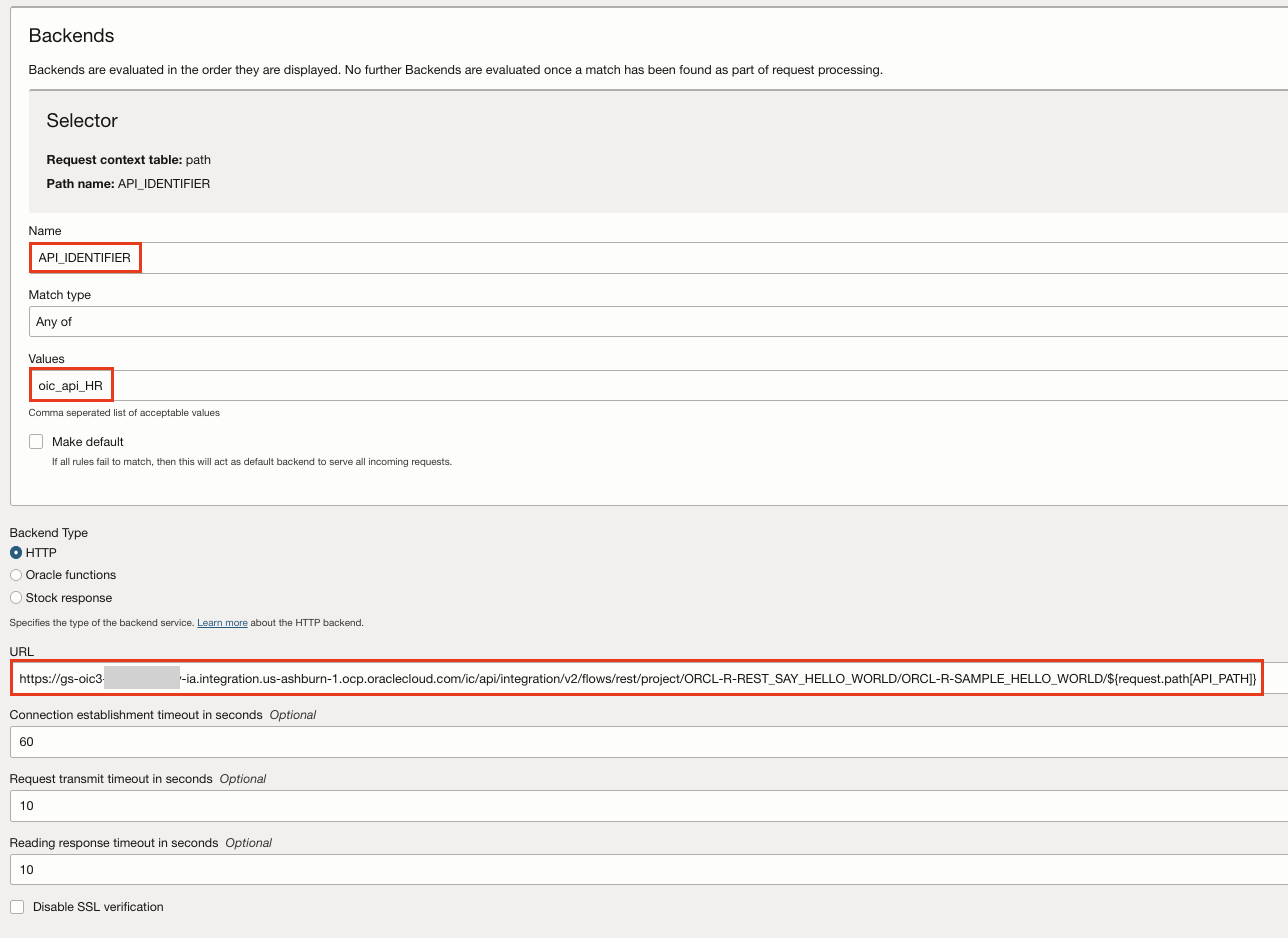
- Select Multiple Backends to configure the defined request context element to be used as the selector. The selector is used by the gateway at runtime, to redirect the request to the backend based on a defined matching rule. If the expression or the backend is mismatched, the gateway will reject the request with HTTP 400.
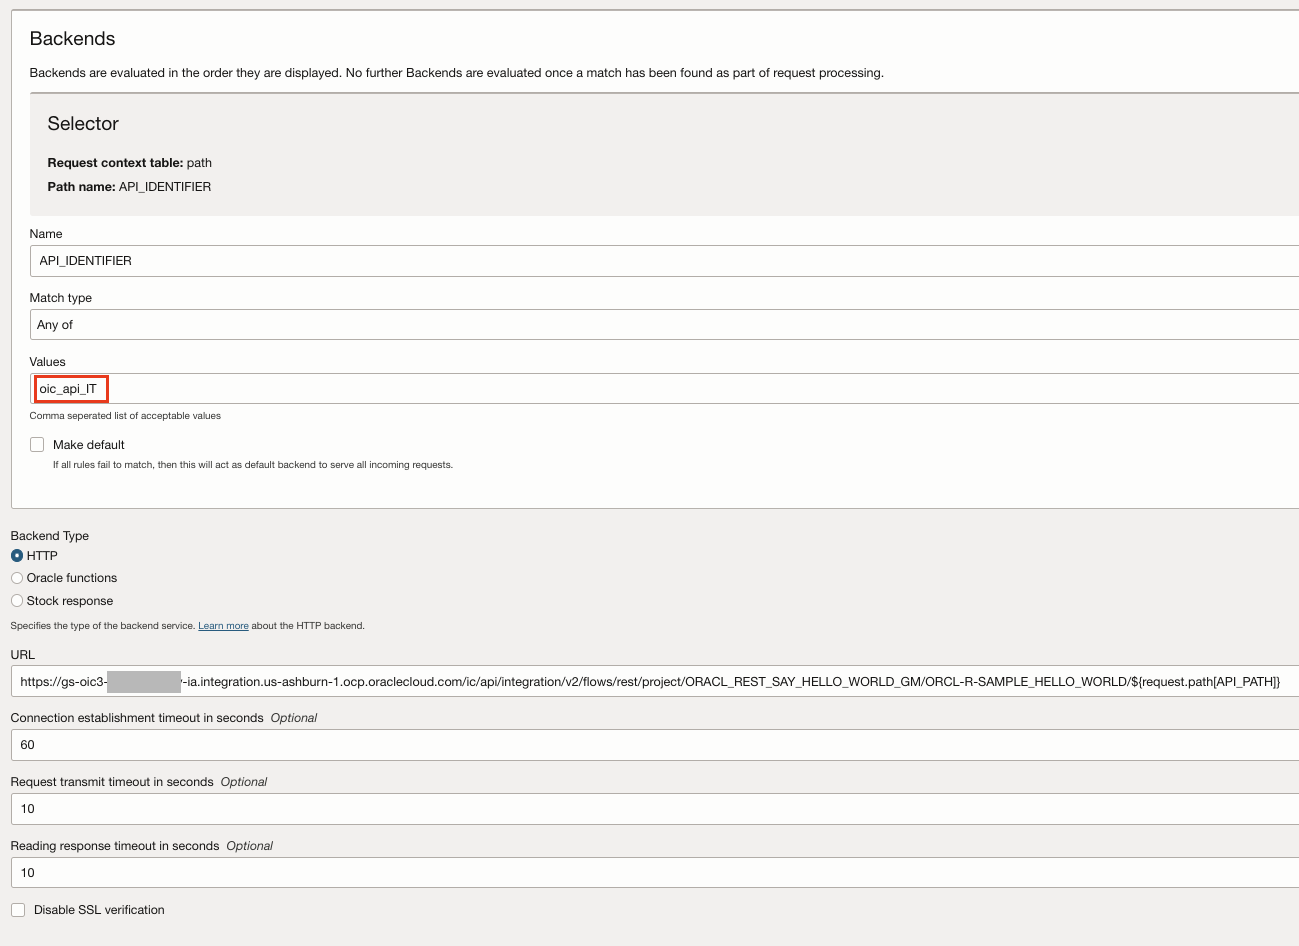
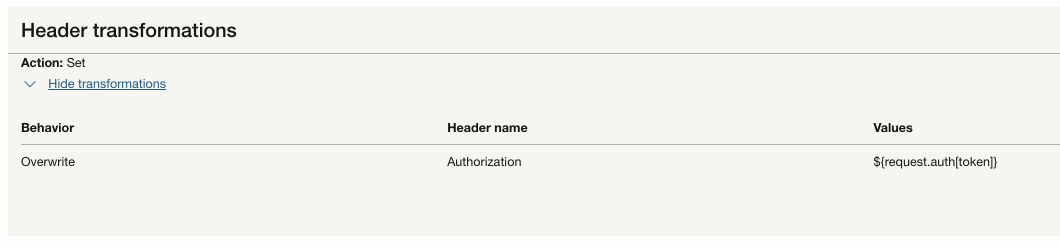
- Adds a Header Transformation Rule in the Route request Policy of both the Routes to set a response header ${request.auth[token]}.This token is the new AT which was created by the authorizer function.
Testing
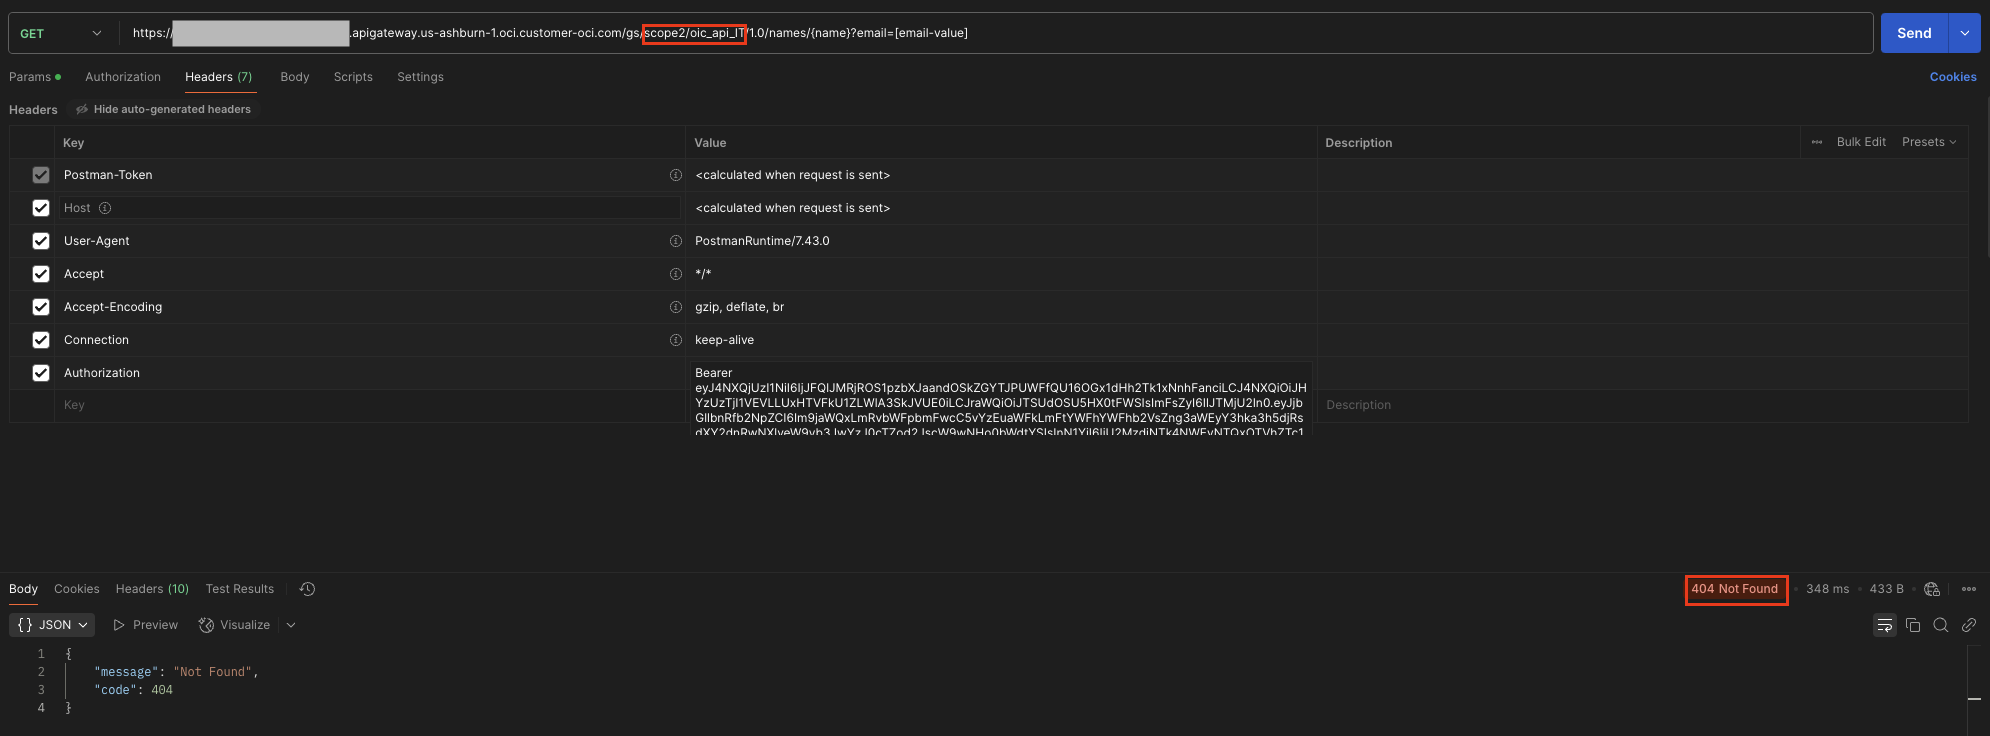
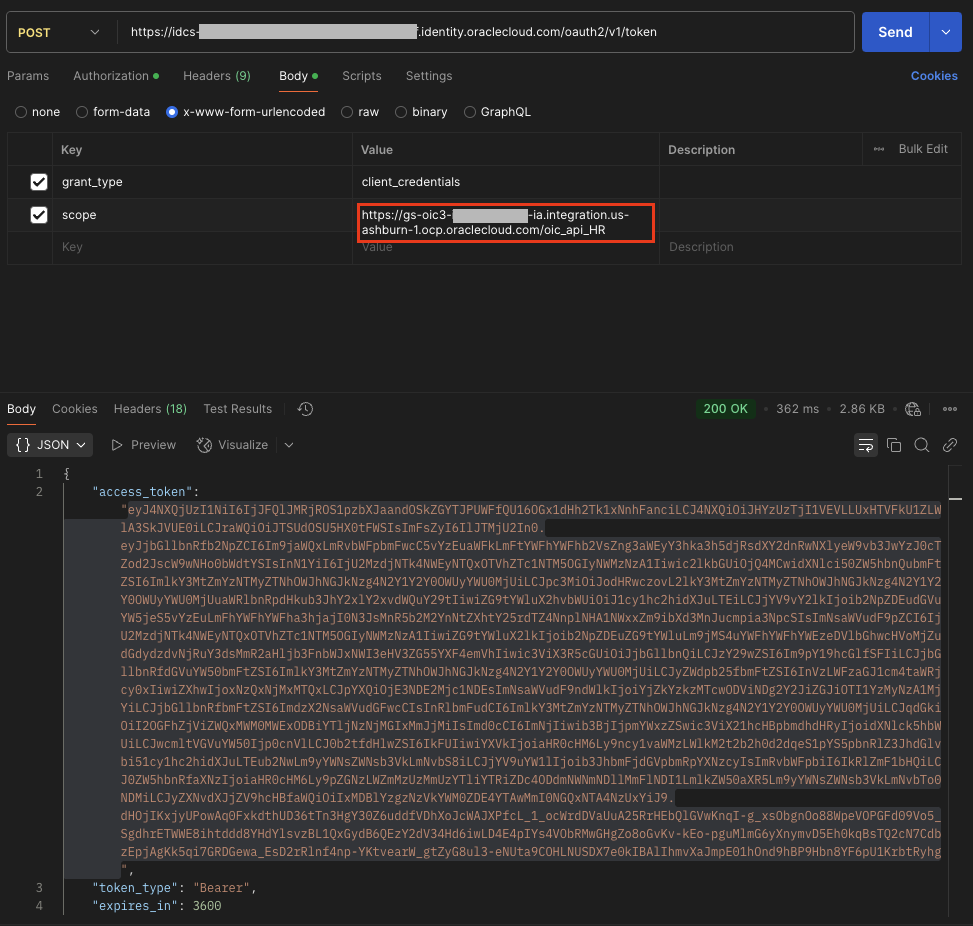
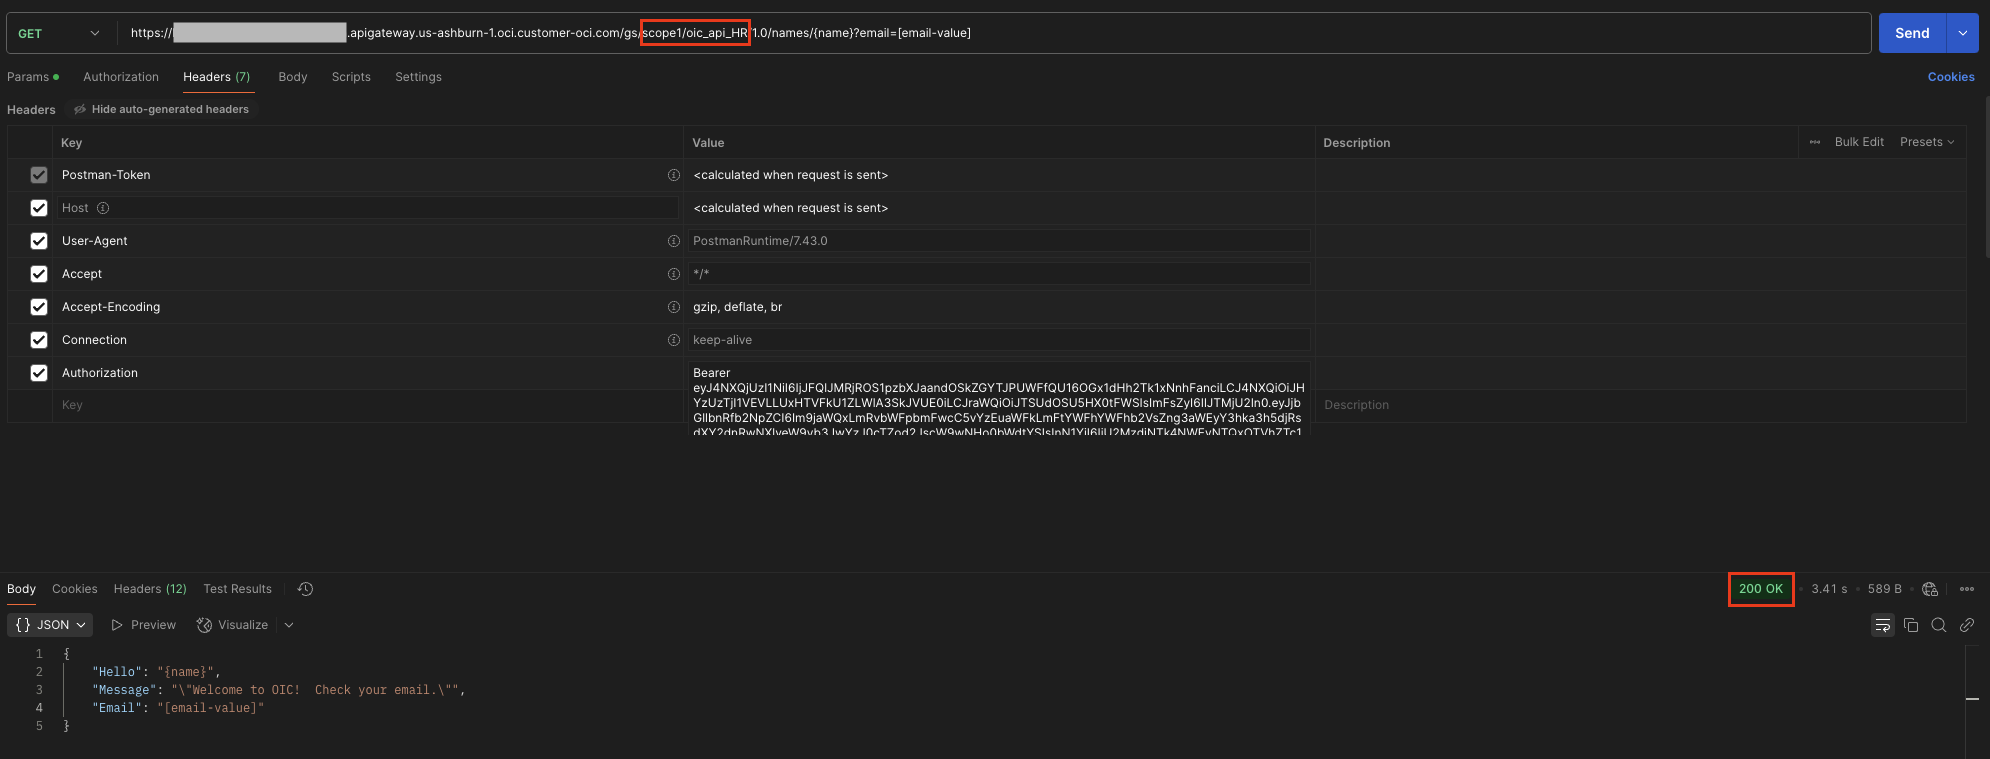
In order to test the configuration, Rohit had to just obtain the Access Token from OCI IAM using the Client ID and Secret of one of the OAuth Client application.The allowed scope has to be sent in the request. Now with the obtained Access Token, he needs to invoke the API on Oracle API Gateway in order to receive a successful 200 OK response from the Oracle Integration REST trigger flow.
If the same AT is used to invoke a different Oracle Integration REST trigger flow, which is actually configured for a separate scope, then the API Gateway sends 404 Not Found as response.