
Introduction
Cost reports are most useful when the resources generating cost can be grouped into dimensions that matter to the business. For OCI Compute, dimensions such as network scope, operating system, shape family, and memory can help answer questions like:
- How much am I spending on public-facing instances versus private instances?
- How much of my compute spend is Linux versus Windows?
- How much compute spend is associated with flexible shapes and larger memory allocations?
Cost Analysis View
OCI Cost Analysis supports filtering and grouping by tags. Oracle also notes that all tags, not only cost-tracking tags, are supported in Cost Analysis, and that tag-based cost visibility is based on when the tag is associated with the resource. This means it is better to tag resources as early as possible in their lifecycle. After the metadata tags are populated, they can be used in OCI Cost Analysis to group or filter compute spend. For more details, see Cost Analysis.
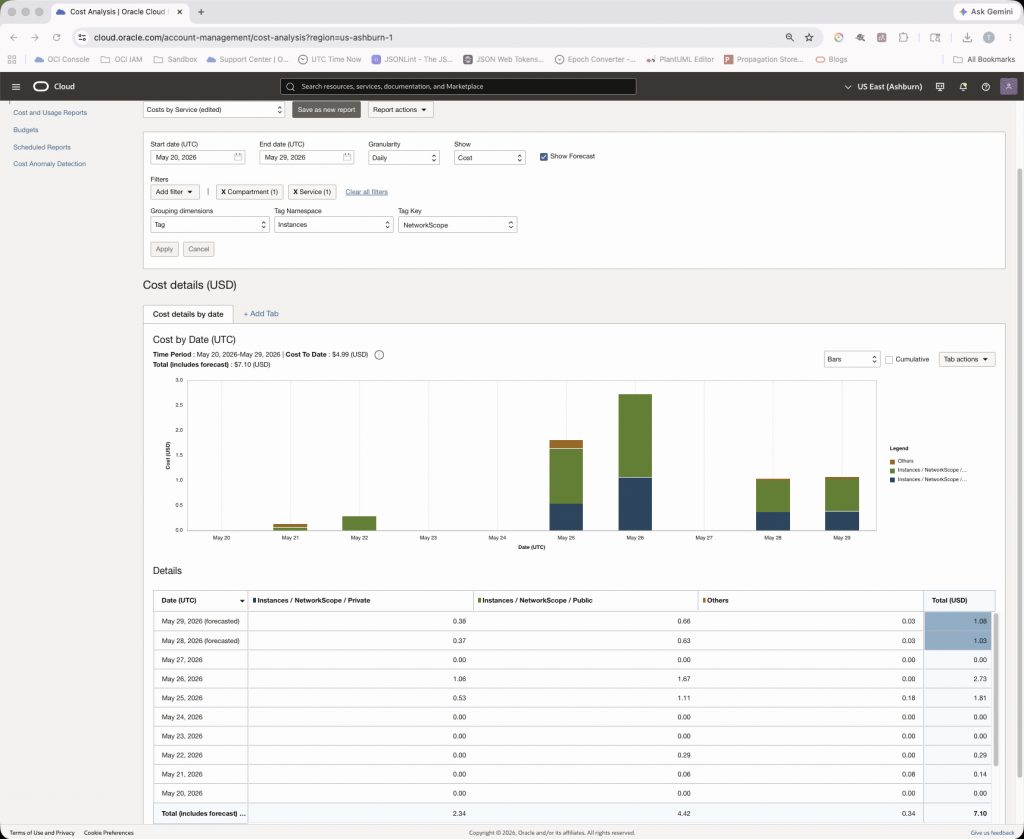
Note: Cost Analysis data can take time to appear. Newly applied tags may not show up immediately, and tag-based reporting does not fully backfill historical costs from before the tag was associated with the resource.
Solution Architecture
This implementation uses two OCI Functions:
- Reconcile: a scheduled function that scans a configured compartment and all child compartments, then corrects or backfills compute metadata tags.
- React: an event-driven function that is triggered when a new compute instance launch completes, so new instances are tagged close to creation time.
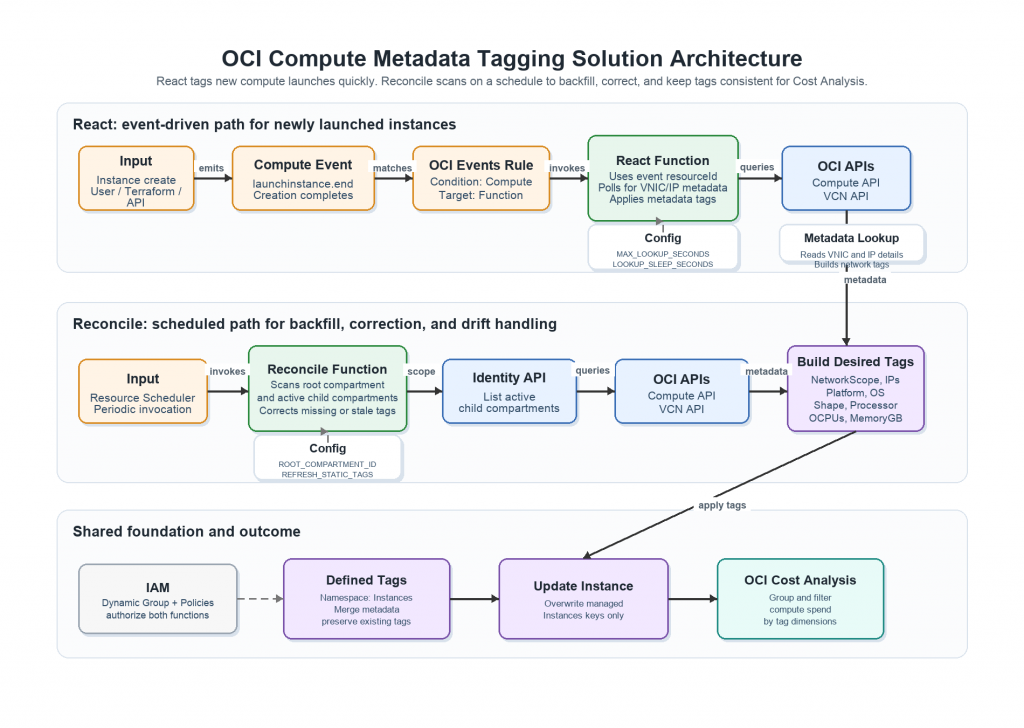
The event-driven function gives near real-time metadata tagging. The reconciler acts as the consistency layer and is useful for backfilling older instances, correcting missed events, and periodically aligning tags with live metadata.
The complete implementation code for both OCI Functions is available in the GitHub repository below:
https://github.com/toabose15/oci-compute-metadata-taggerObjectives
By the end of this implementation, you will be able to:
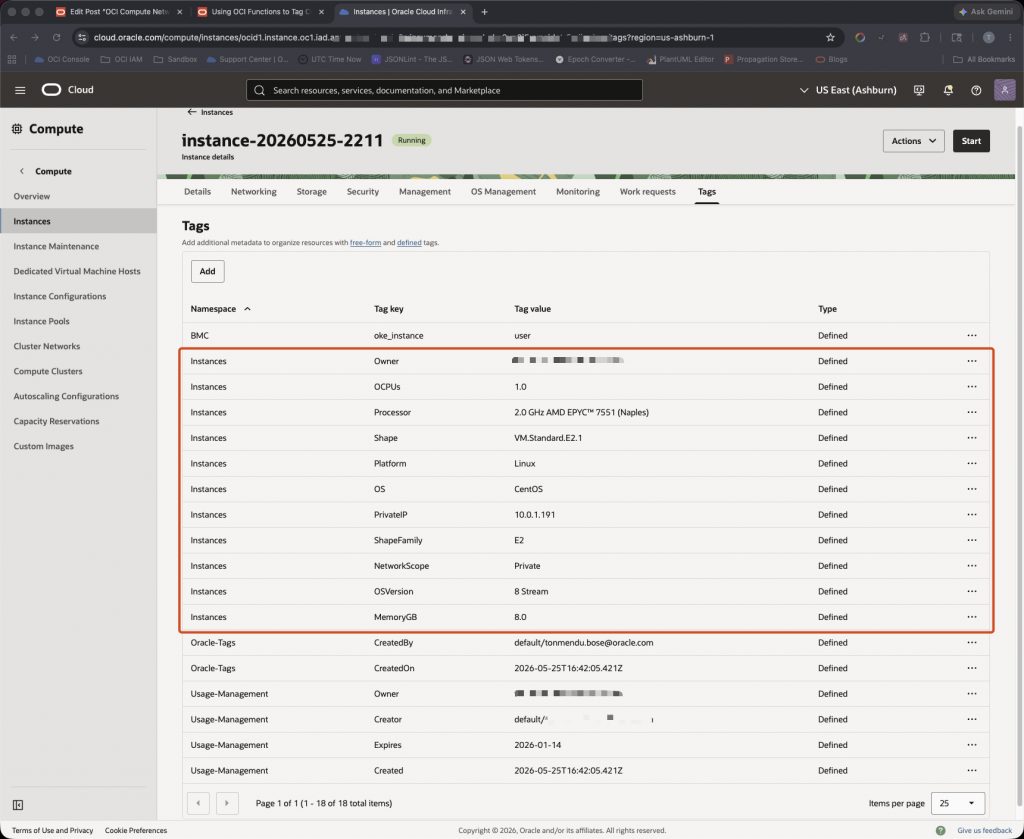
- Create a standard defined tag namespace for compute metadata.
- Tag OCI Compute instances with metadata useful for Cost Analysis and cost reports.
- Deploy a scheduled reconciliation function.
- Deploy an event-driven tagging function for newly launched instances.
- Configure the reconciler to scan one compartment and its child compartments.
- Configure the event-driven function for launch-time tagging behavior.
- Validate both functions using manual invocation and instance creation.
- View cost usage data based on the tag-keys created initially.
Prerequisites
You will need:
- Access to an OCI tenancy.
- Permission to create or manage OCI Functions, Applications, Events rules, dynamic groups, policies, and tag namespaces.
- A compartment where the OCI Functions application will be created.
- A VCN and subnet for the OCI Functions application.
- Network access from the Functions subnet to OCI service APIs.
- Cloud Shell access, or a local environment with Fn CLI, Docker, and OCI CLI configured.
- A compartment OCID that will be used as the root scan scope for the reconciler.
Section 1: Foundation Setup
Dynamic Groups and Policies
The functions use resource principal authentication. This allows the running function to call OCI APIs without storing user credentials in the function code or configuration.
Create the dynamic group & policies from the IAM domain. One dynamic group for the function, one for the resource scheduler. Both resources need to be granted authorization to perform the actions.
- Open the OCI Console navigation menu.
- Go to Identity & Security.
- Under Identity, select Domains.
- Open the domain where the dynamic group should be created.
- Select Dynamic groups.
- Create a dynamic group.
- Add a matching rule for the functions compartment.
- Save the dynamic group.
- Go to Policies and create the required policy statements.
Example dynamic group and policies:
Dynamic group name:
compute-metadata-tagging-functions-dg

Dynamic group matching rule for the function:
ALL {resource.type = 'fnfunc', resource.compartment.id = '{function_compartment_ocid}'}

Dynamic group name:
resource_schedule_dynamic_group

Dynamic group matching rule for the scheduler:
ALL {resource.type='resourceschedule', resource.id='{resource_schedule_ocid}'}

Policies:
Allow dynamic-group compute-metadata-tagging-functions-dg to inspect compartments in tenancy
Allow dynamic-group compute-metadata-tagging-functions-dg to inspect instance-images in tenancy
Allow dynamic-group compute-metadata-tagging-functions-dg to use tag-namespaces in tenancy
Allow dynamic-group compute-metadata-tagging-functions-dg to use instances in compartment {target_compartment_name}
Allow dynamic-group compute-metadata-tagging-functions-dg to inspect vnic-attachments in compartment {target_compartment_name}
Allow dynamic-group compute-metadata-tagging-functions-dg to inspect vnics in compartment {target_compartment_name}
Allow dynamic-group {resource_schedule_dynamic_group} to manage functions-family in {target_compartment_name}Note: Update the resource_schedule_ocid once the schedule is created later in Section 2.
If the reconciler scans multiple compartments, replace the compartment-level policy scope with the parent compartment or tenancy scope that fits your governance model.
Tag Namespace and Tag Keys
Create a defined tag namespace and tag keys before deploying the functions or creating test instances. The functions update defined tags, so the namespace and keys must exist first.
At a high level, complete these steps:
- Go to Identity & Security.
- Under Tagging, select Tag Namespaces.
- Create a tag namespace named Instances.
- Inside this namespace, create each tag key listed below.
- Enable the Cost-tracking toggle, and use Tag value type as Static value.
- The Example value & Source columns are for reference only; these details are not required for creating the tag keys. The values will be updated by the function dynamically per resource.
| Tag Namespace | Tag Key | Tag value type | Example value | Source |
|---|---|---|---|---|
| Instances | NetworkScope | String | Public / Private | Derived from VNIC public IP presence |
| Instances | PrivateIP | String | 10.0.1.149 | Primary VNIC private IP |
| Instances | PublicIP | String | 129.x.x.x | Primary or first public IP, when present |
| Instances | Platform | String | Linux / Windows / Unknown | Derived from image OS |
| Instances | OS | String | Oracle Linux / Windows Server | Image metadata |
| Instances | OSVersion | String | 9 / 2022 | Image metadata |
| Instances | ShapeFamily | String | A1 / E5 / E4 | Derived from instance shape |
| Instances | Shape | String | VM.Standard.A1.Flex | Instance metadata |
| Instances | Processor | String | 3.0 GHz Ampere Altra | Instance shape config |
| Instances | OCPUs | String | 1.0 | Instance shape config |
| Instances | MemoryGB | String | 8.0 | Instance shape config |
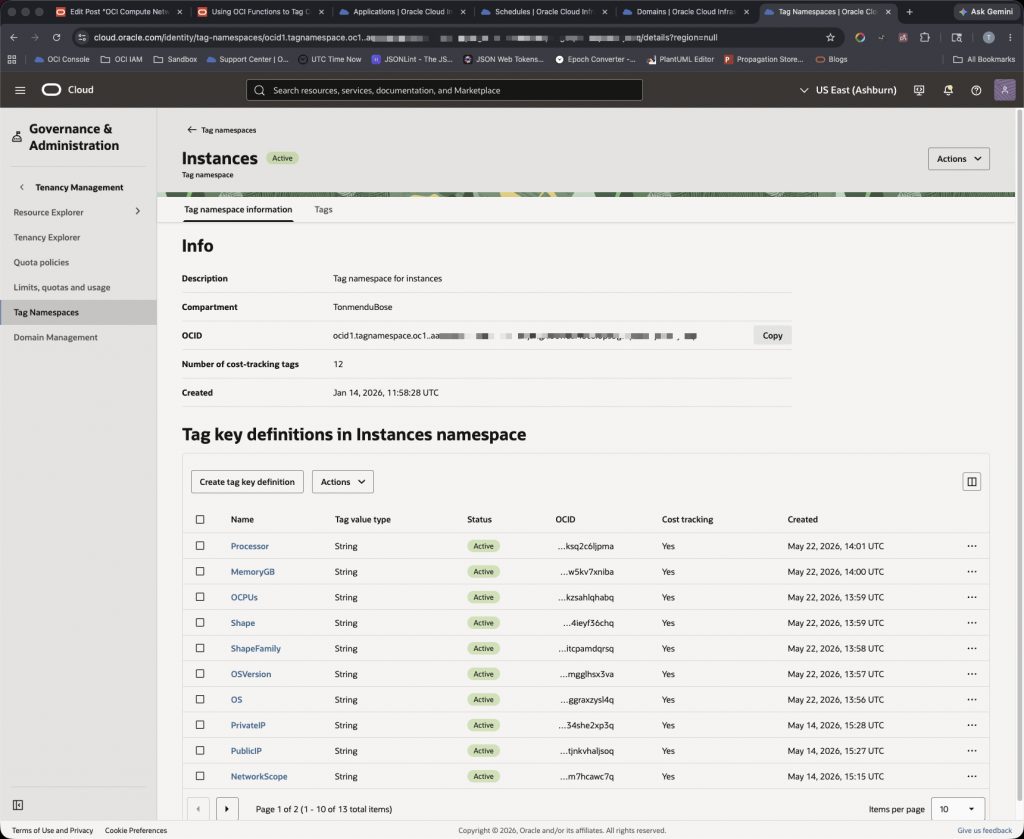
The tag namespace and key creation can be done as tenancy setup work from the tenancy home region. For more details, see Tags and Tag Namespace Concepts, Managing Tag Namespaces, and Managing Tag Key Definitions.
Cloud Shell and OCI Functions
Before deploying either function, prepare Cloud Shell and the Fn CLI context. The OCI Console provides a guided setup flow for this, and the same sequence is shown below with placeholders that can be replaced for your tenancy. For more details, see Functions: Get Started using the CLI.
If you have not created an OCI Functions application yet, create one from the OCI Console:
- Open Developer Services.
- Go to Functions.
- Select Applications.
- Create an application.
- Select the compartment and subnet where the functions will run.
- Select the shape as GENERIC_X86.
- Create the application.
Step 1: Launch Cloud Shell
Launch Cloud Shell from the OCI Console. Ensure that architecture is set to X86_64.
Step 2: Use the context for your region
fn list context fn use context {region_identifier}Example: fn use context us-ashburn-1
Step 3: Update the context with the function compartment OCID
fn update context oracle.compartment-id {function_compartment_ocid}Example: fn update context oracle.compartment-id ocid1.compartment.oc1..XXX
Step 4: Provide a unique repository name prefix
fn update context registry {region_key}.ocir.io/{tenancy_namespace}/{repo_name_prefix}Example: fn update context registry iad.ocir.io/XXX/XXX
Step 5: Set the image repository compartment OCID
fn update context oracle.image-compartment-id {image_compartment_ocid}Example: fn update context oracle.image-compartment-id ocid1.compartment.oc1..XXX
Step 6: Log in to the registry with username + auth token
docker login -u '{tenancy_namespace}/{domain}/{user_name}' {region_key}.ocir.ioExample: docker login -u 'XXX/default/username' iad.ocir.io
Step 7: Verify the setup
fn list apps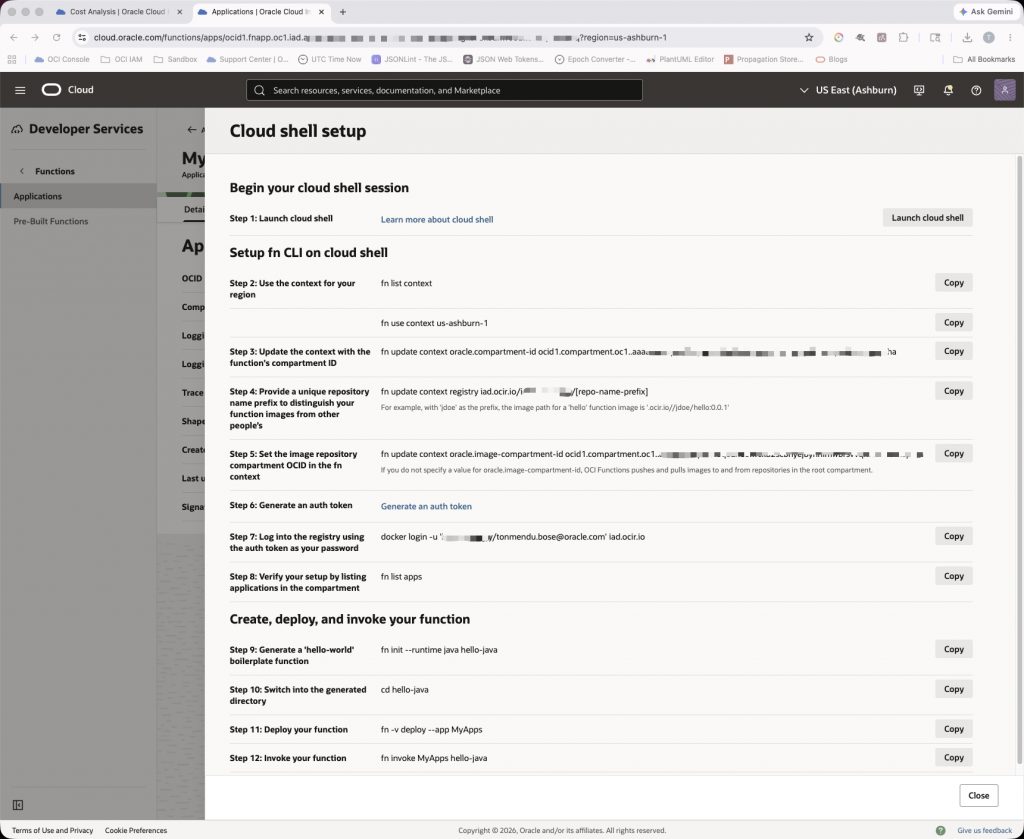
Creation, deployment, and invocation of those functions are covered in the upcoming sections.
Section 2: Setup ‘Reconcile’ function
The reconciler is the periodic source of consistency. It scans a configured compartment and all active child compartments, lists compute instances, reads live VNIC and compute metadata, and updates the Instances defined tags when values are missing or stale.
Deploy the function
From Cloud Shell, clone or open the repository that contains the function code.
git clone https://github.com/toabose15/oci-compute-metadata-tagger
cd oci-compute-metadata-tagger/scheduled-reconciler
Ensure that the below files are present:
func.py
func.yaml
requirements.txt
Deploy the reconciler function:
fn -v deploy --app {function_application_name}Alternately, the function can be created manually by defining the runtime environment first.
fn init --runtime python scheduled-reconciler
cd scheduled-reconciler
The scheduled-reconciler directory will have the standard files generated for the boilerplate function. Replace the contents of the files func.py, func.yaml & requirements.txt with the contents of the repository mentioned earlier. Once done, deploy the function to your application from the same directory.
fn -v deploy --app {function_application_name}Configure the function
Once deployed, the Reconcile function needs two configuration keys:
- ROOT_COMPARTMENT_ID: It scans that compartment and all active child compartments.
- REFRESH_STATIC_TAGS: It controls how the reconciler treats metadata that normally does not change during the life of an instance.
- false: these tags are updated only if they are missing, empty, or set to Unknown. This keeps the reconciler focused on dynamic values while still filling gaps.
- true: these tags are refreshed on every reconciler run.
The keys can be setup by navigating into the ‘Configuration’ tab of the deployed function.
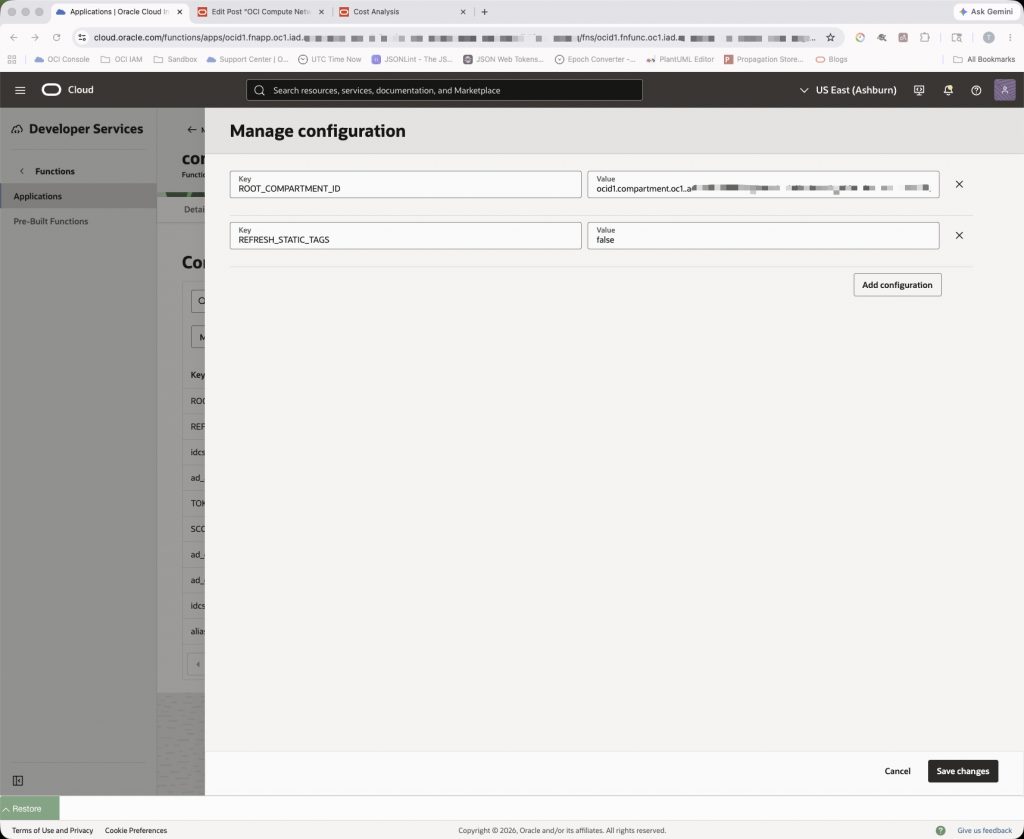
Alternately, this step can also be done by OCI CLI:
oci fn function update \
  --function-id {reconciler_function_ocid} \
  --config '{"ROOT_COMPARTMENT_ID":"{compartment_ocid}","REFRESH_STATIC_TAGS":"false"}'
For more details, see Passing Custom Configuration Parameters to Functions.
Schedule the function
After validation, schedule the reconciler to run periodically. The right schedule depends on how quickly your environment changes.
On the deployed function page, navigate to ‘Schedules’ tab & add a schedule.
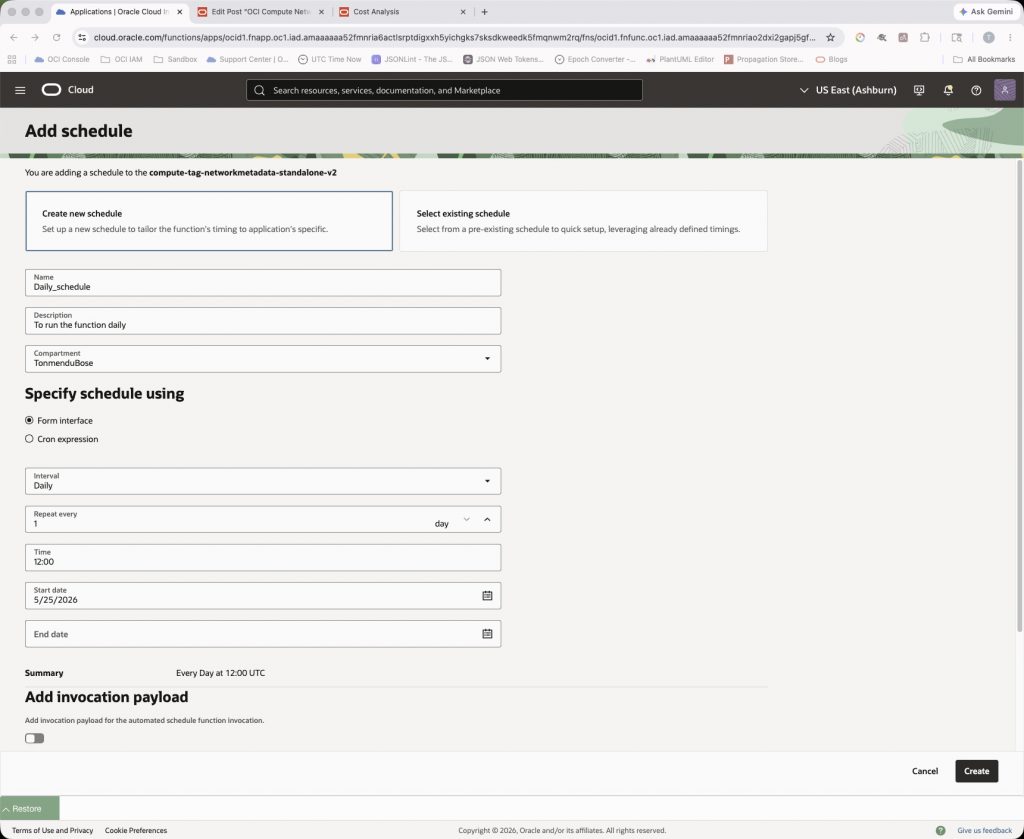
If your compute instances follow an auto-start schedule, set the function schedule accordingly to accommodate this.
Section 3: Setup ‘React’ function
The event-driven function tags new compute instances when a launch completes. This gives near real-time metadata tagging without waiting for the next reconciler run. For more details, see Services that Produce Events.
Deploy the function
The deployment steps are similar to the ones discussed in Section 5. If the deployment approach is manual, ensure that the source code from XXX is used in this scenario. In Cloud Shell, from your home directory move to the event-driven function folder.
cd oci-compute-metadata-tagger/event-reactorEnsuring that the requisite files are present , deploy the code.
fn -v deploy --app {function_application_name}Provisioned Concurrency consideration (Optional)
When Terraform or another automation creates multiple instances at the same time, the Events service can trigger multiple function invocations close together. Provisioned concurrency can reduce initial invocation latency and help absorb these bursts.
Example sizing guidance:
Expected simultaneous launches: 10
Suggested provisioned concurrency: 10 to 15
OCI provisioned concurrency is configured in provisioned concurrency units, and the valid increments depend on function memory. For more details, see Reducing Initial Latency Using Provisioned Concurrency.
Example CLI command:
oci fn function update \
  --function-id {event_function_ocid} \
  --provisioned-concurrency '{"strategy":"CONSTANT","count":10}'
Configure the function
The event-driven function uses two configuration keys to control how long it waits for VNIC and public IP metadata to become visible after instance launch.
Once deployed, the React function needs two configuration keys:
- MAX_LOOKUP_SECONDS: Maximum total time the function should spend trying to find VNIC and IP metadata before returning.
- LOOKUP_SLEEP_SECONDS: Wait time between lookup attempts.
Parameter guidance:
| Scenario | MAX_LOOKUP_SECONDS | LOOKUP_SLEEP_SECONDS | Notes |
|---|---|---|---|
| No provisioned concurrency | 10 to 30 | 3 to 5 | Keeps event invocations short. Reconciler handles drift. |
| Provisioned concurrency enabled | 60 to 180 | 3 to 5 | Allows more time for public IP visibility after launch. |
| Terraform burst launches | Match to concurrency plan | 3 to 5 | Size provisioned concurrency around expected burst. |
OCI provisioned concurrency is configured in provisioned concurrency units, and the valid increments depend on function memory. For more details, see Reducing Initial Latency Using Provisioned Concurrency.
The keys can be setup by navigating into the ‘Configuration’ tab of the deployed function.
Create the Events Rule
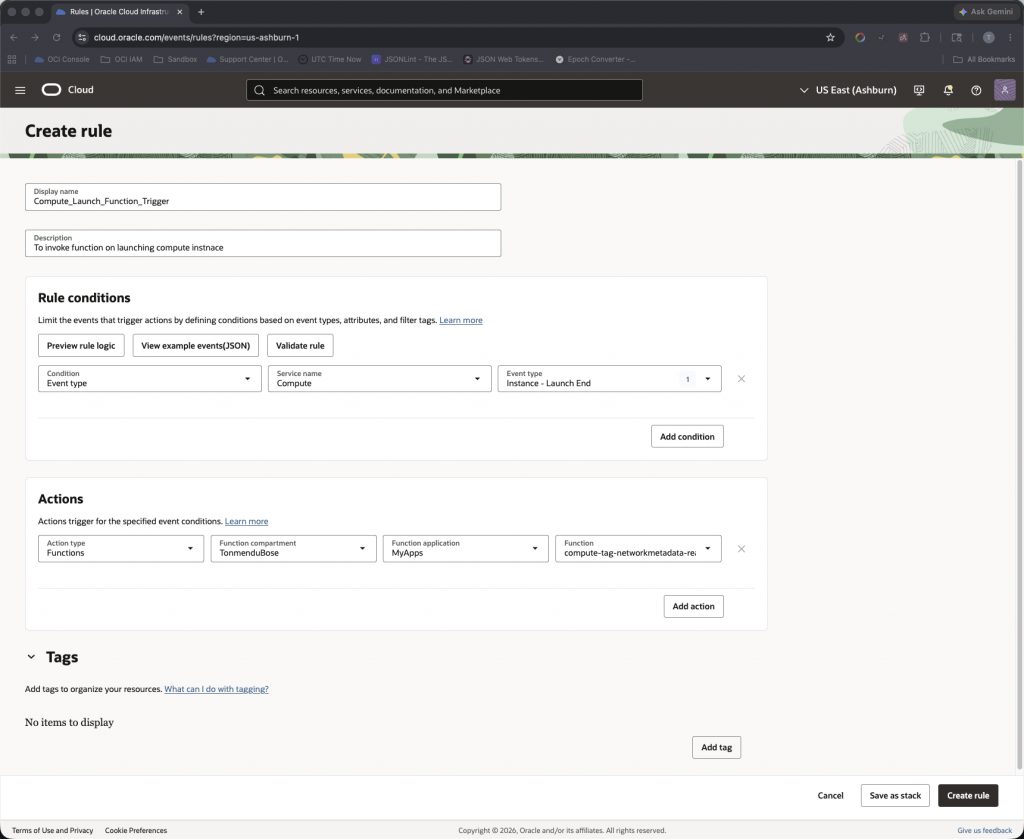
Create an OCI Events rule that invokes the event-driven function when a compute launch completes.
- Open the OCI Console navigation menu.
- Go to Observability & Management.
- Under Events Service, select Rules.
- Select the compartment (same as function) where the Events rule should be created.
- Select Create rule.
- Enter a rule name, for example compute-launch-metadata-tagging-rule.
- Add a description, for example Invoke a function when an OCI Compute instance launch completes.
- In Rule conditions, select Condition as Event type.
- Set Service name to Compute.
- Set Event type to the Instance – Launch End.
- In Actions, set Action type to Functions.
- Select the compartment & application.
- Select the function tag-instance-metadata-v2.
- Select Create rule.
Section 4: Testing and validation
Validate the Reconciler function
Confirm the reconciler has these configuration values:
ROOT_COMPARTMENT_ID={root_compartment_ocid}
REFRESH_STATIC_TAGS=false
While still logged into Cloud Shell, run the below to invoke the function:
fn invoke {function_application_name} scheduled-reconcilerExample response:
{
  "rootCompartmentId": "ocid1.compartment.oc1..example",
  "compartmentsScanned": 3,
  "instancesScanned": 12,
  "updated": 4,
  "unchanged": 8,
  "skippedNoVnic": 0,
  "imageLookups": 2,
  "imageCacheHits": 6,
  "errors": []
}
Validate the React function
Create a compute instance in the same compartment as the function. Wait for sometime after creation, then check & validate the tags.
Check cost usage reports
Oracle documentation for Viewing and Working with the Chart Data states, “Data can take up to 48 hours to appear in Cost Analysis.” Perform the below steps after allowing sufficient time for cost data to reconcile. From the OCI Console:
- Open Billing & Cost Management.
- Under Cost Management, click on Cost Analysis.
- Keep the reports category as Costs by Service and select the appropriate start & end dates.
- Next, add filters to select Service as COMPUTE. If the function’s scope is set to a particular compartment instead of tenancy, set the Compartment filter as well.
- Under Grouping Dimensions select Tag, select the Instances Tag Namespace, and choose the Tag Key as OS (for example) to get details on operation system.
- The tag key can be toggled to another value get cost usage based on a different criteria.
- Use the option Save as new report to save the selected filters as a Saved Report for later viewing.
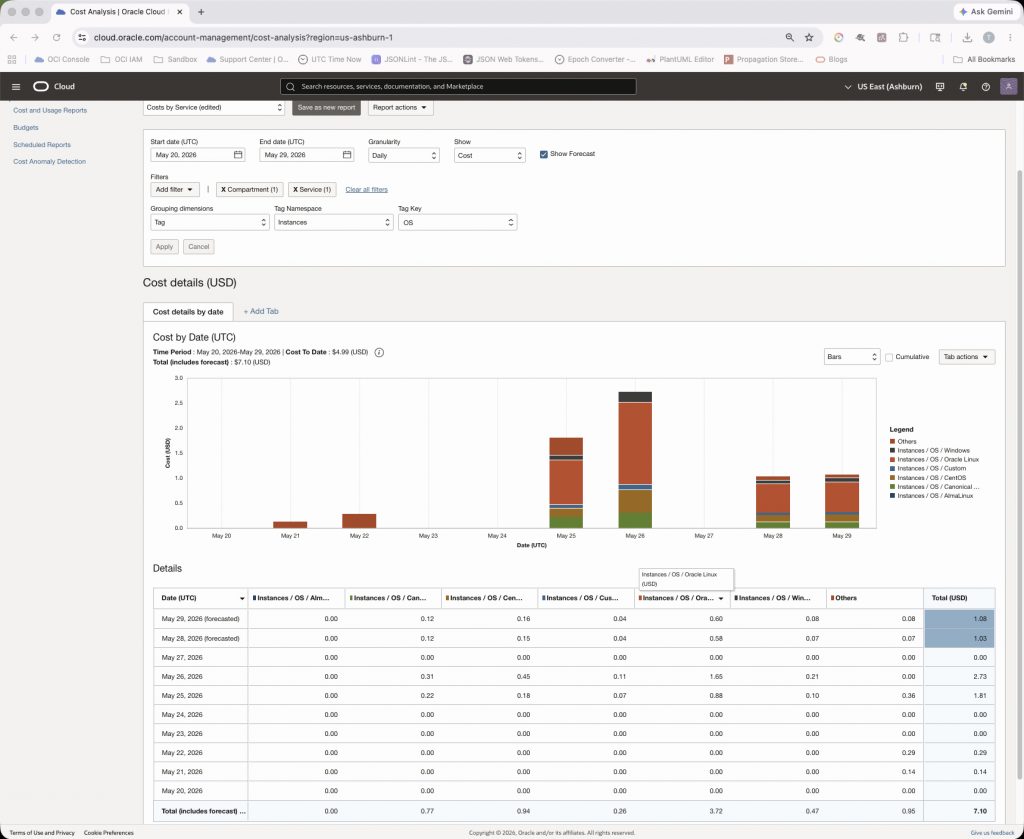
The saved report can then be scheduled for automatic generation, or further, can be sent to recipients over email. For more details, see Creating a Cost Analysis Scheduled Report and Set Up Oracle Cloud Infrastructure Functions to Send Cost Usage Report using Email.
Conclusion
OCI Events and Functions can automatically enrich compute instances with live network metadata. The event-driven function tags new launches quickly, while scheduled reconciliation keeps tags current.
Storing this metadata in defined tags lets operations and security teams search, report, and govern instances by public or private scope without manually inspecting VNICs.