ADW Version Oracle Database 19c Enterprise Edition Release – Production Version 19.5.0.0.0
Oracle Cloud Application 21B (11.13.21.04.0)
Fusion Analytics Warehouse Application Version 21.R2.P3
Background
Fusion HCM Analytics provides comprehensive workforce, turnover data sourced from Fusion HCM Cloud in a warehouse designed to support broad set of analytics use cases. In some specific use cases, Fusion HCM Analytics data can be complemented with additional Payroll, Cumulative Earning – Deduction or Costing data sets. For such data, Fusion HCM Cloud provide with an extract mechanism named HCM Extracts. HCM Extracts uses BI Publisher as the delivery mechanism for extracted data.
This blog is part of in a series covering topics on how to utilize Oracle ETL / Data Integration tools to extract data from various data sources to complement Fusion Analytics Warehouse factory data. Future blog topics will cover extracting from: Oracle SaaS Applications, Oracle on-premise applications (e.g. EBS), and other Oracle applications such as Responsys, Eloqua and third party data sources like Salesforce or Workday.
This blog walks though how to configure Oracle Data Integrator (ODI) on Oracle Cloud Marketplace to replicate data from Fusion HCM Cloud, using HCM Extracts, into an Autonomous Data Warehouse (ADW) database that is part of the FAW product.
This current article covers Part 2 – Defining and preparing the HCM extract to deliver to SFTP Server using Object Storage Bucket mounted as a file system on the ODI VM.
It assumes all the steps describes in Part 1 blog have been executed.
* Follow the steps in the companion blog for instructions to set up ODI Marketplace and configure ADW, especially on:
Policies Assignment (Step 1)
SSH key-pair Generation (Step 4-b and 4-c)
ODI Marketplace Provisioning (Step 2)
ADW Configuration (Step 5-h, 5-i, 5-j and 6-d)
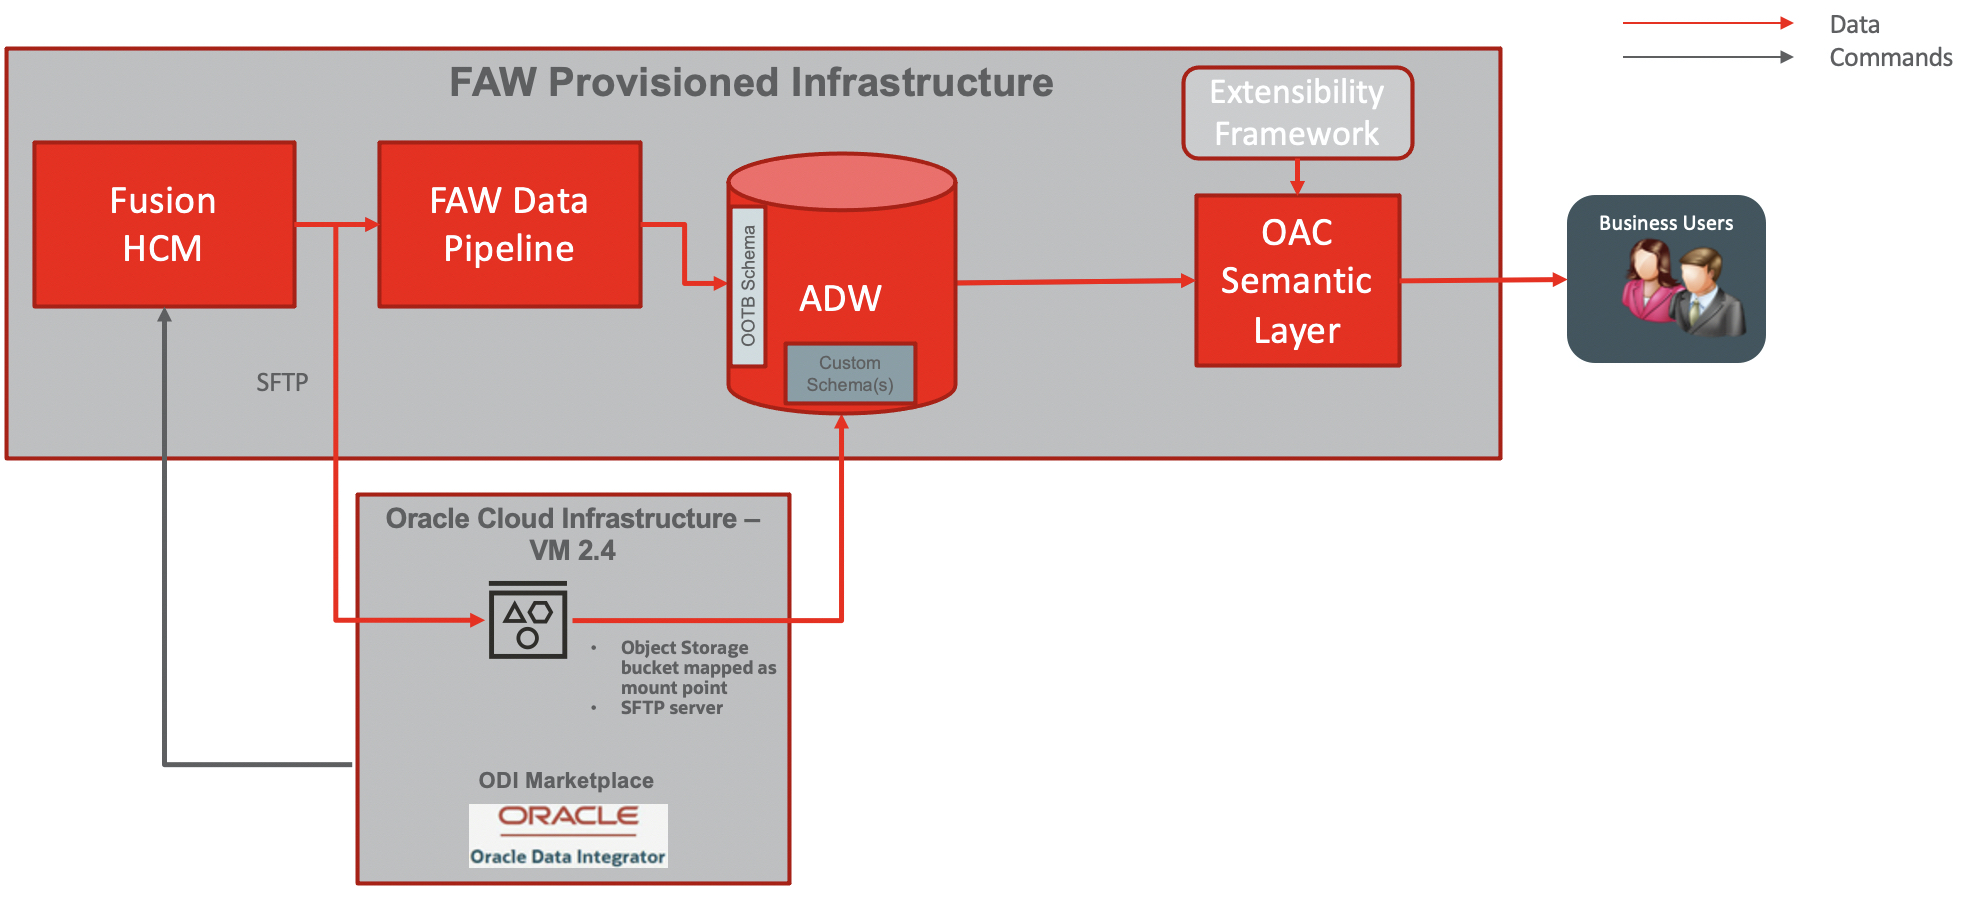
Architecture Overview
The diagram below details the architecture blue print for this use case:
Figure 1 : Architecture overview
The data flow is as follow:
ODI Market Place (MP) will be installed in Linux VM
An object storage bucket will be mounted as a folder mount point on the ODI MP VM (with s3sfuse)
An SFTP Server will be configured with private key authentication with opc user on the ODI VM
Run the appropriate payroll flows in HCM extracts to ensure the HCM Extract produces output data
Create and Prepare an HCM Payroll Data Extract
Edit/ Create HCM Extract Definition in Fusion HCM : Extract Parameters, Blocks + Filter Records, Data Elements, Validate Extract
Integrate HCM Extract with BIP: Create RTF template and report in BI Publisher
Set Up Report Options: Define Delivery Method (SFTP) and Associate Report location in BI
Run / Schedule Extract using FlowActionService SOAP API to push the HCM Extract to SFTP
ODI MP will wait for the HCM Extract to be deliver to the SFTP before integrating it into ADW with the LKM File to Oracle
All additional transformations will happen inside the ADW
HCM extracts can be scheduled once every day
Semantic model will be extended by customizing an existing subject area or addition of a new subject area to allow reporting on HCM data extracted in ADW, as per the CEAL Team blog available here.
Defining the HCM Extract Cloud data extract job
Prepare Data for HCM Extract by Running QuickPay Payments in Payroll for a Person
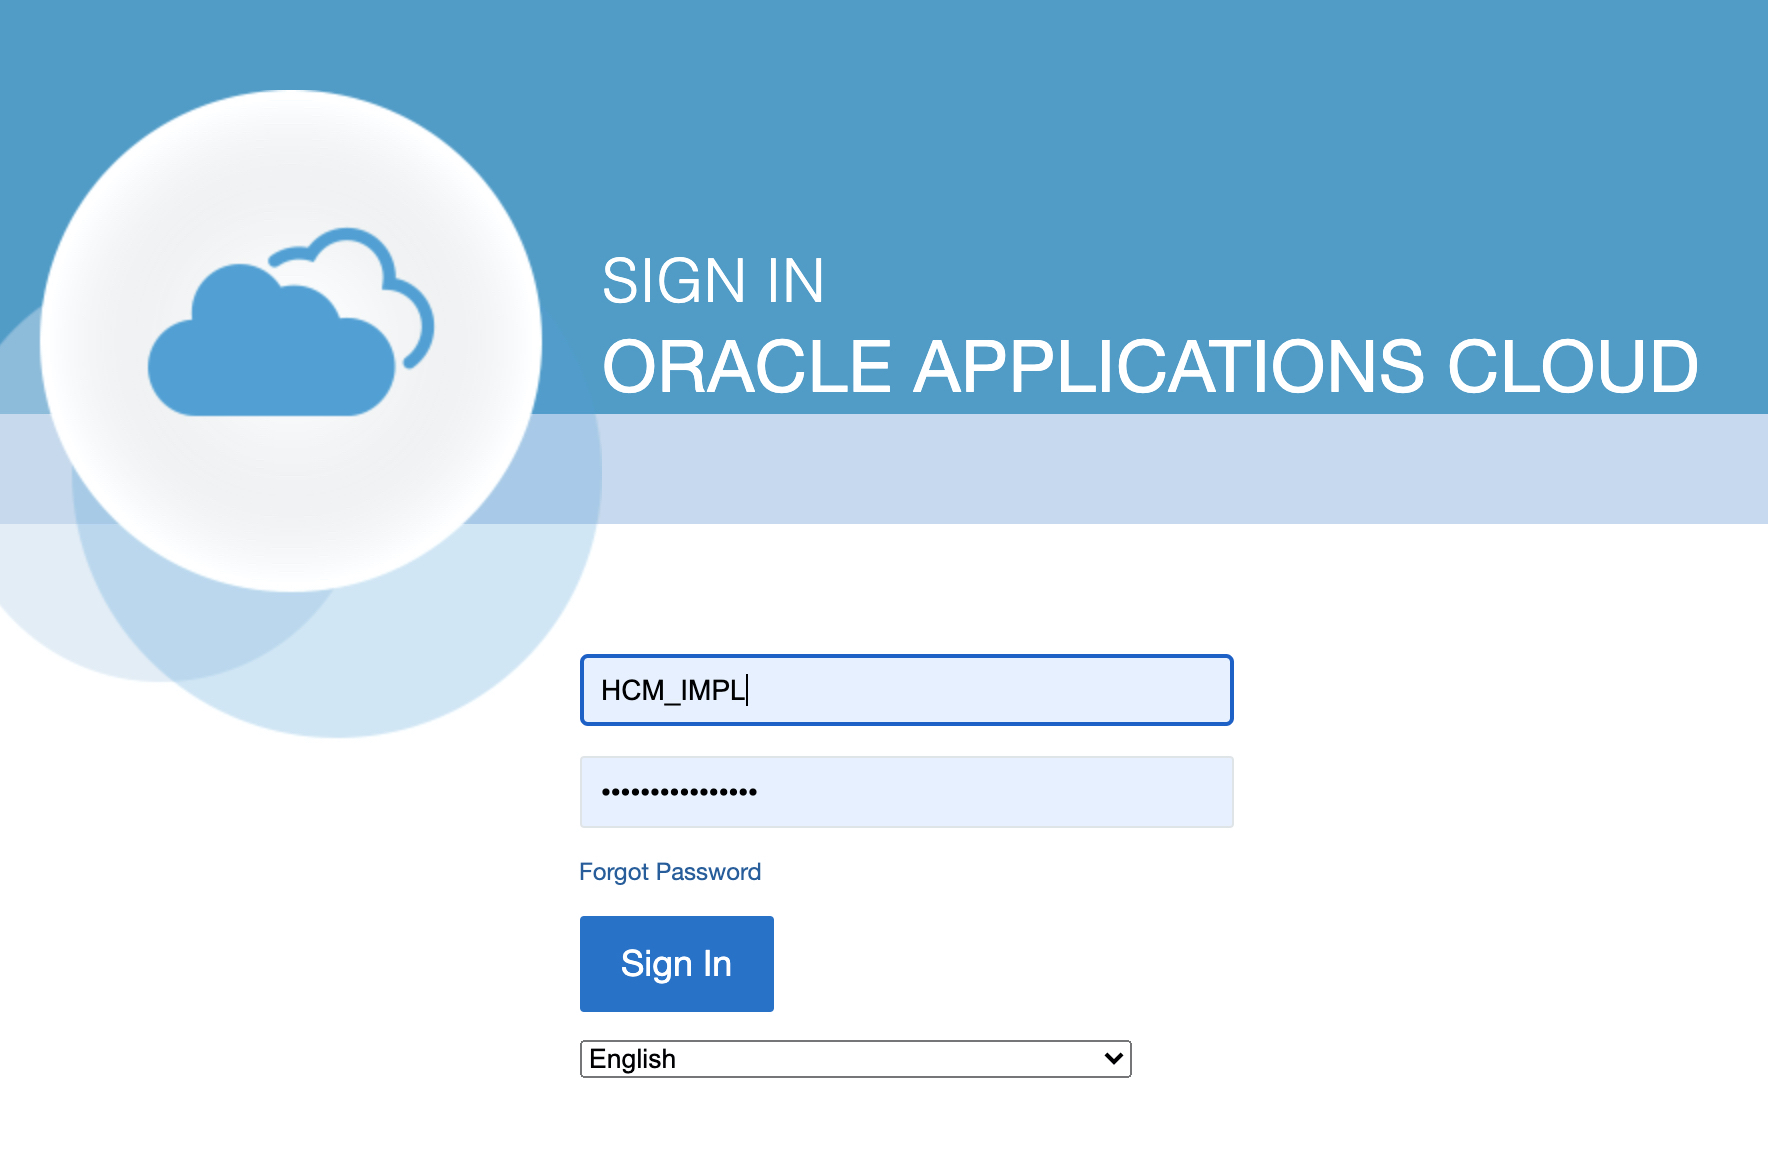
Follow the steps below to run QuickPay Payments process in HCM Cloud
a) Sign in HCM Cloud with a user that has HCM Extract access privileges
Figure 1 : Sign in HCM Cloud
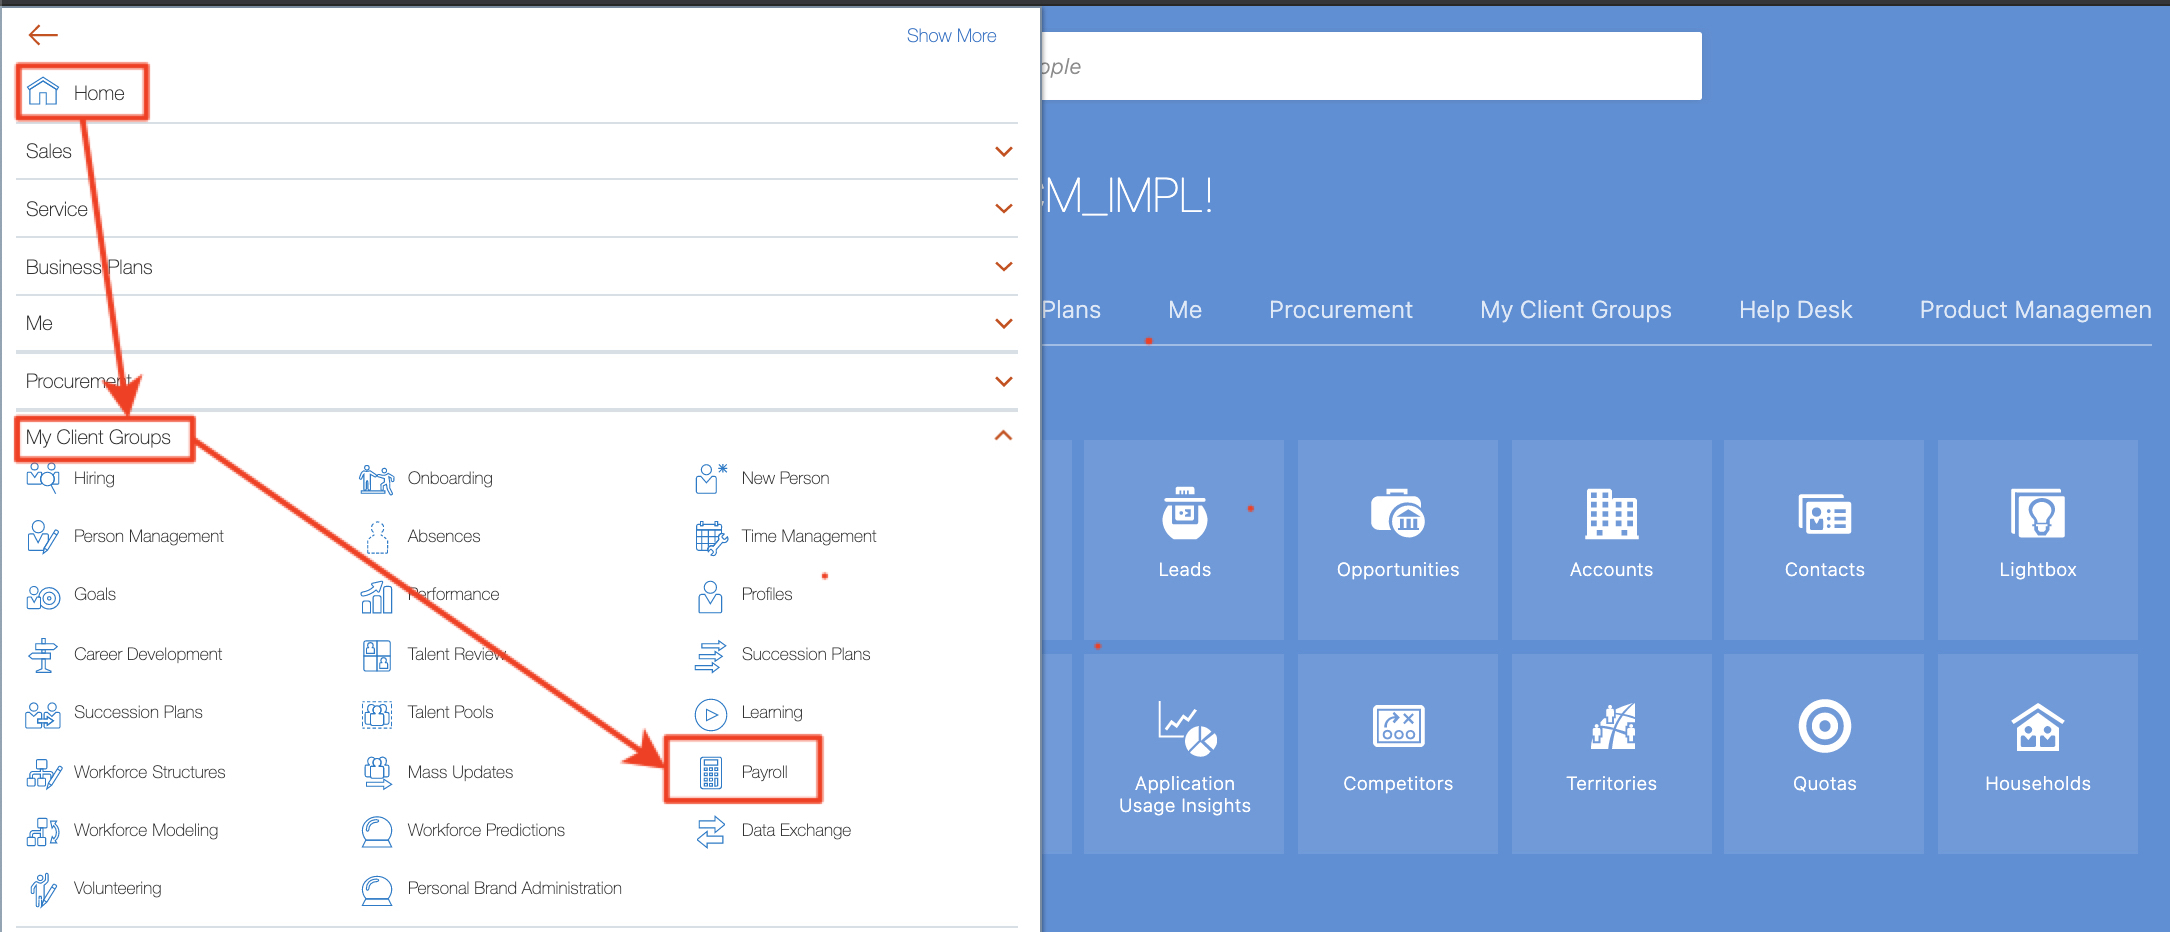
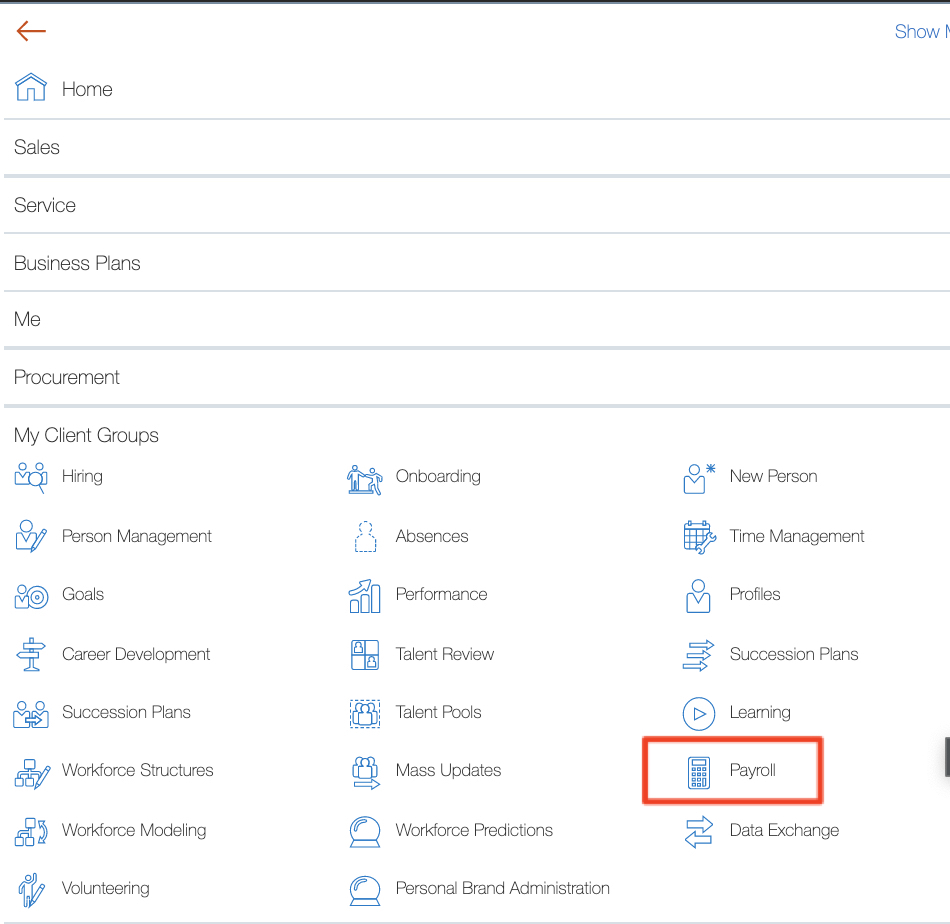
b) Click on the Home hamburger on the top left and click on My Client Groups > Payroll
Figure 2 : Access Payroll
c) Enter the word “quick” in the search field, run the search and select QuickPay Payments
Figure 3 : Access QuickPay Payments
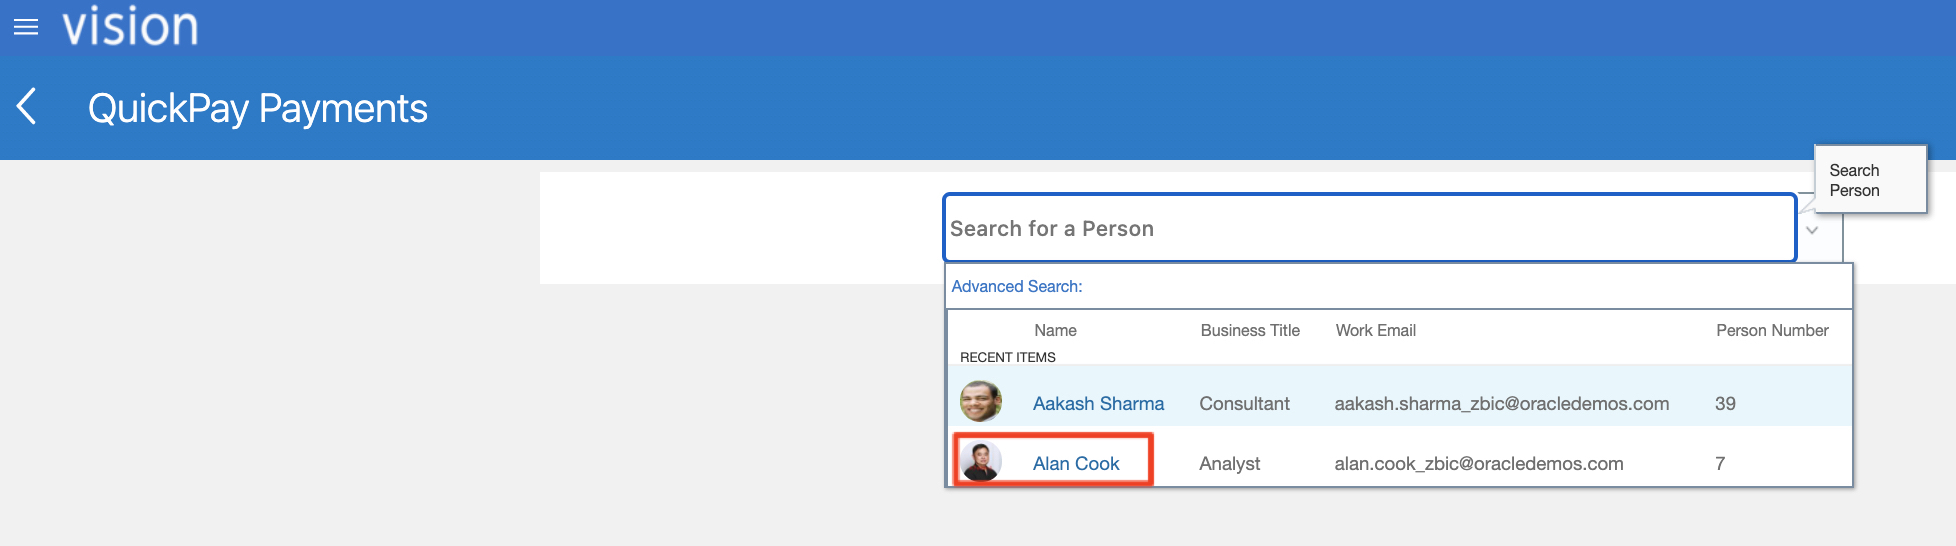
d) Search for a Person and select a Person to run the QuickPay Payment process for
Figure 4 : Select a Person for QuickPay Payments
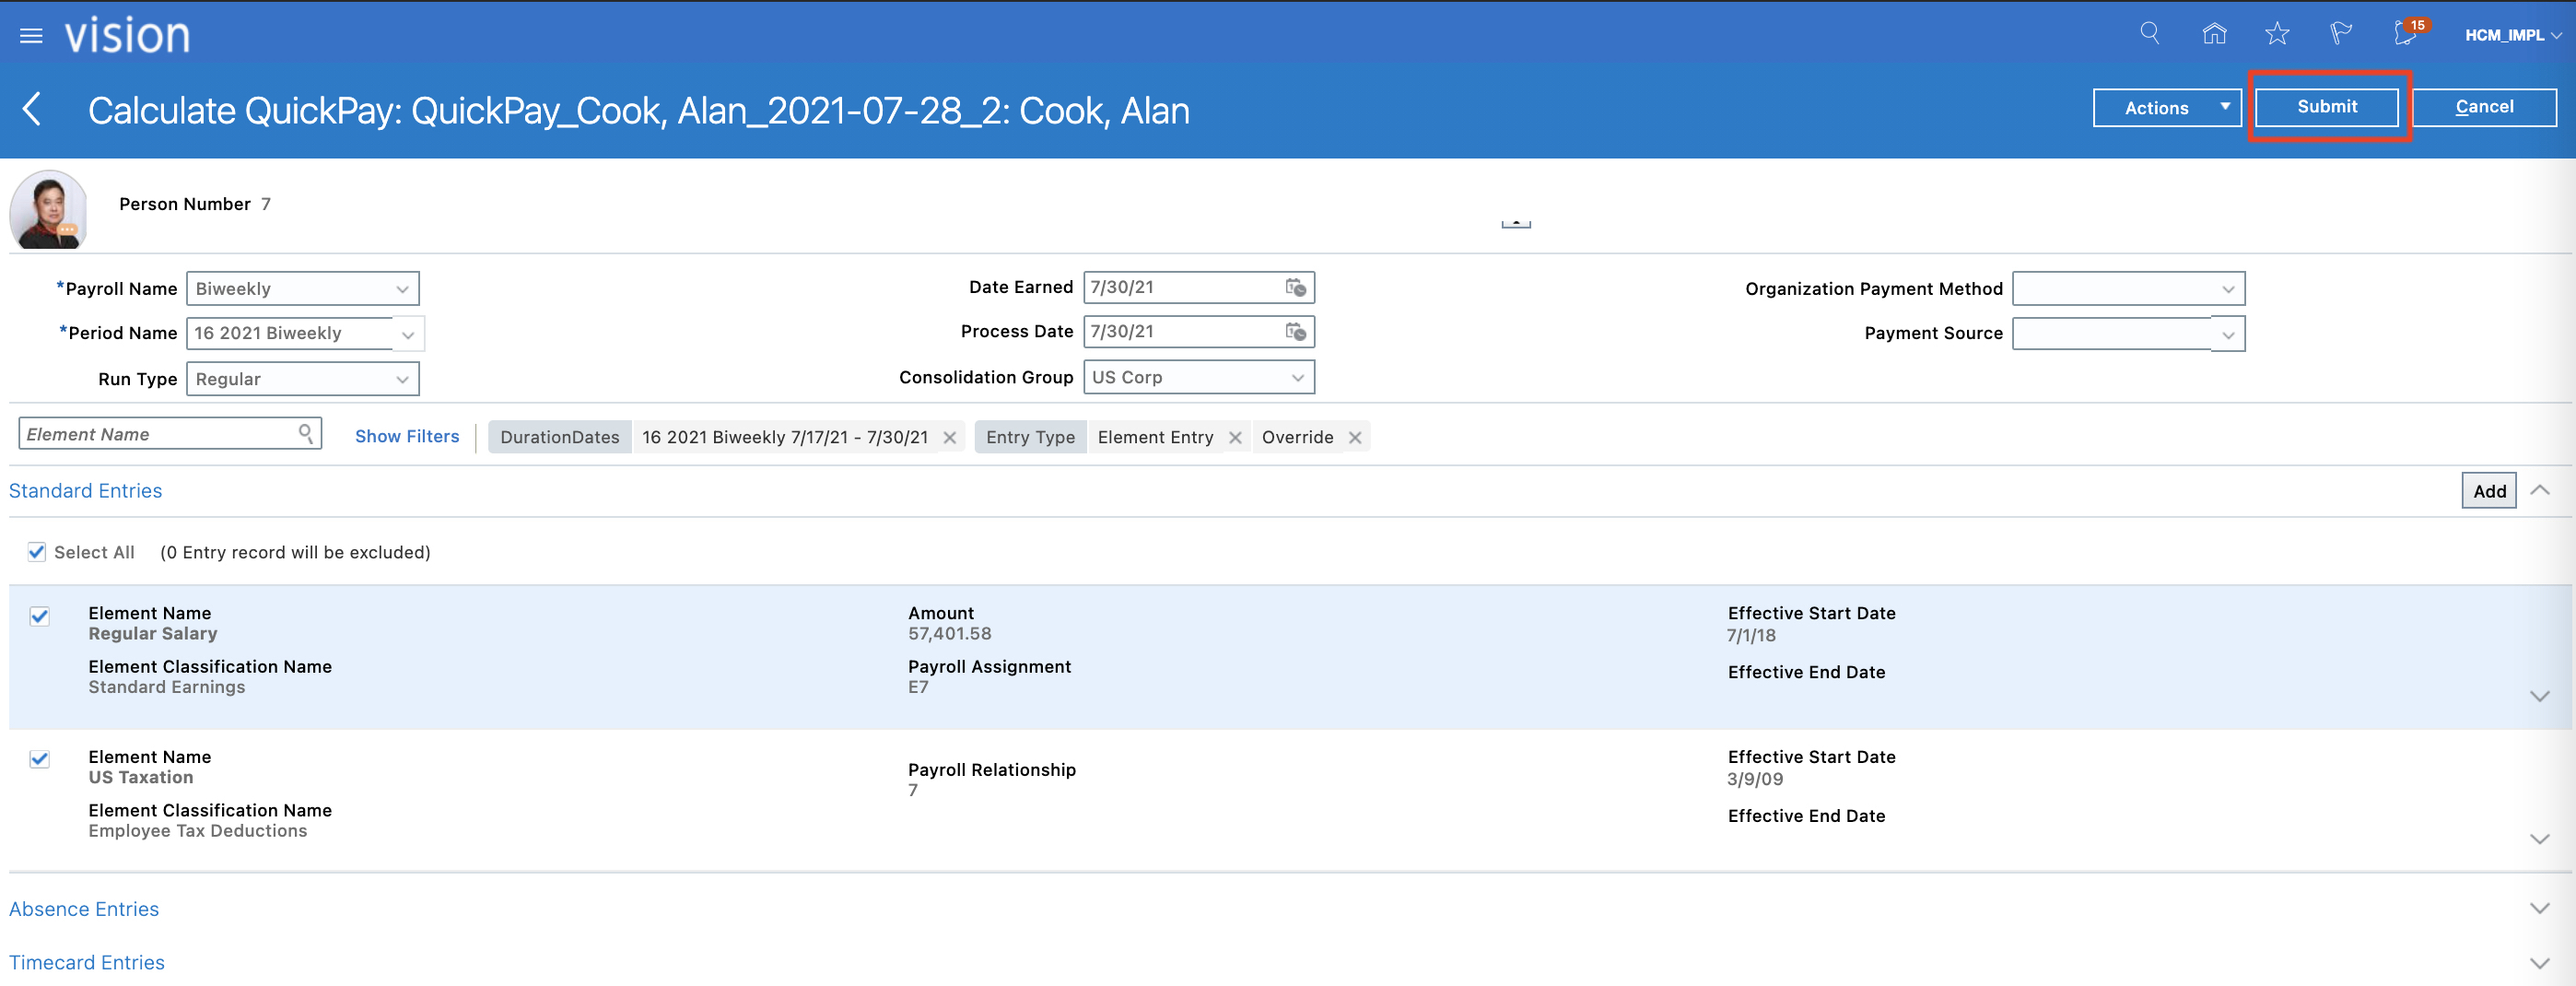
e) Click on Submit
Figure 5 : Submit QuickPay
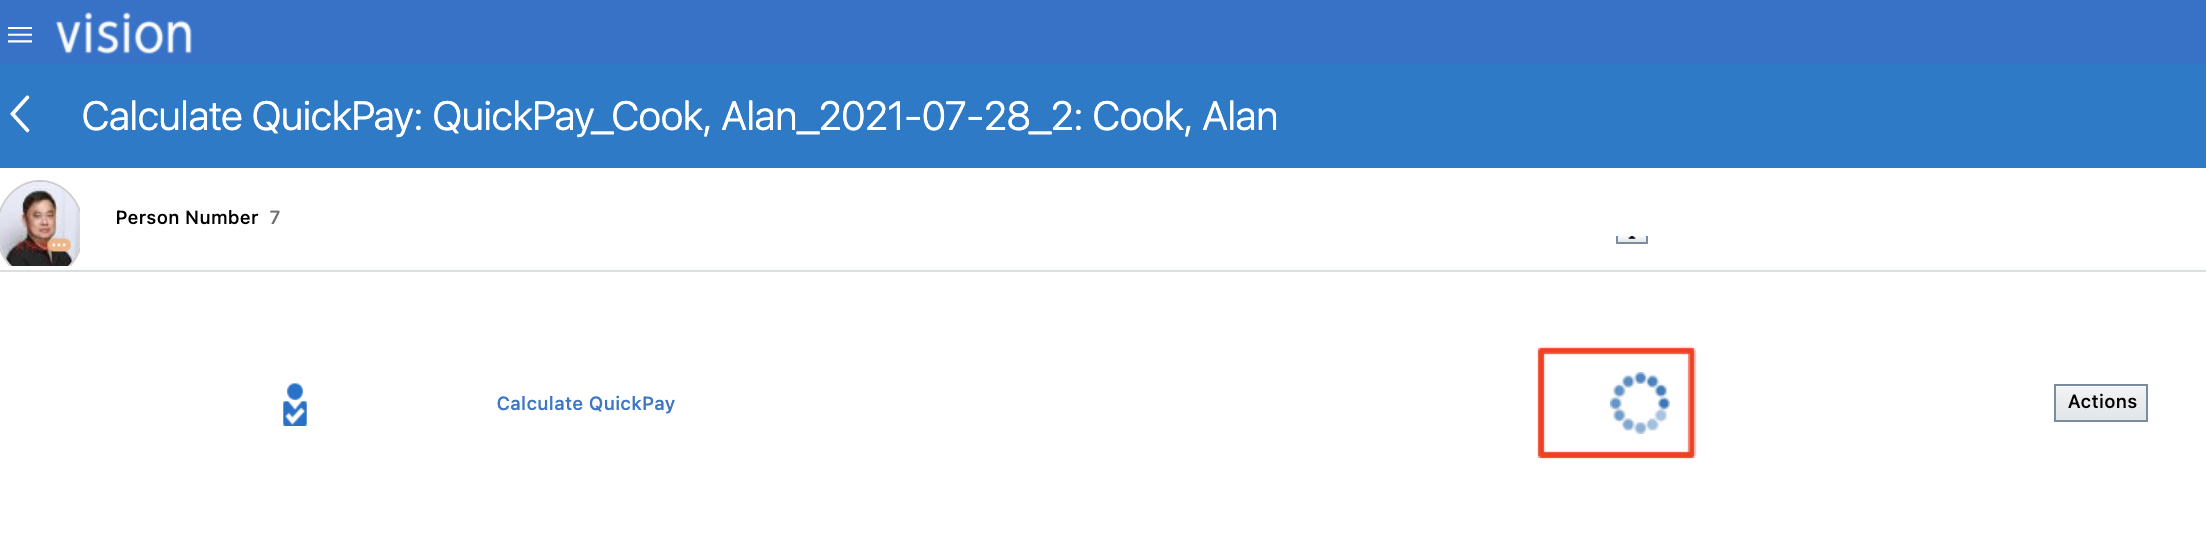
f) Wait for QuickPay Payment process to complete
Figure 7 : QuickPay Payments Being Calculated
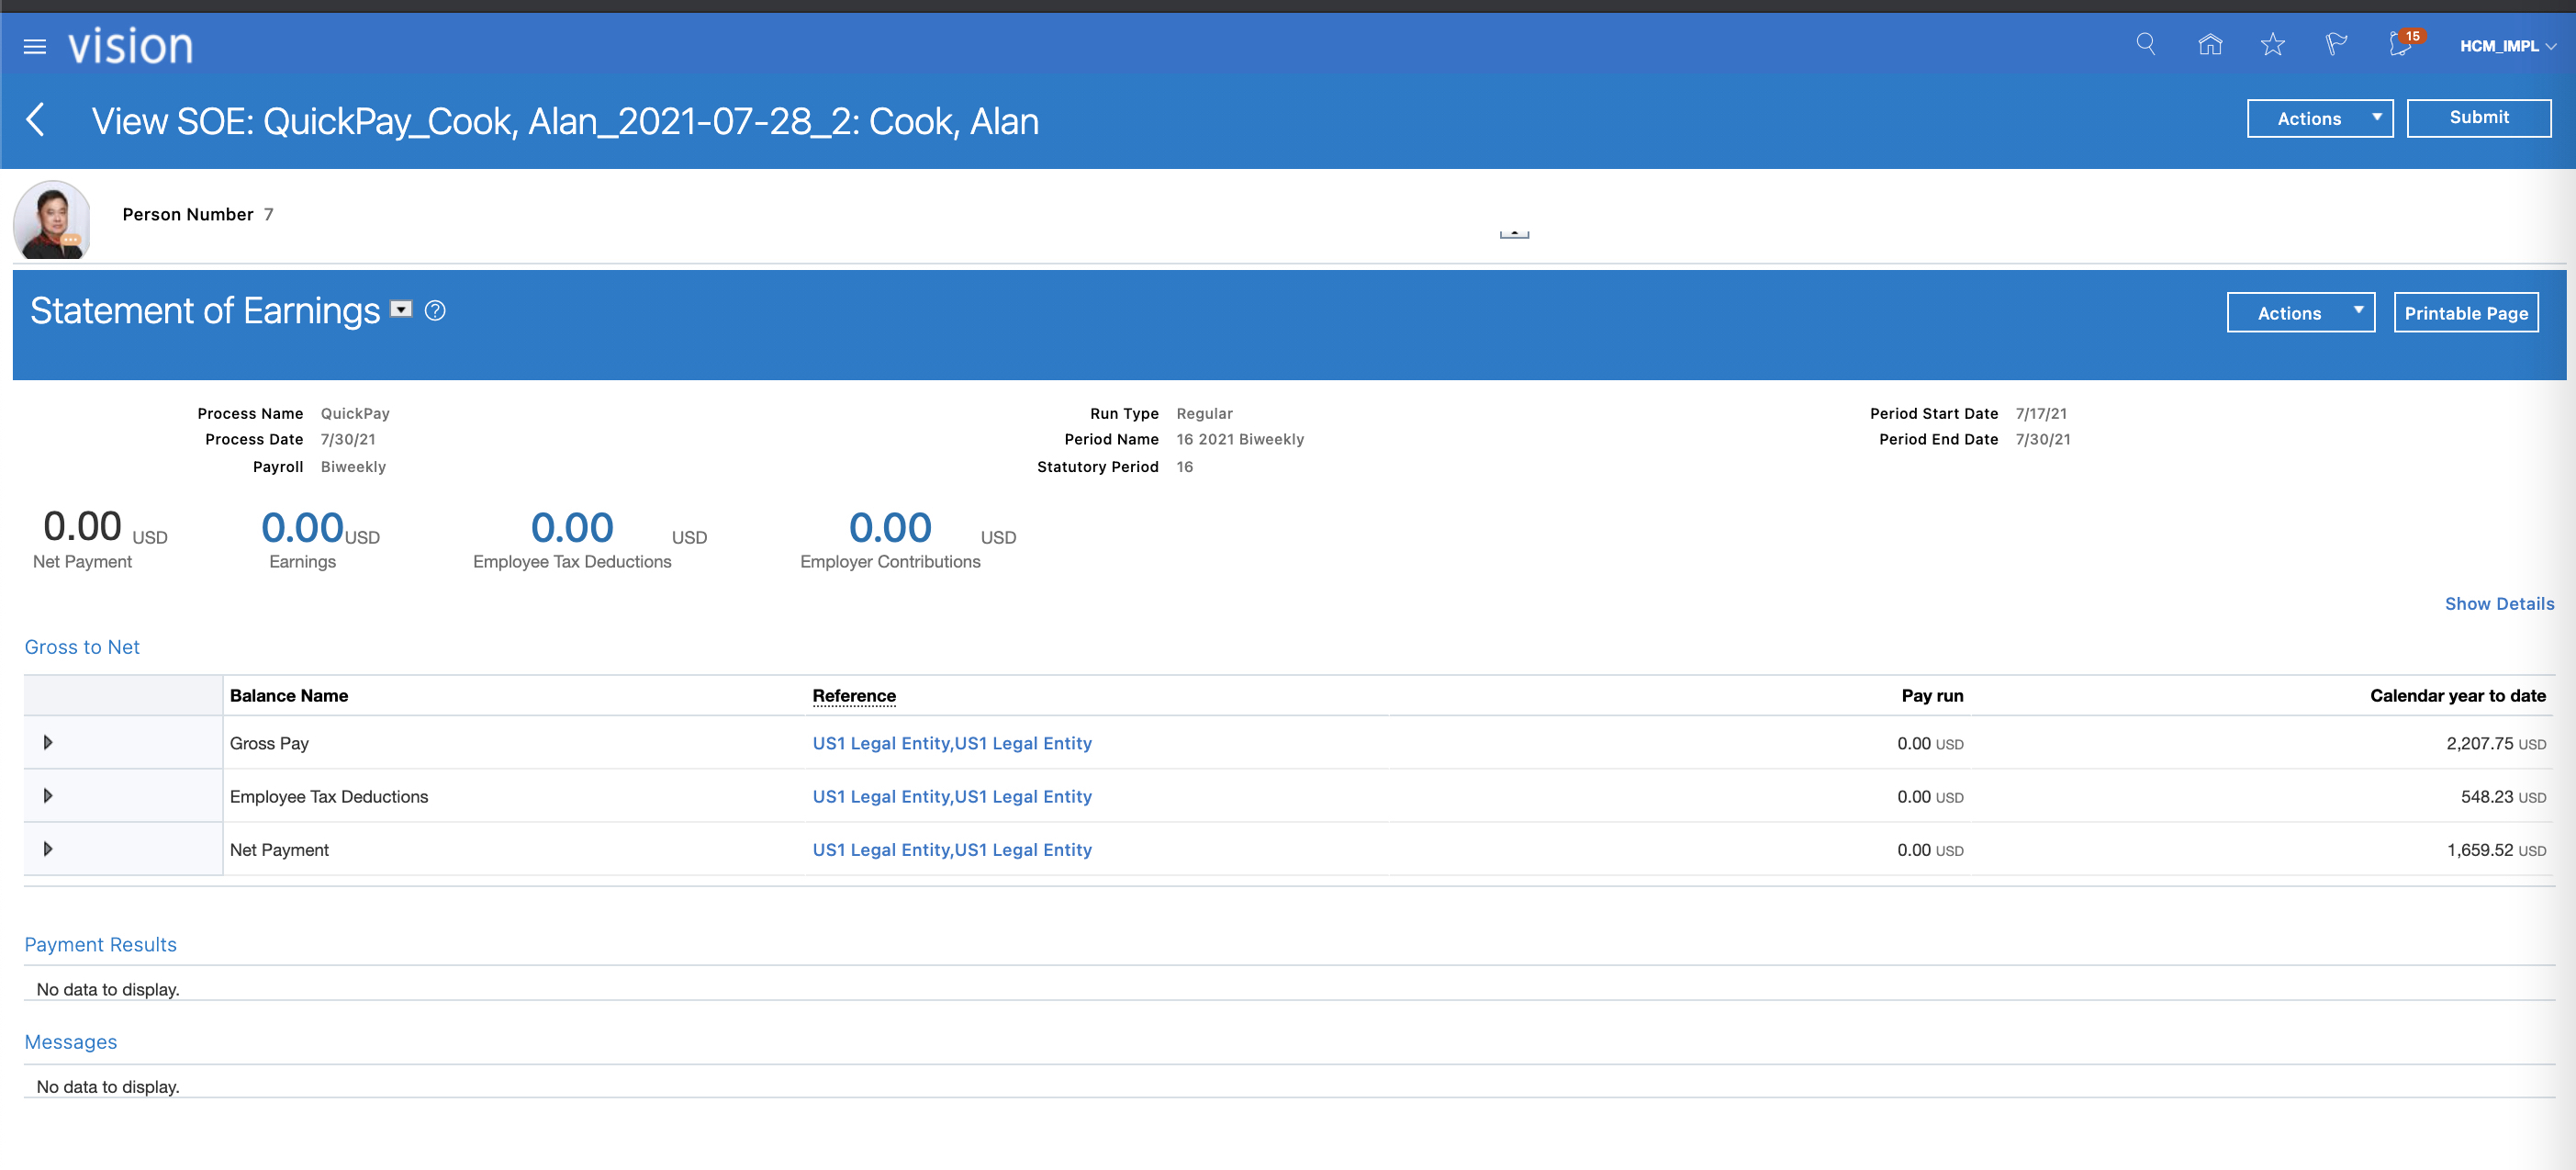
g) Review QuickPay Payment Calculation results.
Figure 8 : QuickPay Payments Calculated
Creating the HCM Extract from an Existing HCM Extract
Follow the steps below to duplicate an existing HCM Extract.
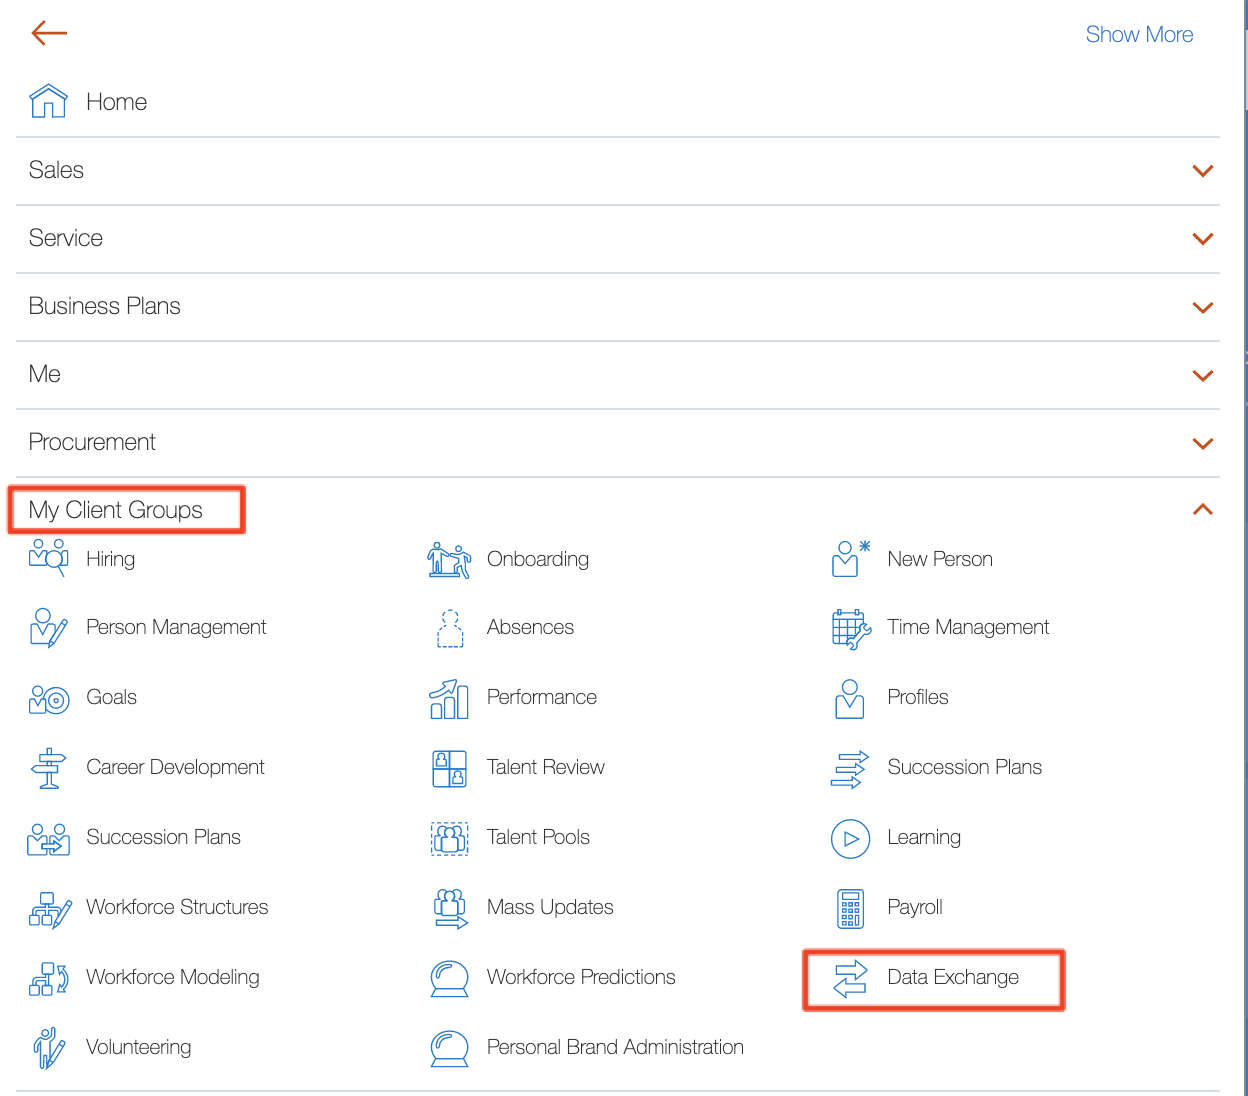
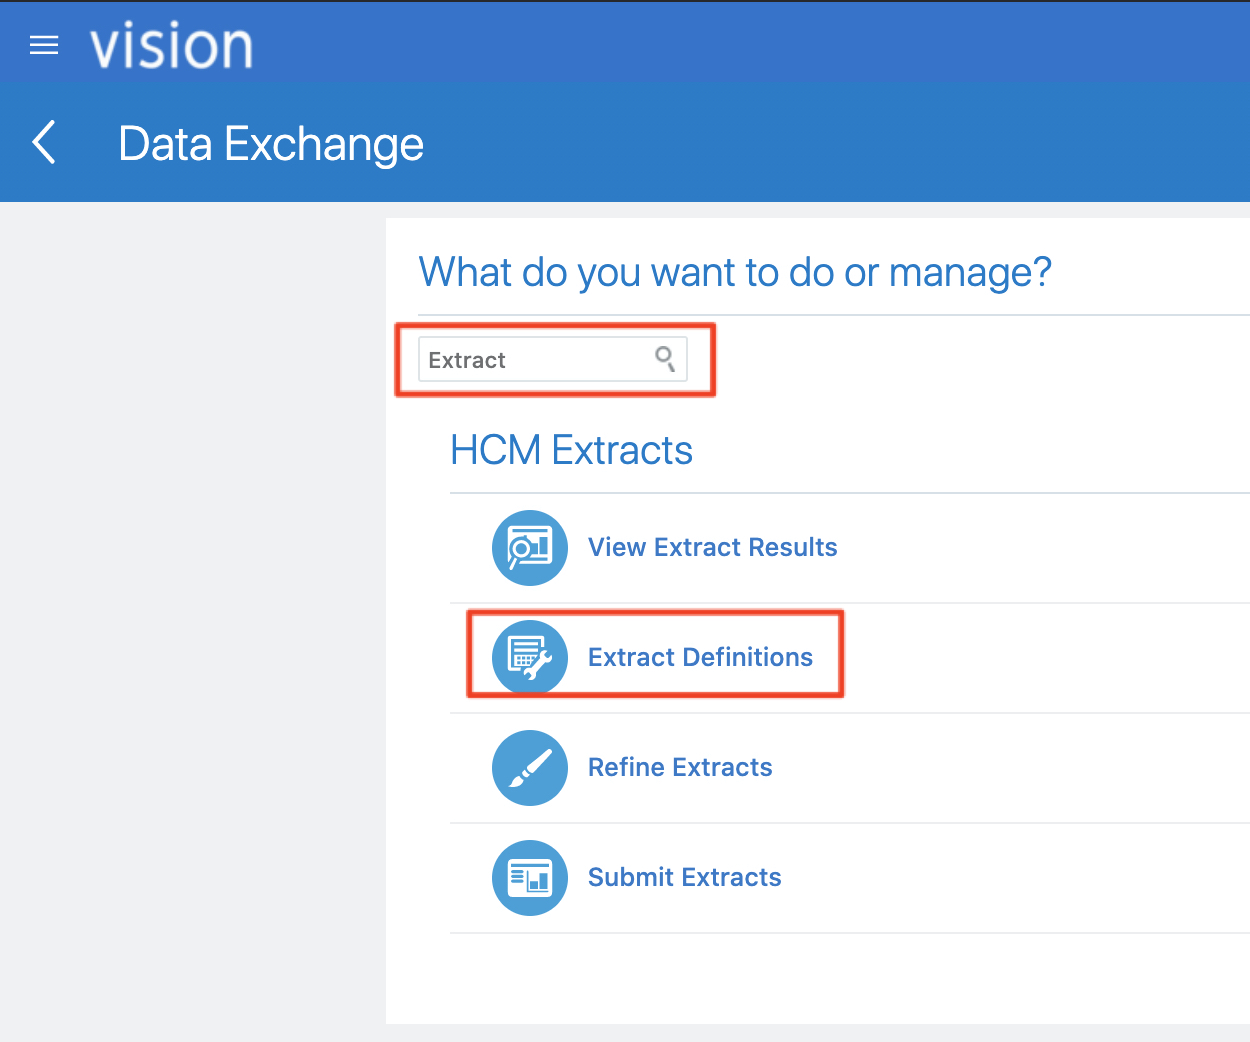
a) Access My Client Groups > Data Exchange
Figure 9 : Access Data Exchange
b) Search for Extract and click Extract Definition
Figure 10 : Extract Definition
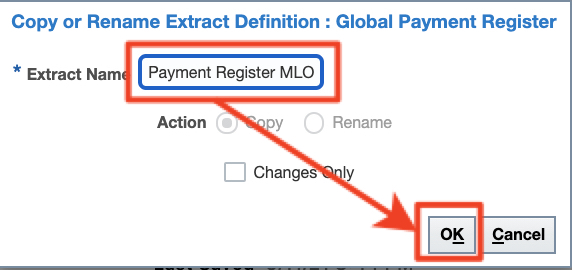
c) Filter by Global extract and duplicate Payroll Costing Report
Figure 11 : Duplicate HCM Extract Definition
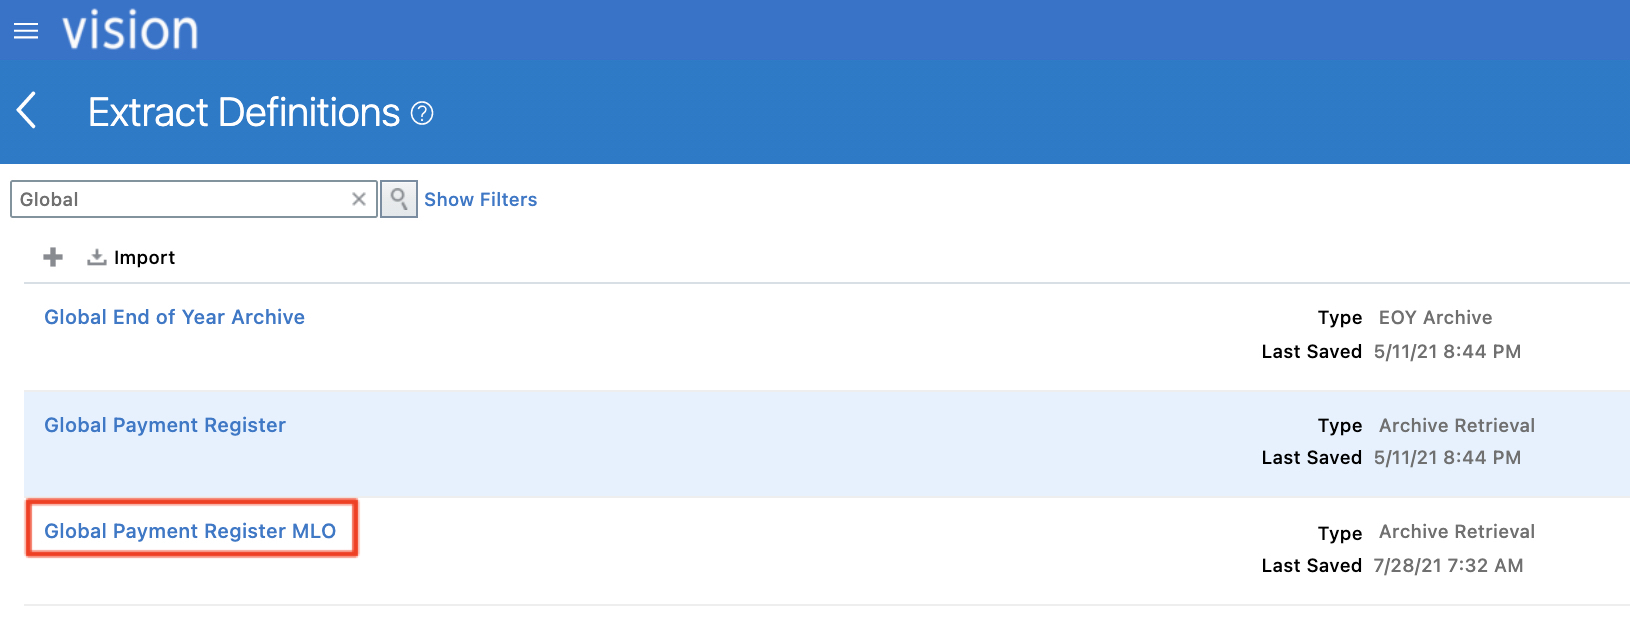
d) Enter a name (here Global Payment Register MLO) for the new Extract and click OK
Figure 12 : Enter copied name for HCM Extract
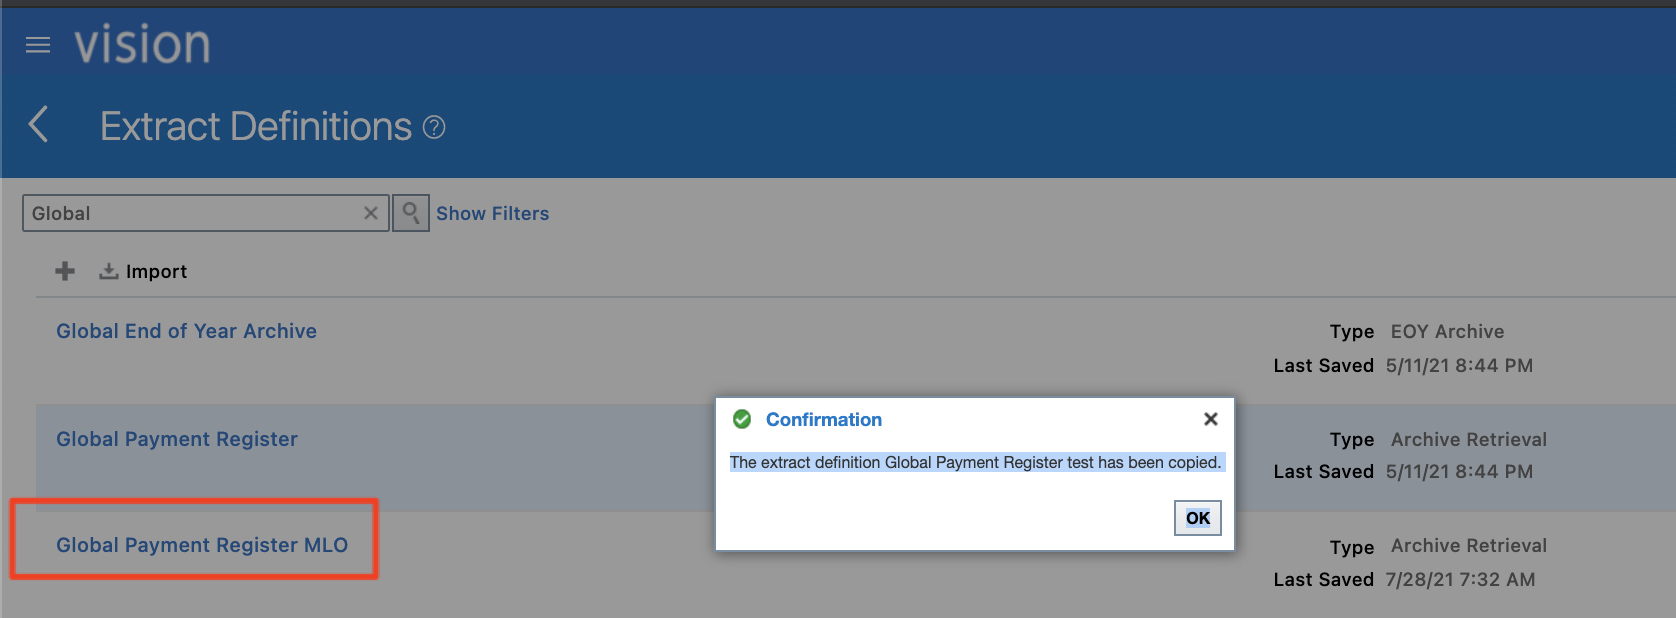
f) Wait for the copy to complete and confirm the HCM Extract has been duplicated
Figure 13 : Validate that the HCM Extract has been duplicated
Duplicating the BI Publisher Report to the Custom
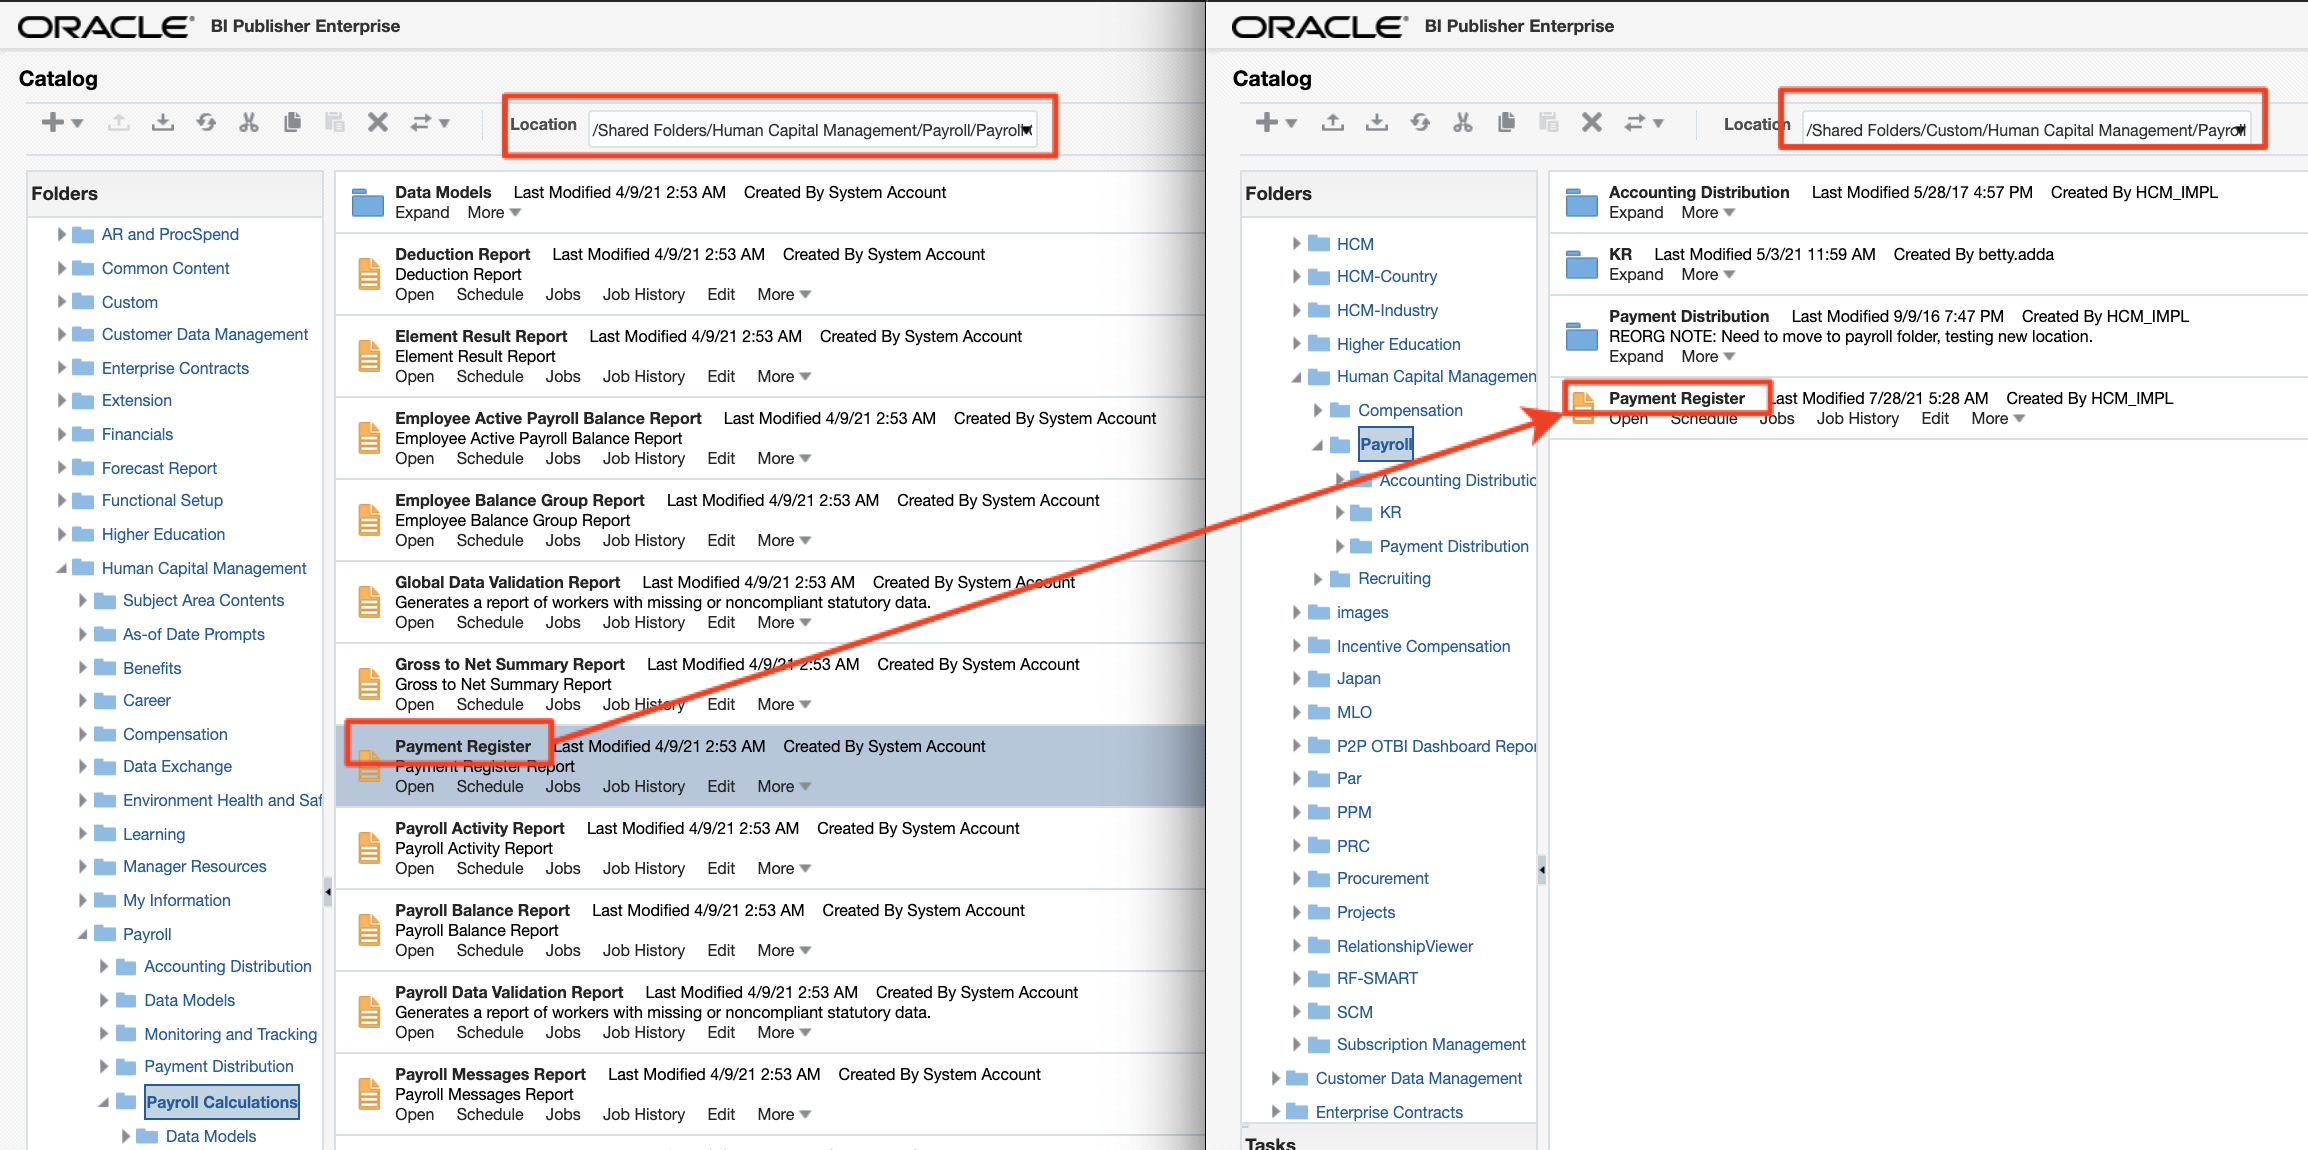
HCM Extracts leverage BI Publisher as a delivery mechanism of the output data. In Fusion OTBI, it is not possible to modify an out of the box BI Publisher report (to update a BI Publisher template, to update the output format of a
In order to update the delivery output of a BI Publisher report, the original report needs to be copied under the Custom catalog folder.
Follow the steps below to copy the Payment Register BIPublisher report from its delivered location to the Custom location of your choice:
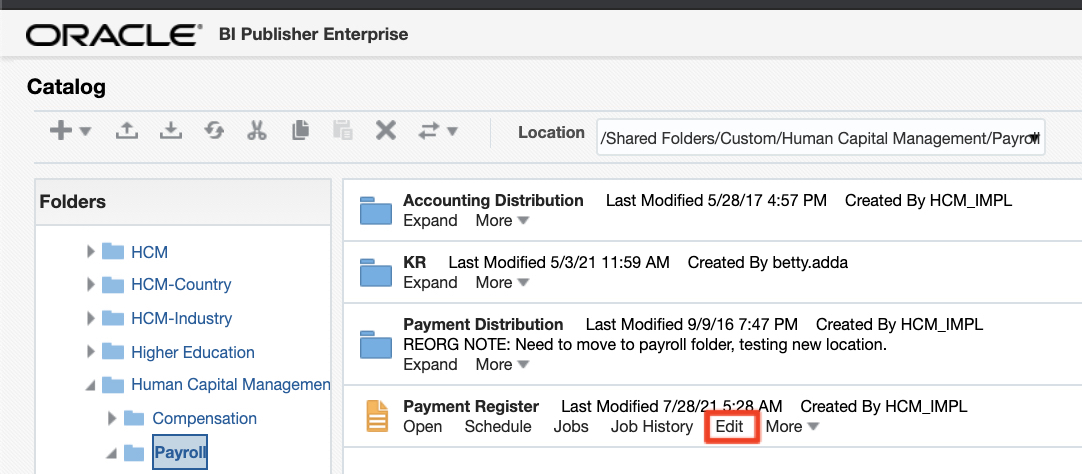
a) Using the BI Publisher catalog feature copy the Payment Register BIPublisher report from /Human Capital Management/Payroll/Payroll Calculations/ to /Custom/Human Capital Management/Payroll
Figure 14 : Copy the BI Publisher Report to the Custom Folder
b) Access the copied version of the and Edit the report
Figure 15 : Edit the BIP Report
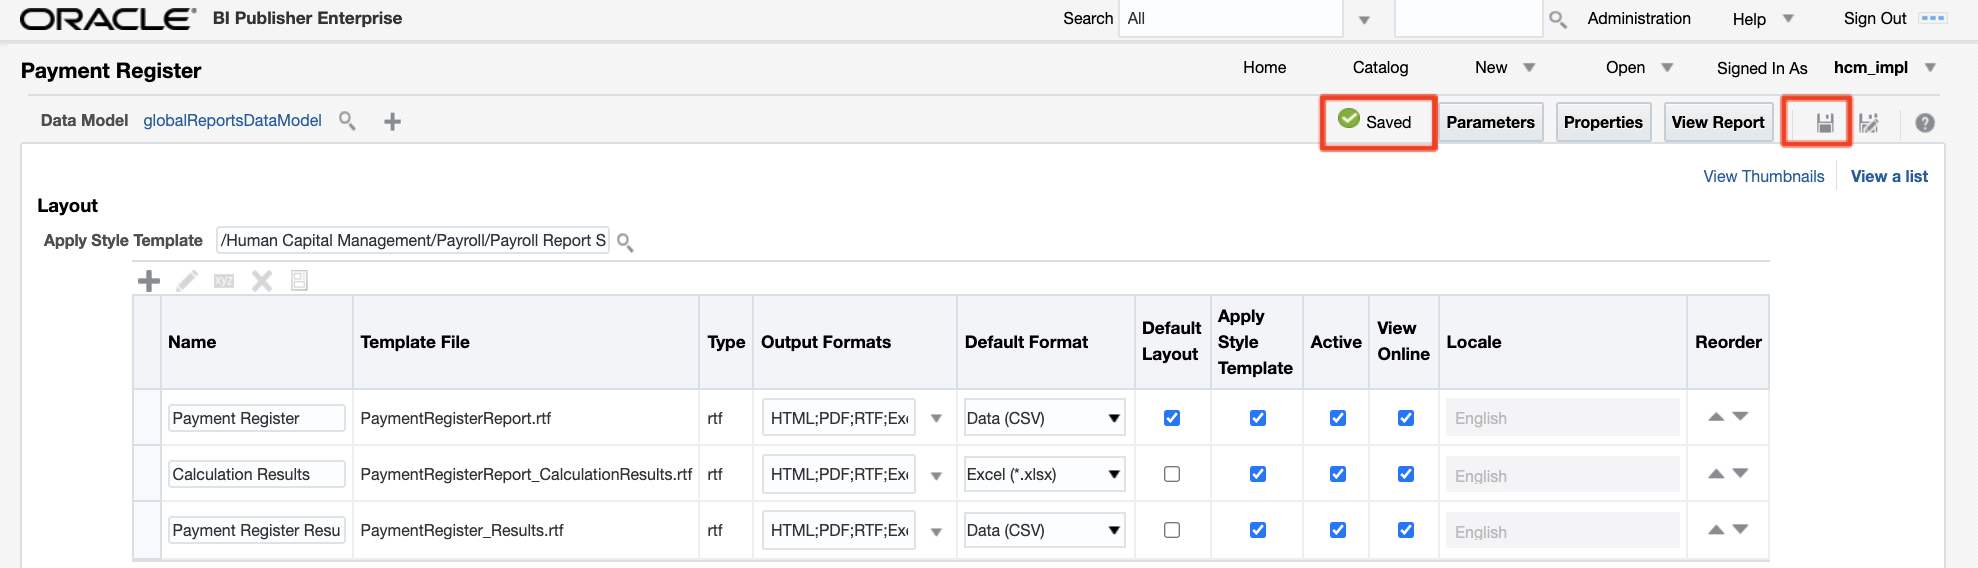
c) Click on View as list. Update Output Formats and Default Format to be set to Data (CSV) for the Payment Register and Payment Register Results layouts
Figure 16 : Update the BIP Layouts
d) Save the changes
Figure 17 : Save
Updating Extract Delivery options
By default, the delivery options of the HCM Extract duplicated in the previous steps don’t include FTP / SFTP delivery. Follow the steps below to the update the HCM extract delivery option
a) From Home > My Client Groups > Data Exchange > Extract Definitions, open the HCM Extract by clicking on its name
Figure 18 : Open the HCM Extract
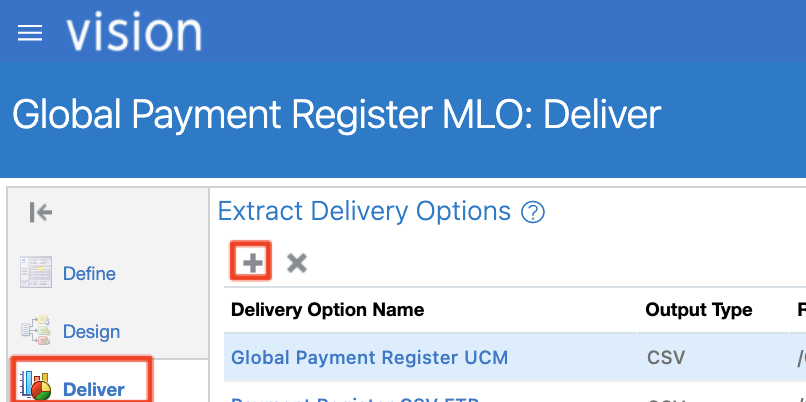
b) Click on the Deliver menu on the left hand side and click the plus button to add a new one
Figure 19 : Open the delivery options and add a new one
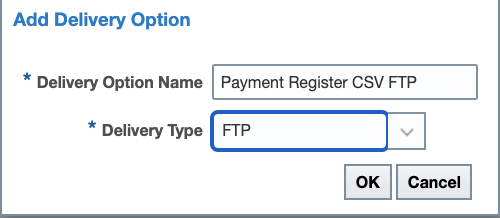
c) Enter Payroll Costing Results – SFTP in the delivery option name and FTP in the delivery type.
Figure 20 : Add FTP / SFTP Delivery option
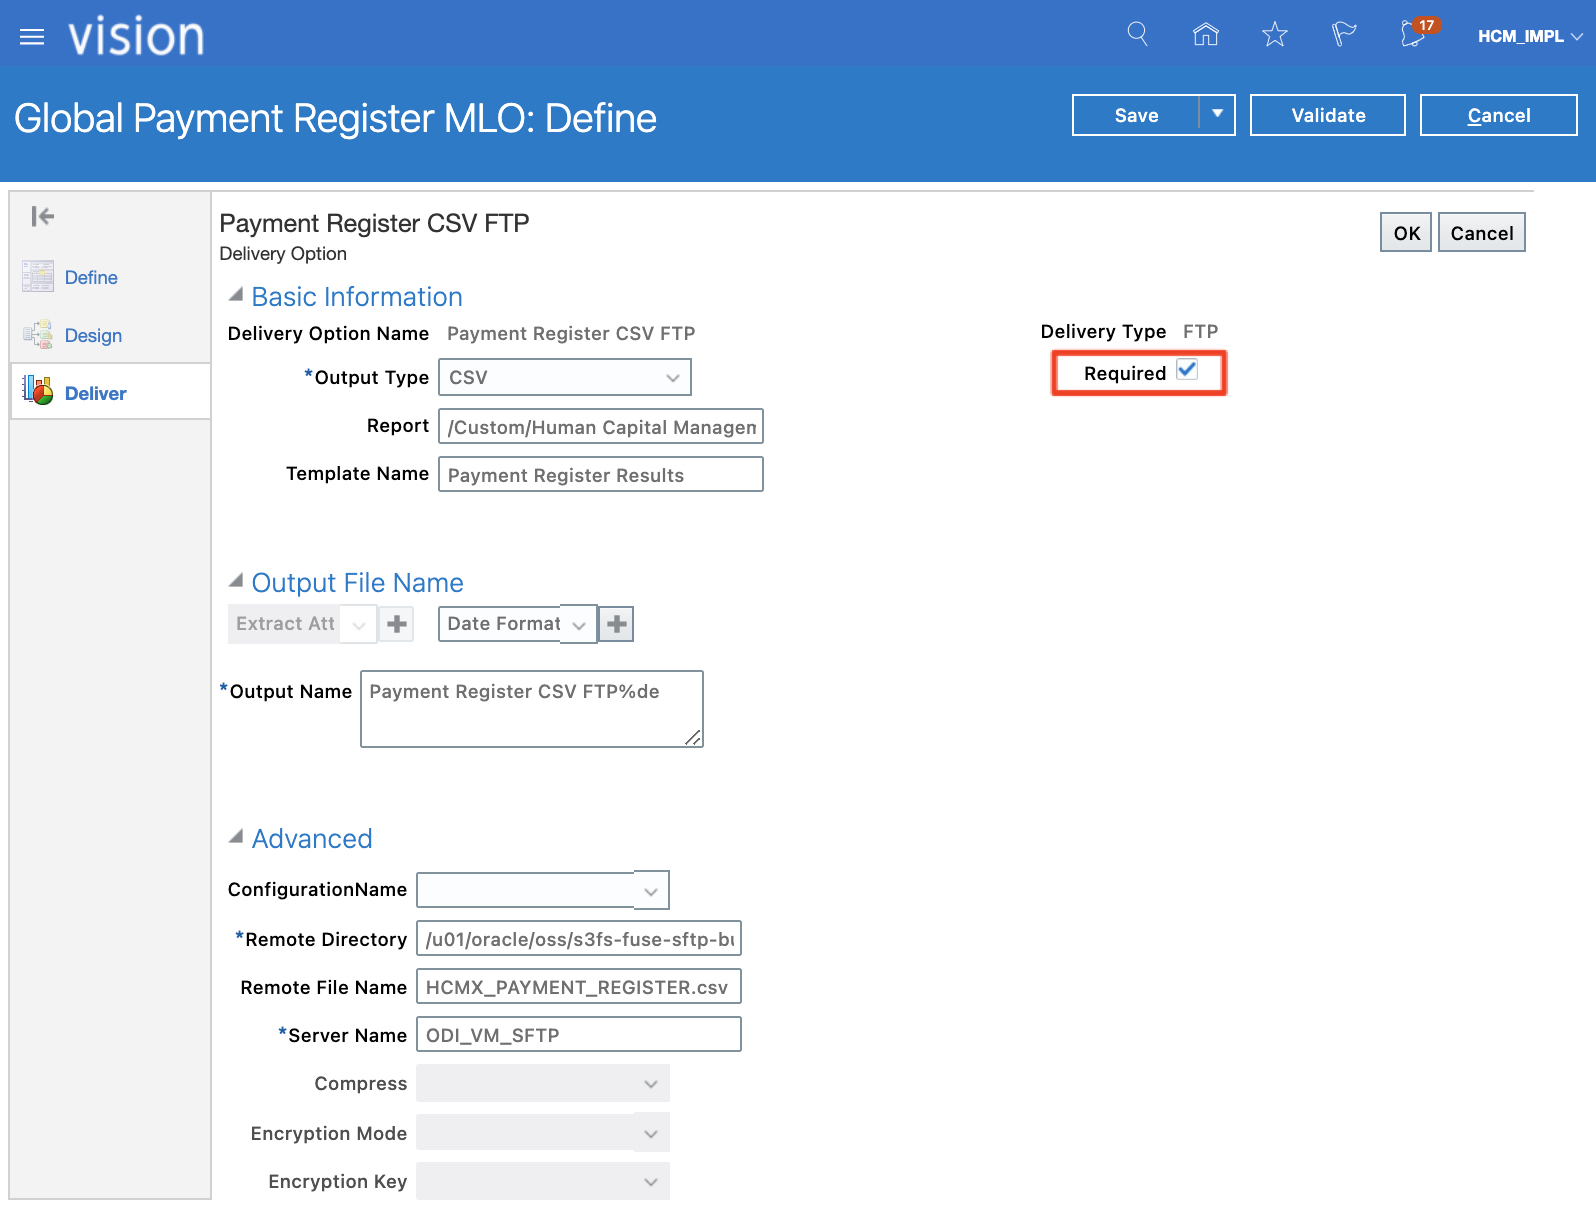
d) In the new delivery option screen, enter the information below (as per the BI Publisher report copied in the Custom Folder and the SFTP Configuration in BI Publisher done in the Part 1 blog of the series). Make sure the Required check box is checked.
Output Type
CSV
Report path
/Custom/Human Capital Management/Payroll/Payment Register.xdo
Template Name
Output Name
Payment Register Results
Payment Register CSV FTP%de
Remote Directory
/u01/oracle/oss/s3fs-fuse-sftp-bucket
Remote File Name
HCMX_PAYMENT_REGISTER.CSV
Server Name
ODI_VM_SFTP
Figure 21 : SFTP Delivery options details
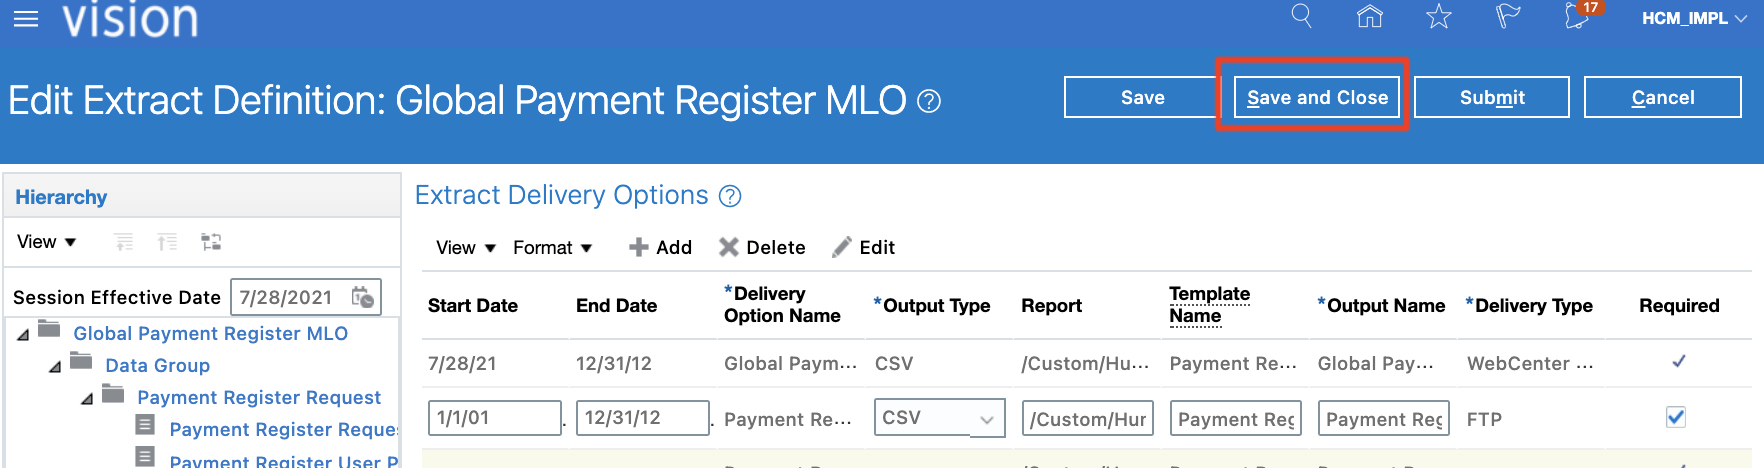
e) Save and confirm the new delivery option was added and save
Figure 22: SFTP Delivery option added
f) Save and close
Figure 23: Save and Close
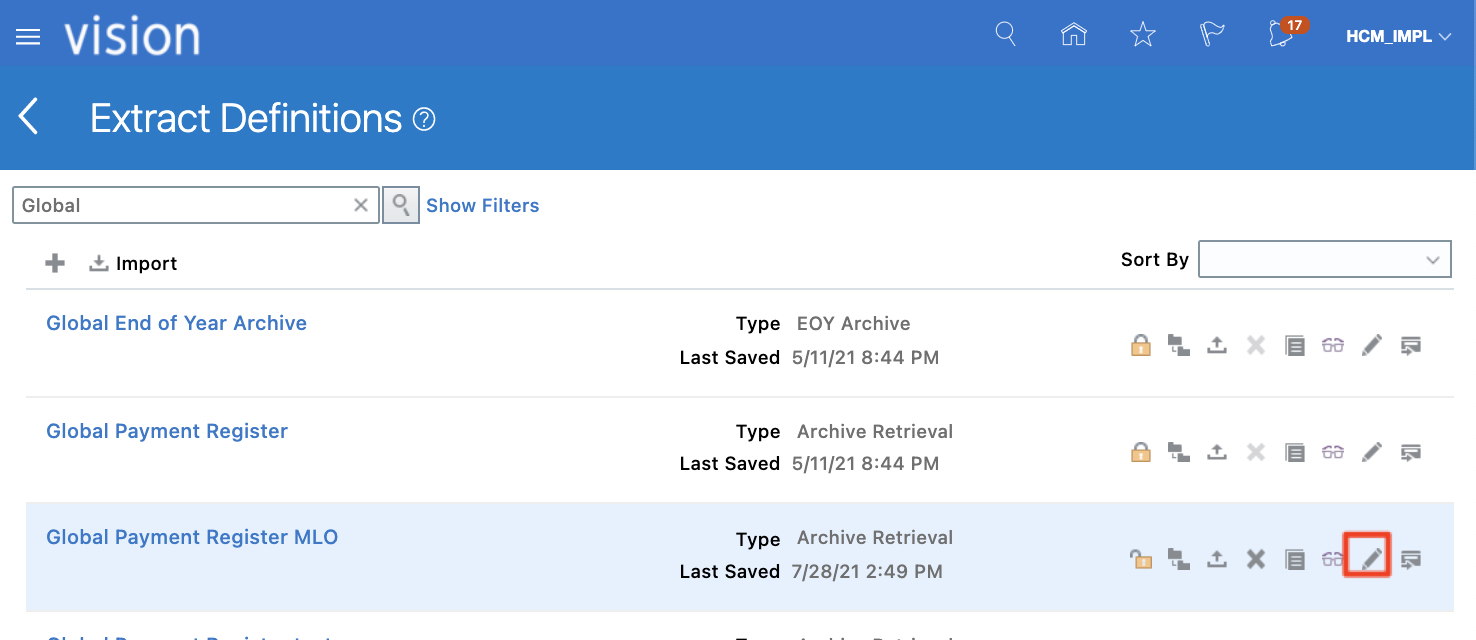
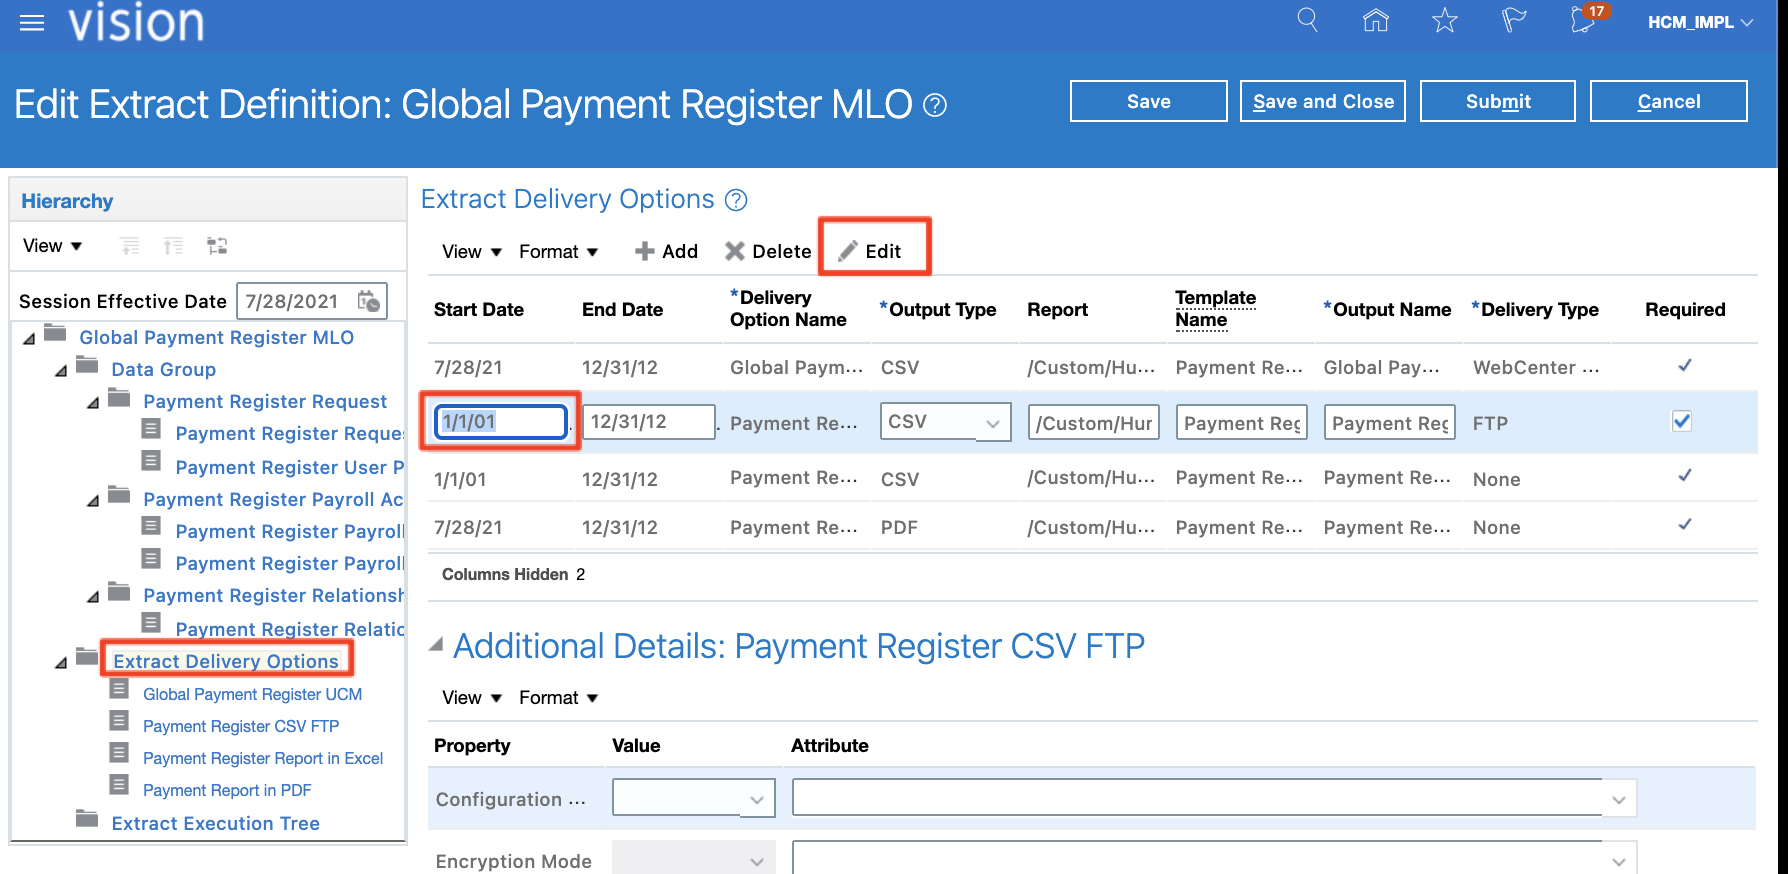
g) Click on Advanced Edit to update the start / end date of the new Delivery Options
Figure 24: Advanced Edit
g) Update the start date to 1/1/01
Figure 25: Update SFTP Delivery option start date
g) Save and Close
Figure 26: Save and Close
Validate Extract
In order to be able to run the duplicated HCM Extract, it needs to be validated. Follow below steps to run the validation
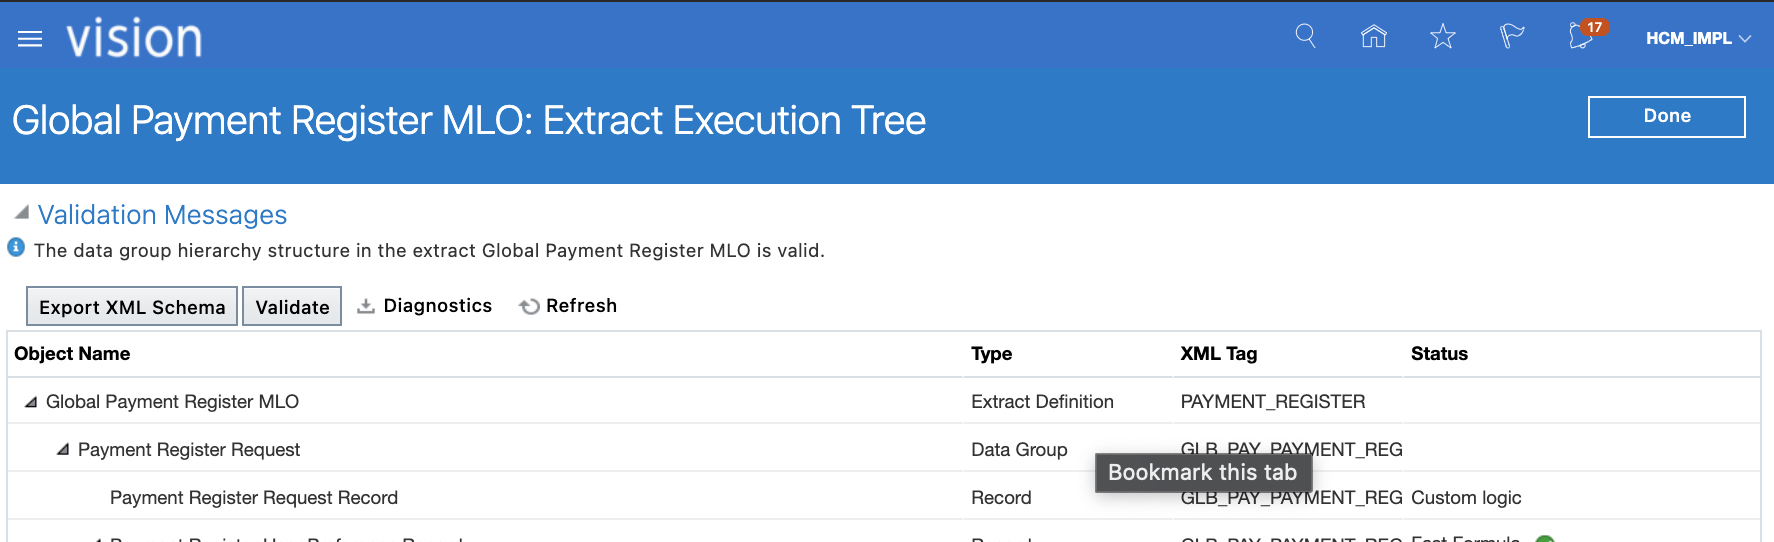
a) From the delivery options window, click on Validate button next to save
Figure 27: Validate HCM Extract
b) Click OK.
Figure 28: Run validation
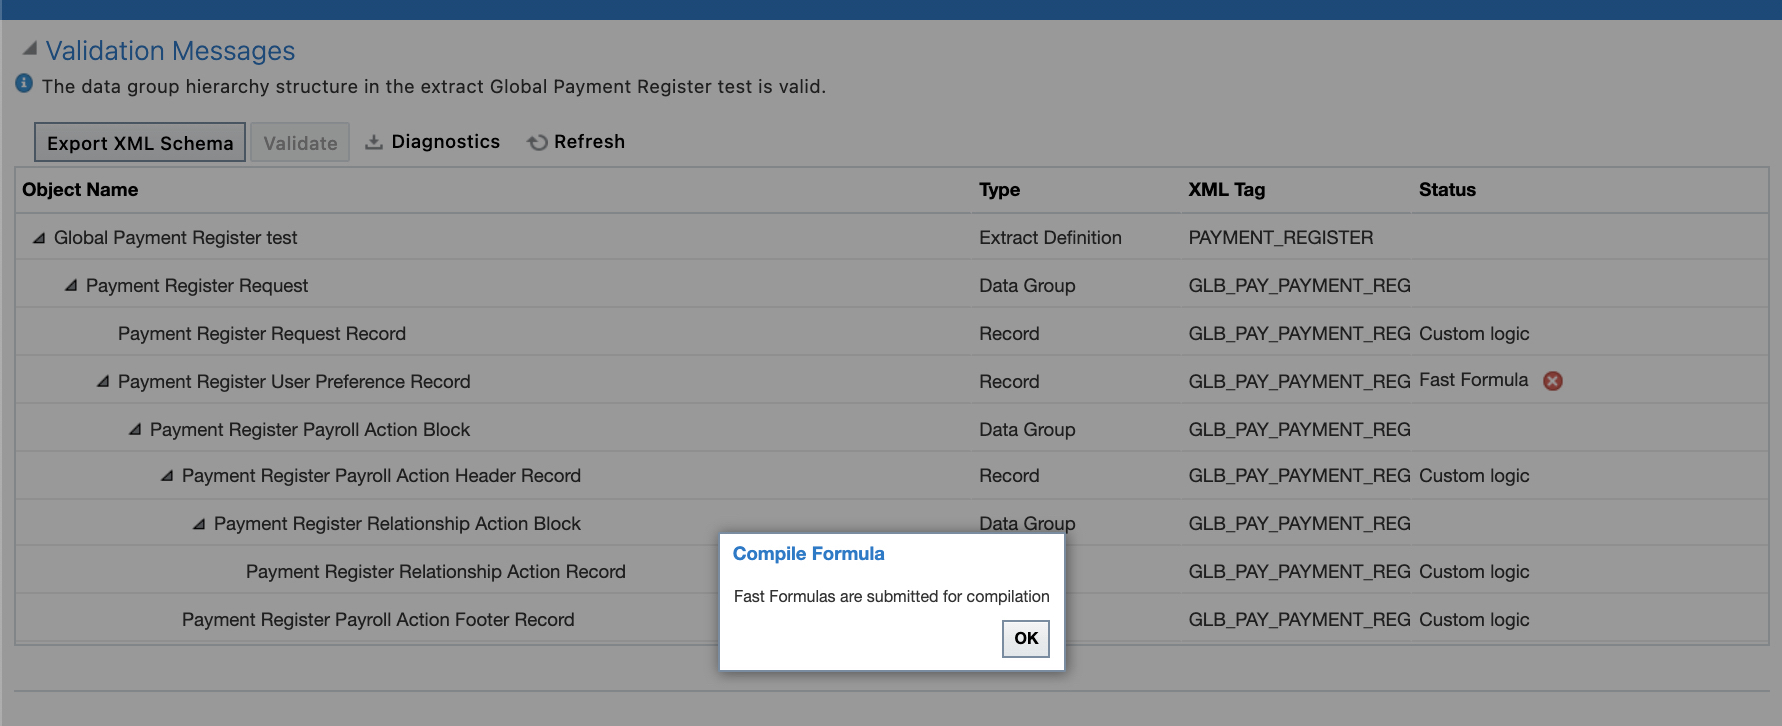
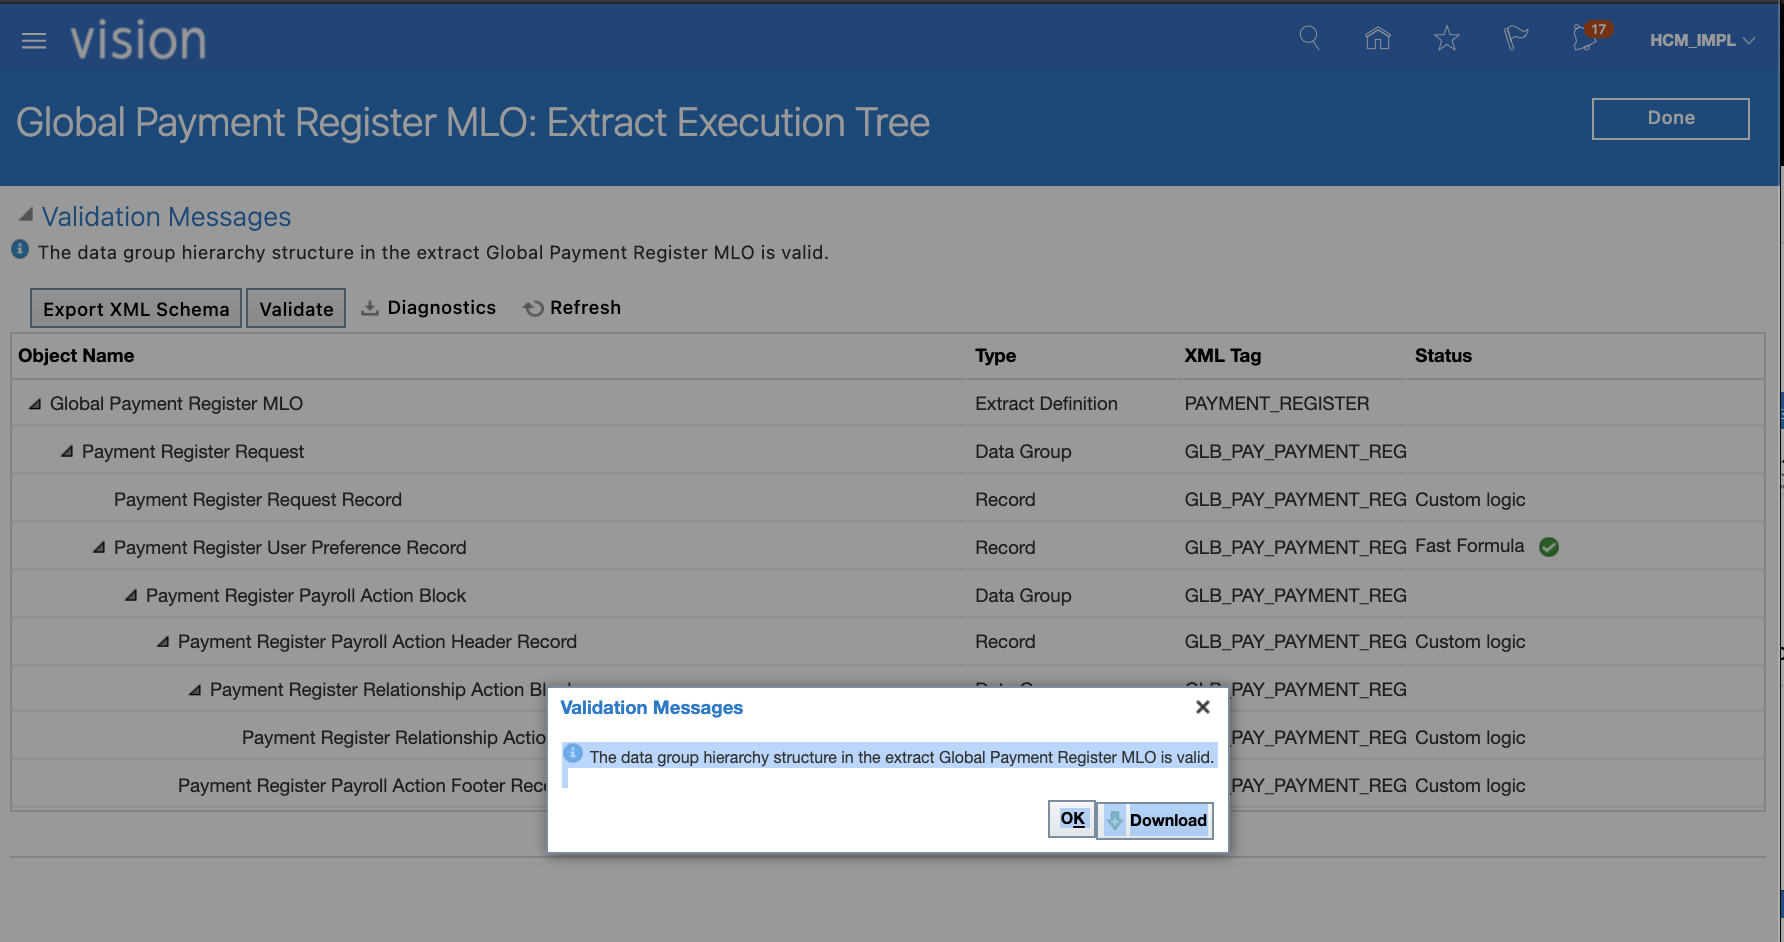
c) Click on Refresh. Verify that the data group hierarchy structure is valid verify that all the fast formulas are valid. Click the Done button in the upper right corner
Figure 29: Refresh and confirm Fast Formula are valid.
Submitting the HCM Extract
Now that the HCM Extract is ready and data has been prepated, we can run the HCM Extract by submitting the corresponding Payroll Flow.
Manually Submit the HCM Extract
a) Navigate to Home > My Client Group > Payroll
Figure 30 : Access Payroll
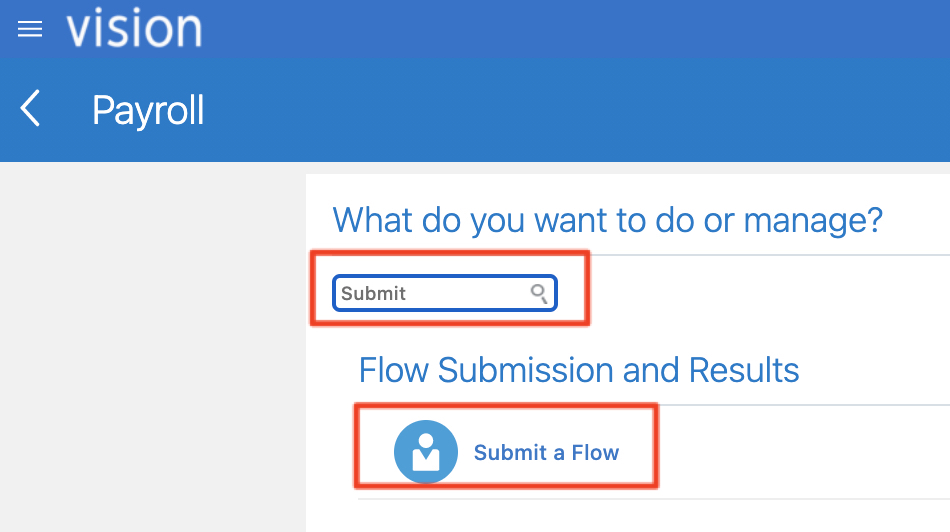
b) Filter by word “Submit” and click on Submit a Flow
Figure 31 : Submit a Flow
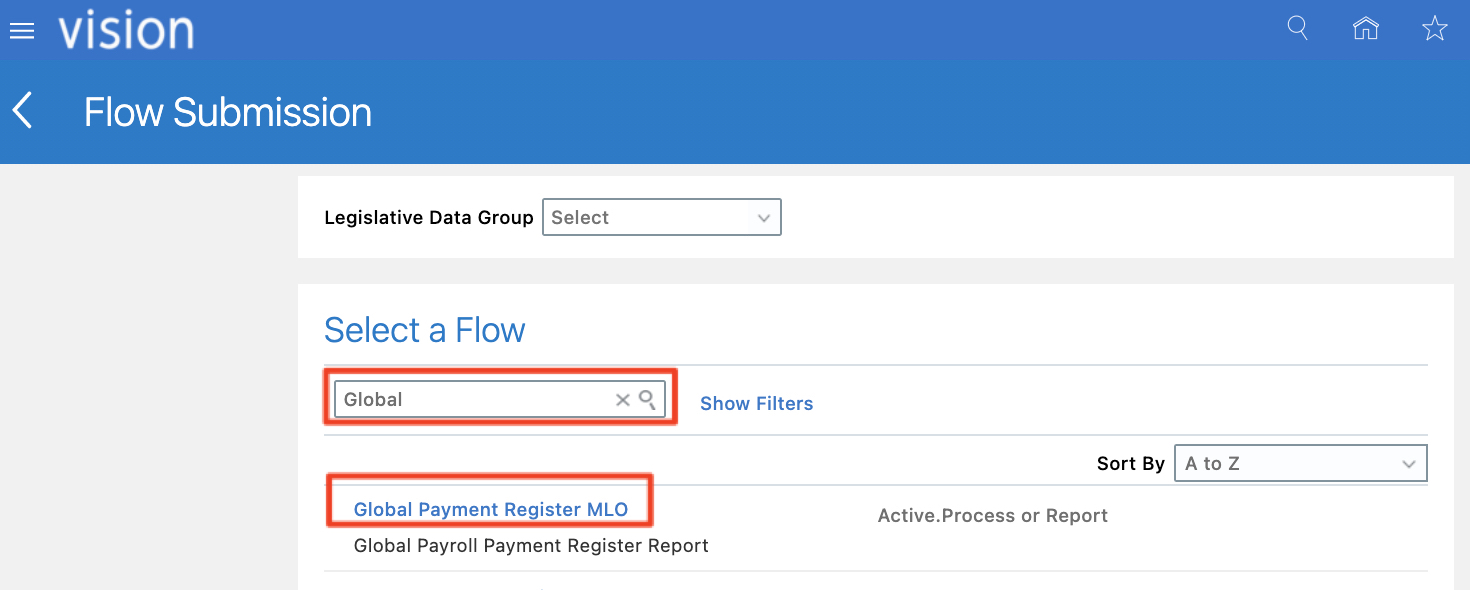
c) Filter by ” Global” keyword and select Global Payment Register MLO flow
Figure 32 : Select Global Payment Register MLO Flow
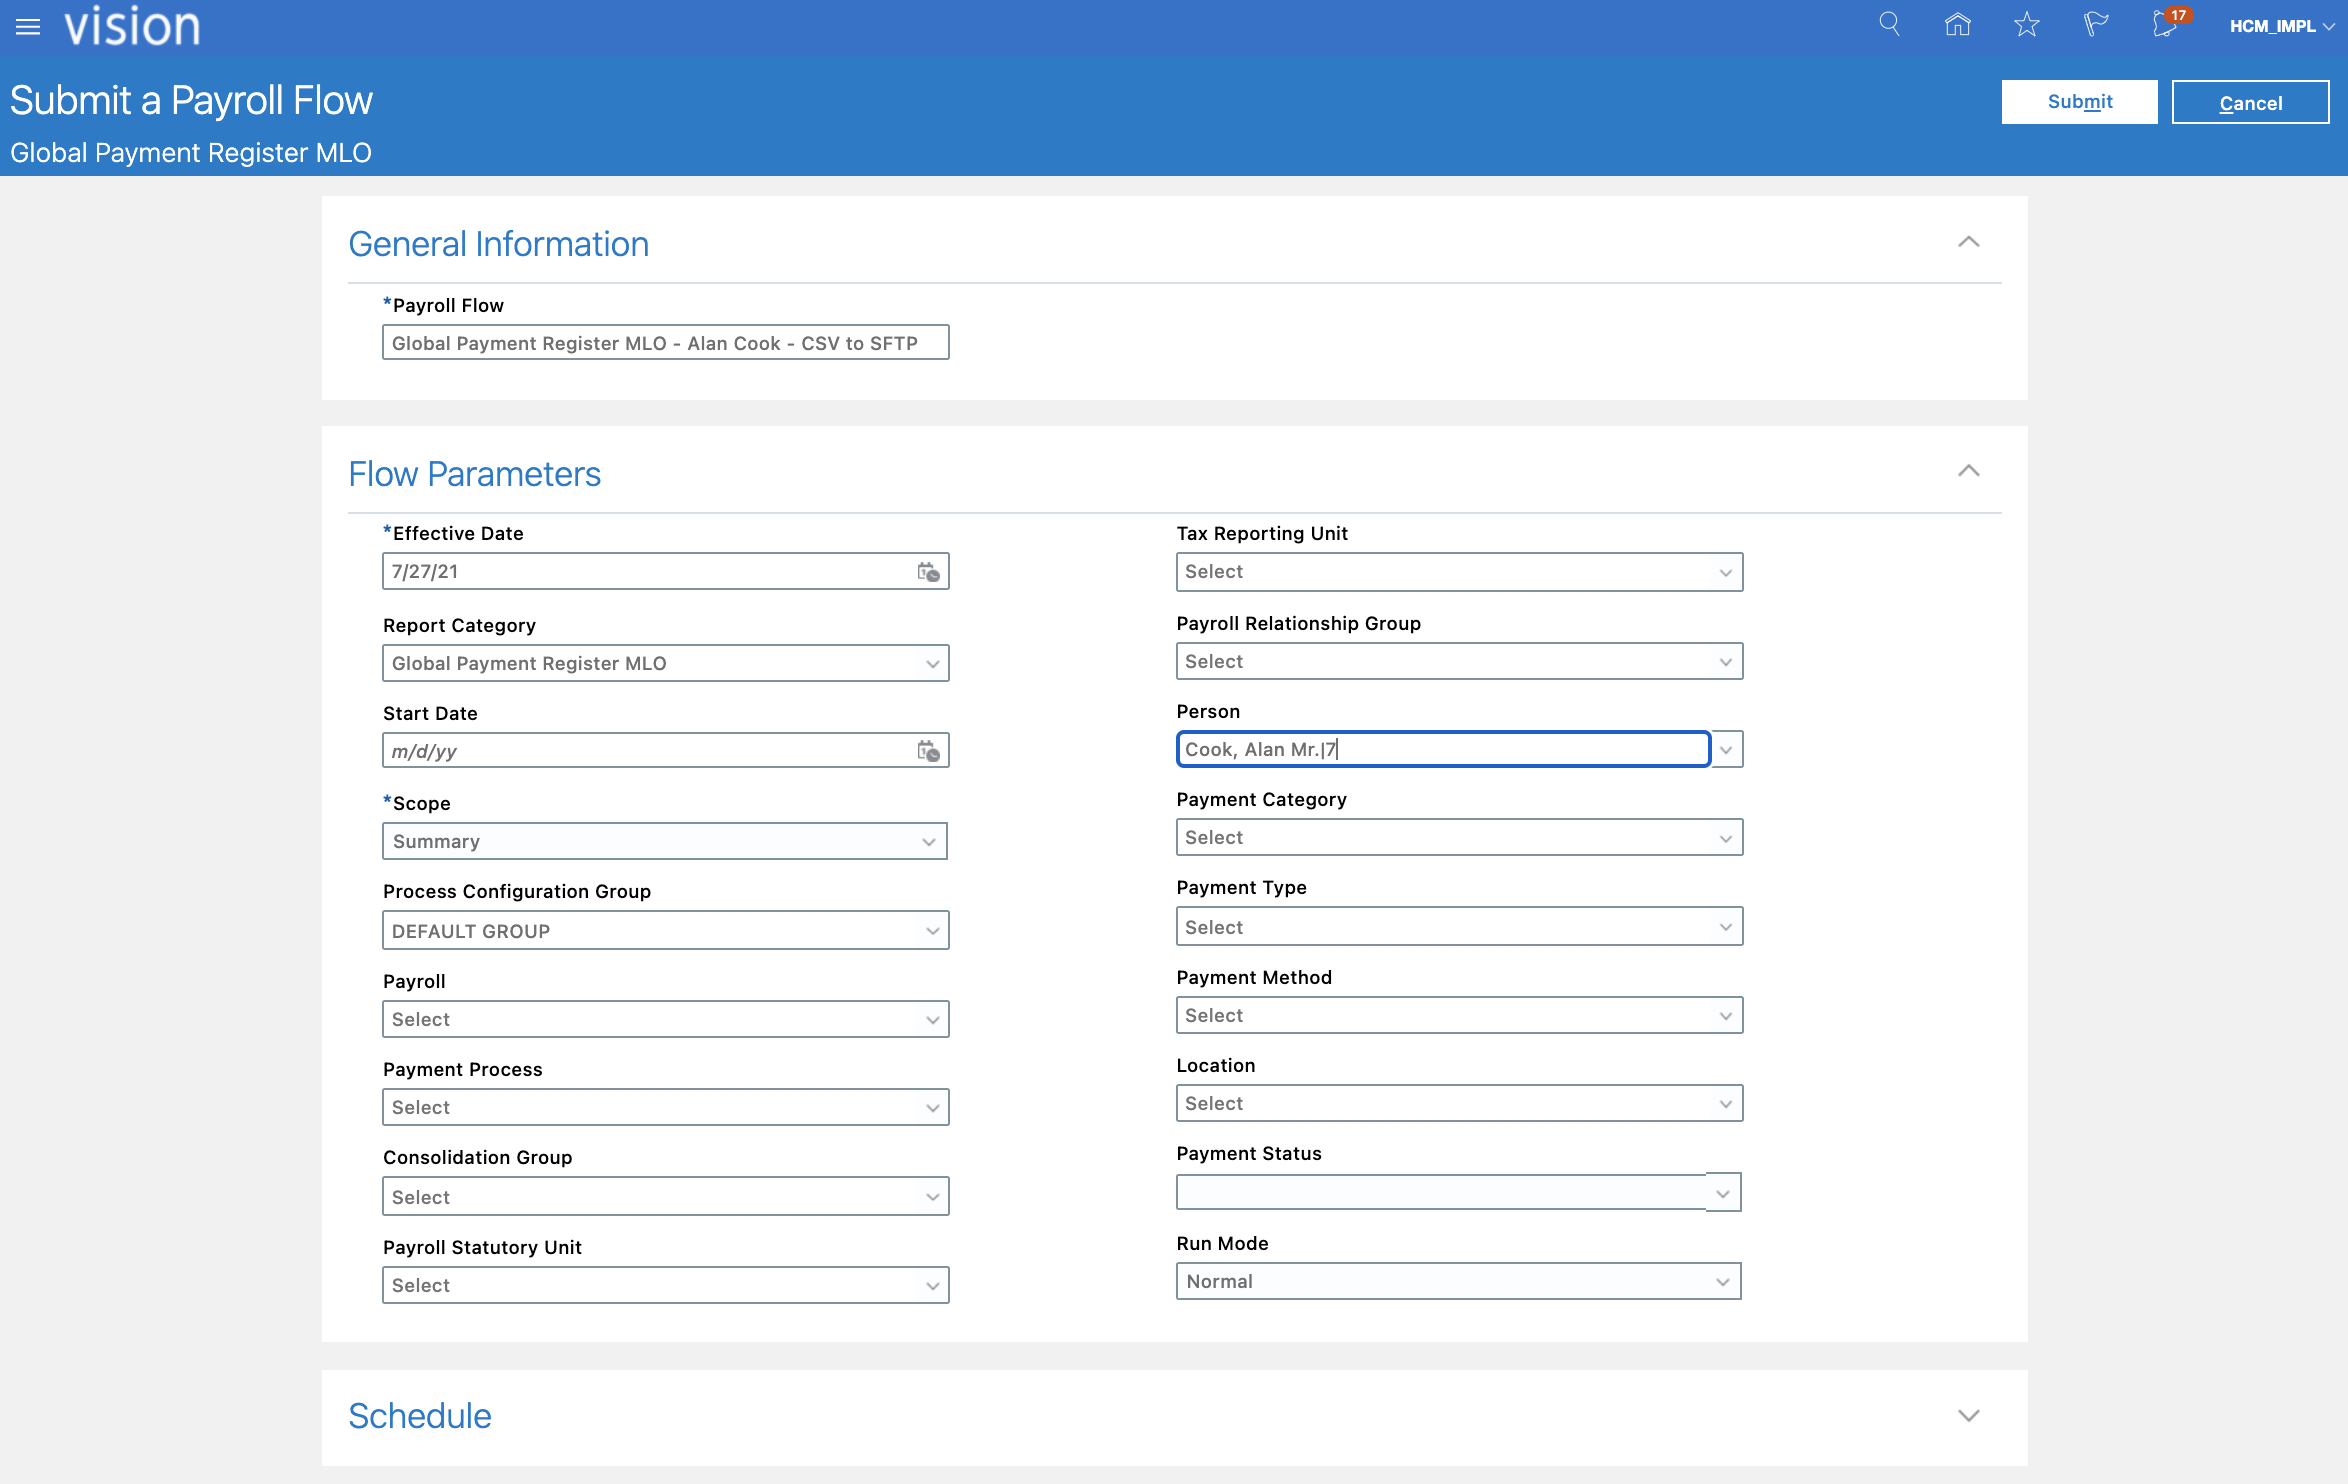
d) Enter the Flow details and make sure to choose a Person and Effective Date according to the data that has been prepared in previous section. Click Submit.
Figure 33 : Enter Flow details and Submit
e) Wait for flow to complete
Figure 34 : Wait for Flow
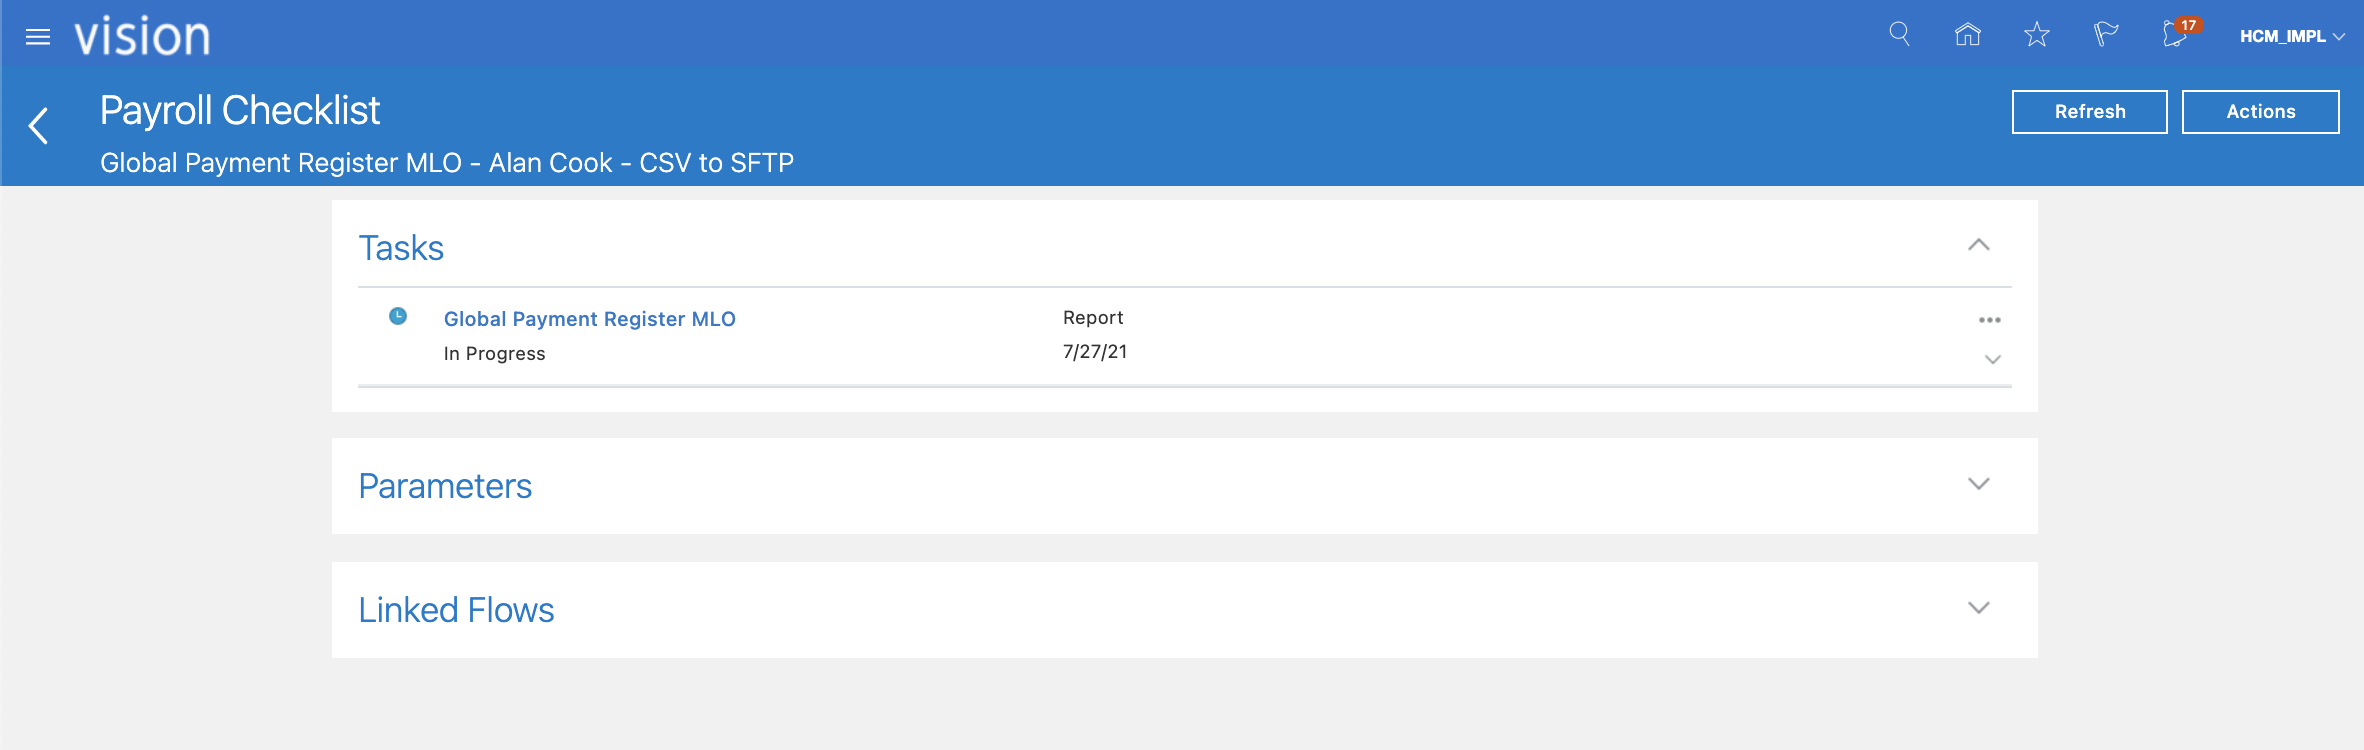
f) Once flow is completed, open the task to review
Figure 35 : Open Flow Task
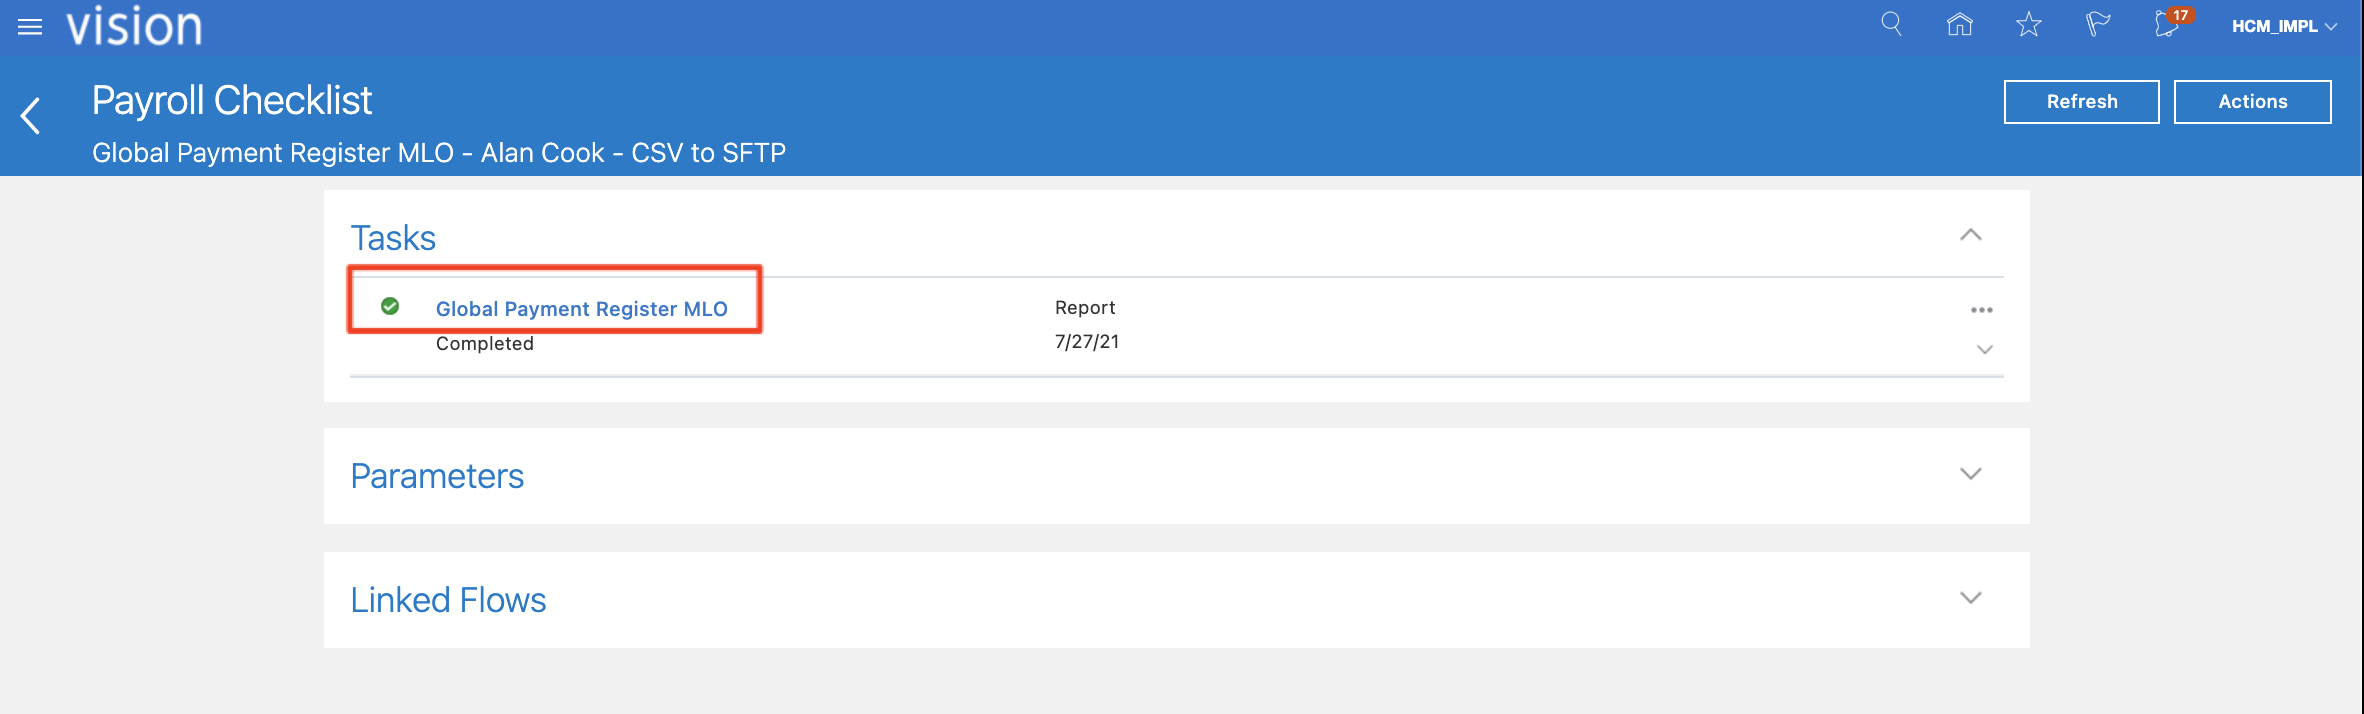
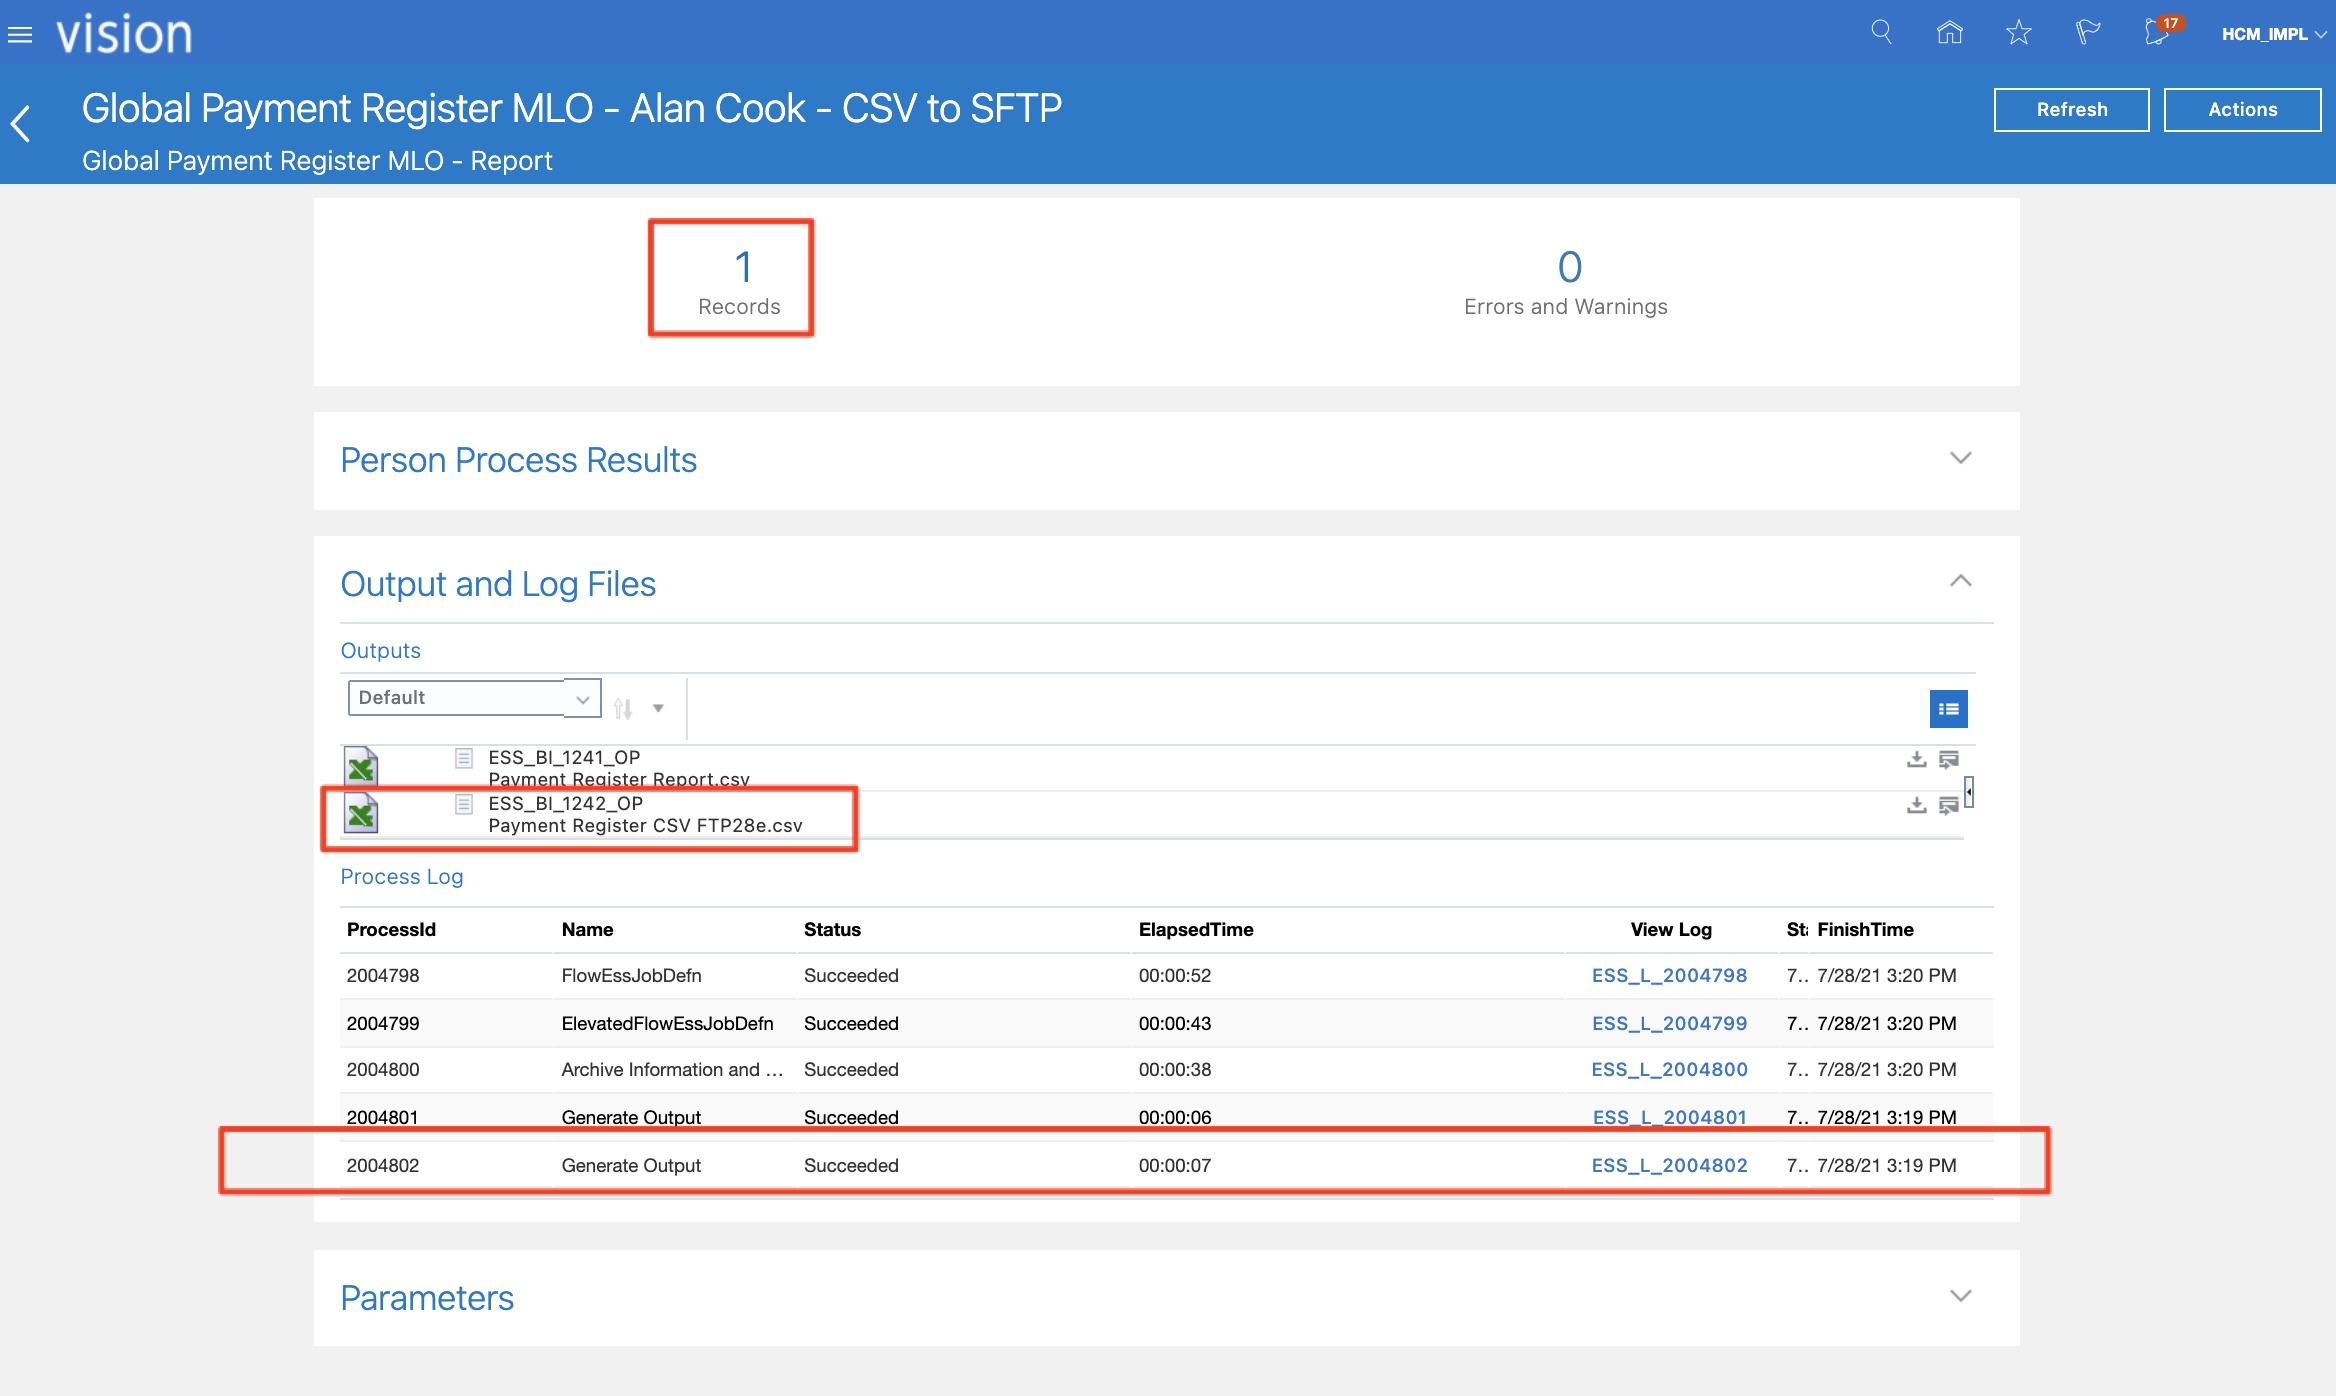
g) Review the Process Results
Figure 36 : Review Process Results
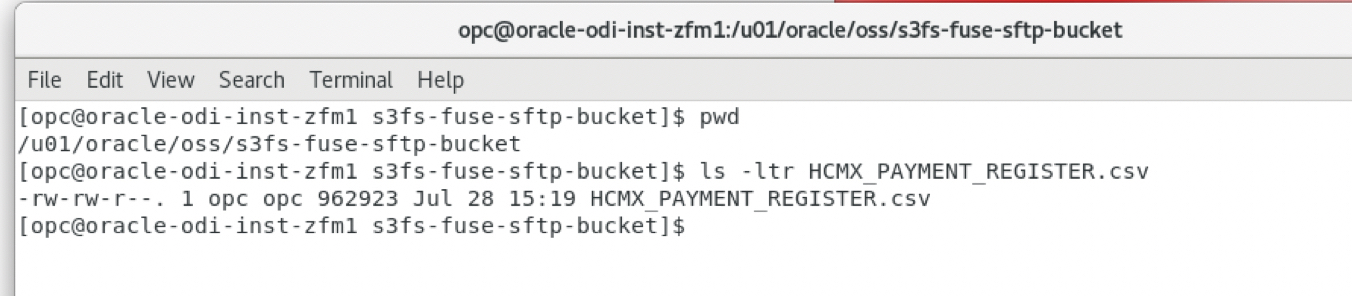
h) Login to the ODI VM and verify that the HCM Extract file has been generated
Figure 37 : Validate HCM Extract on ODI VM
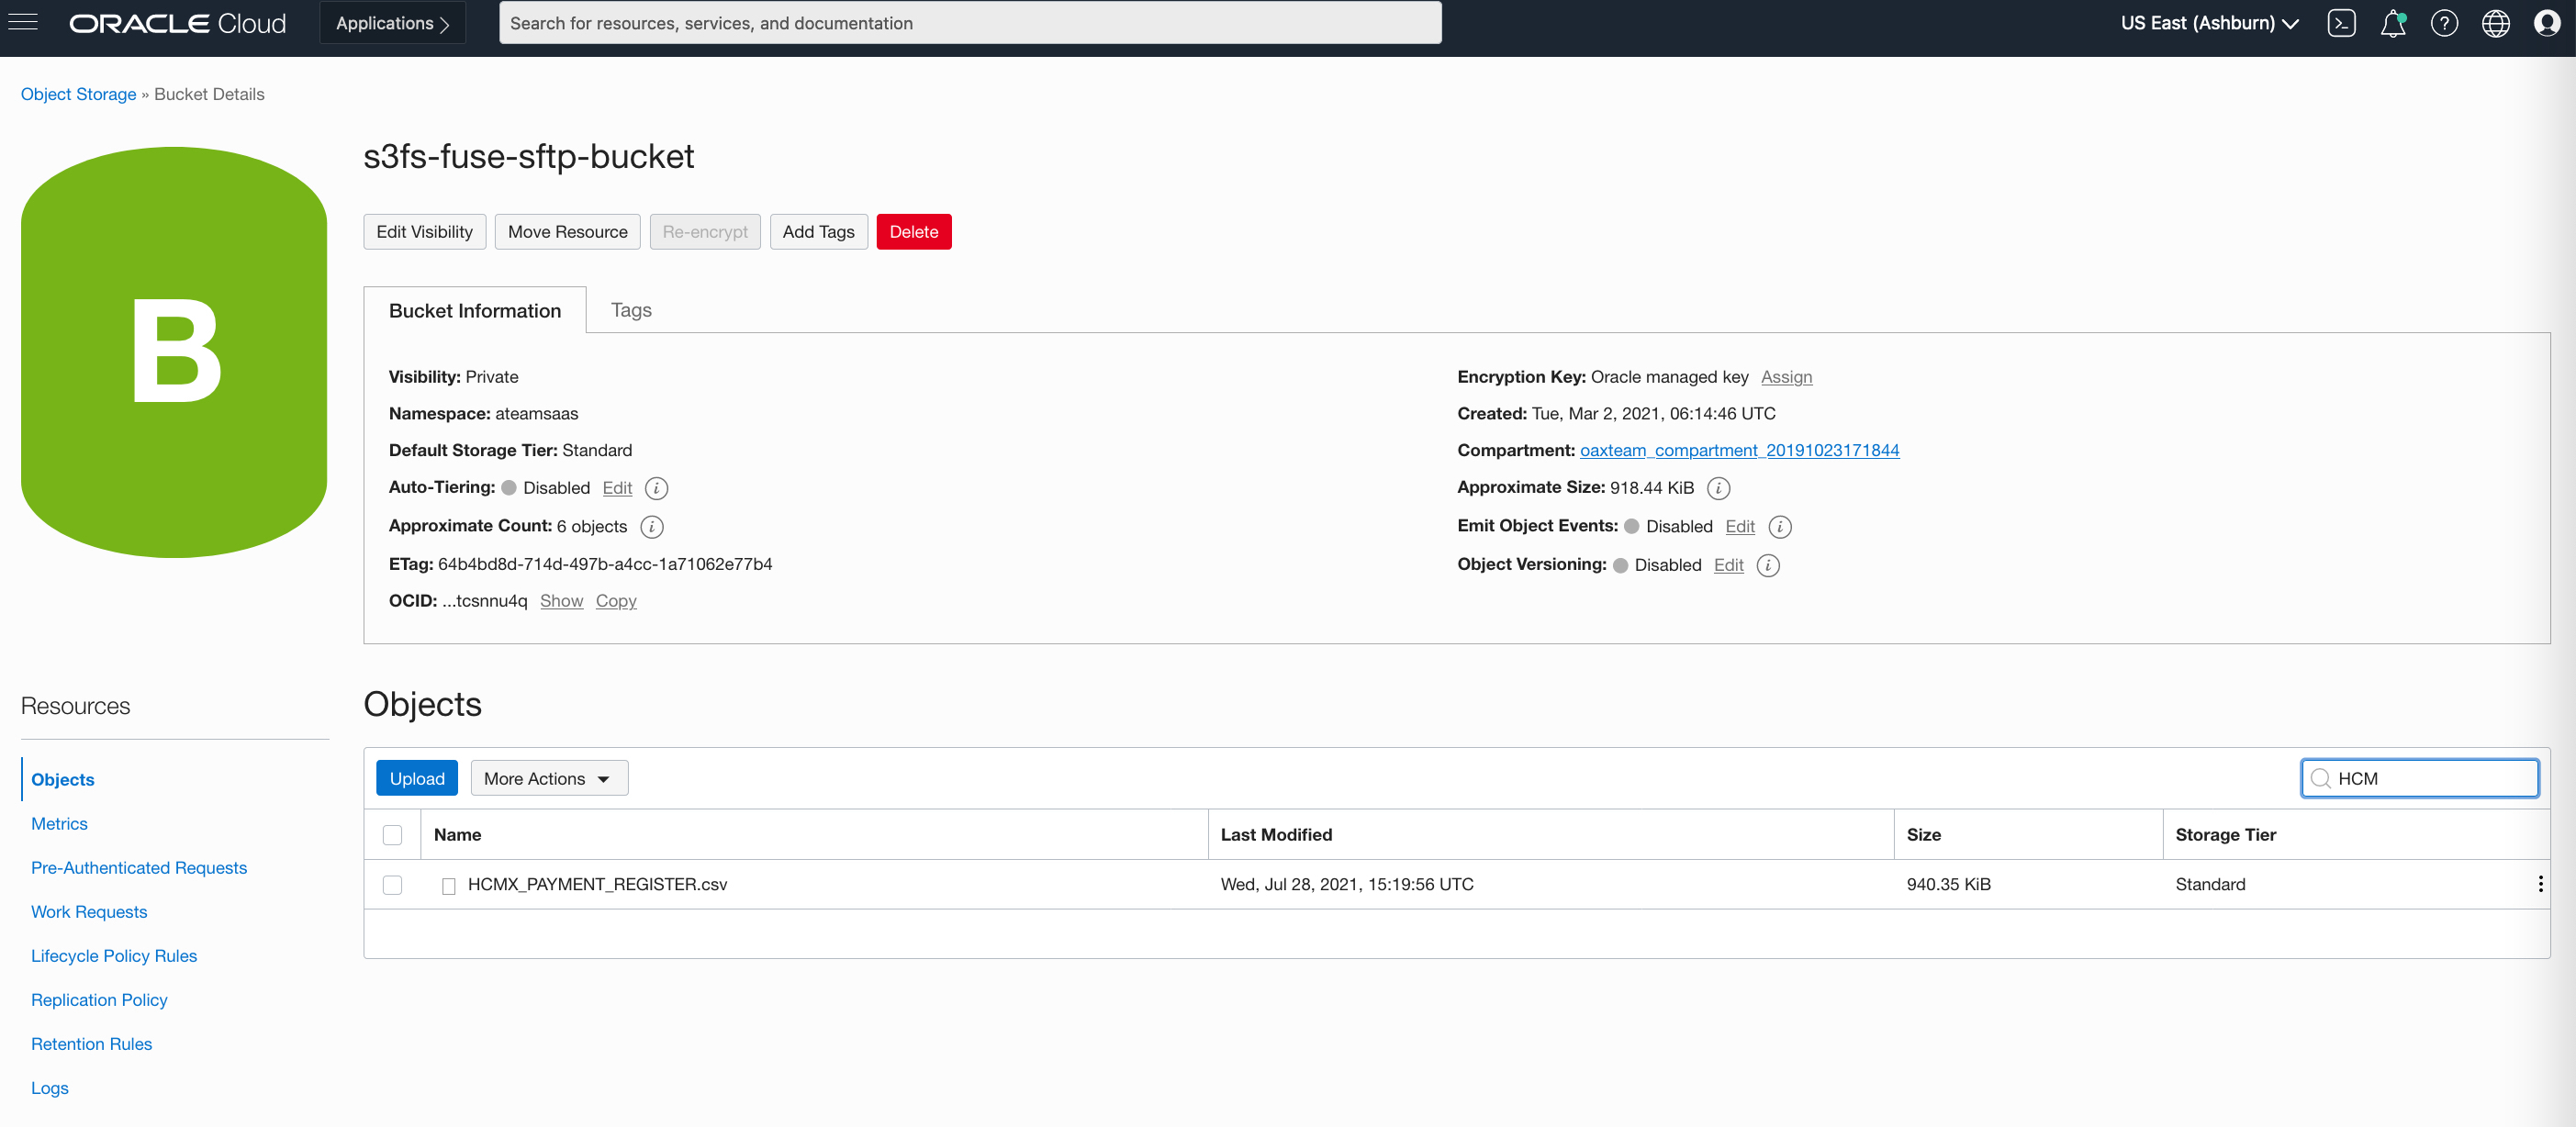
i) Navigate to the OCI Console and access the bucket that was configured during Part 1 blog.
Figure 38 : Validate HCM Extract on OCI Console
This concludes the activities in this article.
Want to Learn More?
Click here for more A-Team Oracle Data Integrator (ODI) Blogs.
Click here to sign up to the RSS feed to receive notifications for when new A-team blogs are published.
Click here to access the ODI Marketplace documentation library.
Summary
This article walked through the steps to configure HCM Extracts to ouput csv files to OCI Object Storage.
Bookmark this post to stay up-to-date on changes made to this blog as our products evolve.
Authors
Matthieu Lombard
Consulting Solution Architect
The Oracle A-Team is a central, outbound, highly technical team of enterprise architects, solution specialists, and software engineers.
The Oracle A-Team works with external customers and Oracle partners around the globe to provide guidance on implementation best practices, architecture design reviews, troubleshooting, and how to use Oracle products to solve customer business challenges.
I focus on data integration, data warehousing, Big Data, cloud services, and analytics (BI) products. My role included acting as the subject-matter expert on Oracle Data Integration and Analytics products and cloud services such as Oracle Data Integrator (ODI), and Oracle Analytics Cloud (OAC, OA For Fusion Apps, OAX).