
Introduction
PingOne can be used as the authoritative identity source for Oracle Cloud Infrastructure (OCI) IAM identity domains by using SCIM provisioning. In this model, users, groups, and group memberships are managed in PingOne and provisioned into OCI IAM.
Once the groups are available in OCI, IAM policies can be written against those provisioned groups to control access to OCI PaaS resources. Additionally, service roles can be granted to these users and groups for any Oracle SaaS applications associated with the identity domain.
This article describes how to configure outbound SCIM provisioning from PingOne to OCI IAM. It complements the SSO setup described in Set up Single Sign-On Between OCI IAM and PingOne.
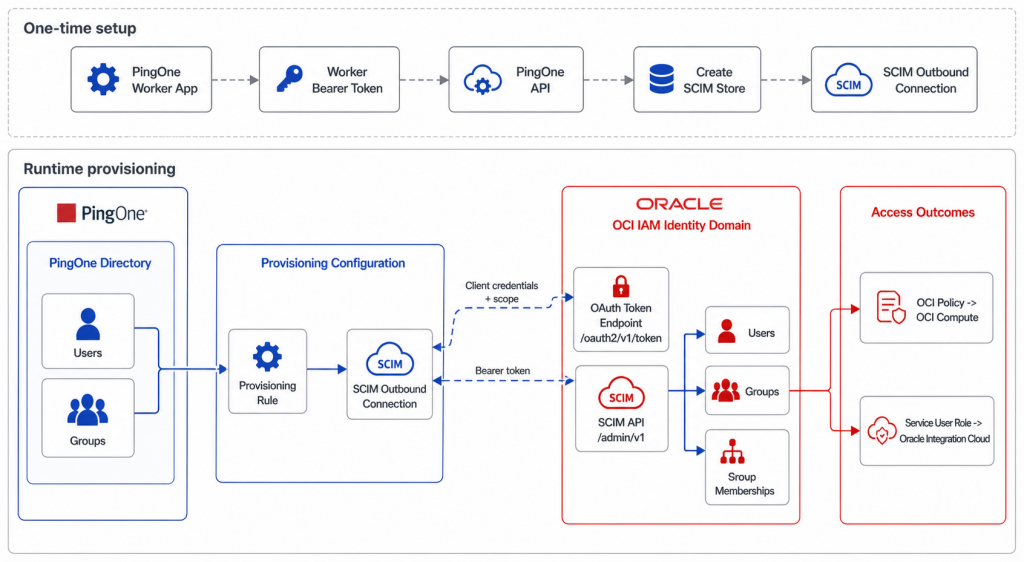
The architecture has three main flows:
- A PingOne worker application performs a one-time setup task by obtaining a PingOne bearer token and using the PingOne API to create the SCIM outbound connection.
- During runtime provisioning, PingOne uses the provisioning rule to send selected users, groups, and group memberships through the SCIM outbound connection.
- The SCIM outbound connection obtains a bearer token from the OCI IAM identity domain token endpoint, calls the OCI IAM SCIM API, and creates or updates users, groups, and group memberships in the identity domain.
Why not use PingOne Admin console for creating the SCIM connection?
- OCI IAM requires the OAuth token request to include the correct scope (example, “urn:opc:idm:__myscopes__“). The way to set it in the PingOne configuration is through a property called OAUTH_SCOPE.
- OCI IAM also expects group membership updates to use SCIM PATCH semantics. The USE_GROUP_PATCH value must be set to true.
At the time of writing, both of these mentioned properties are unavailable for configuration through console, but are exposed through APIs.
Objectives
- Create a confidential application in OCI IAM for SCIM provisioning
- Capture the OCI IAM identity domain URL, and construct the SCIM and OAuth token endpoints
- Create a PingOne worker application with environment-level Identity Data Admin access
- Generate a PingOne worker access token
- Create the PingOne SCIM outbound connection by using the PingOne API
- Create a PingOne provisioning rule to provision selected users and groups into OCI IAM
- Validate users, groups, and group memberships in OCI IAM
Prerequisites
- Access to an OCI tenancy with permissions to manage identity domains, integrated applications, users, groups, and policies
- Access to the target OCI IAM identity domain
- Access to a PingOne environment with permissions to create worker applications, assign environment-level roles, and configure provisioning
- curl installed on the workstation used to run the initial API requests
- PingOne users & groups with appropriate memberships
Section 1: Configure the Confidential Application in OCI IAM
Create a confidential application in the target OCI IAM identity domain. PingOne uses this application to obtain OAuth access tokens for SCIM API calls.
- Sign in to the OCI Console.
- Go to Identity & Security.
- Under Identity, click Domains.
- Click the identity domain where users and groups should be provisioned.
- Click Integrated applications.
- Click Add app & select Confidential Application.
- Enter a name for the application.
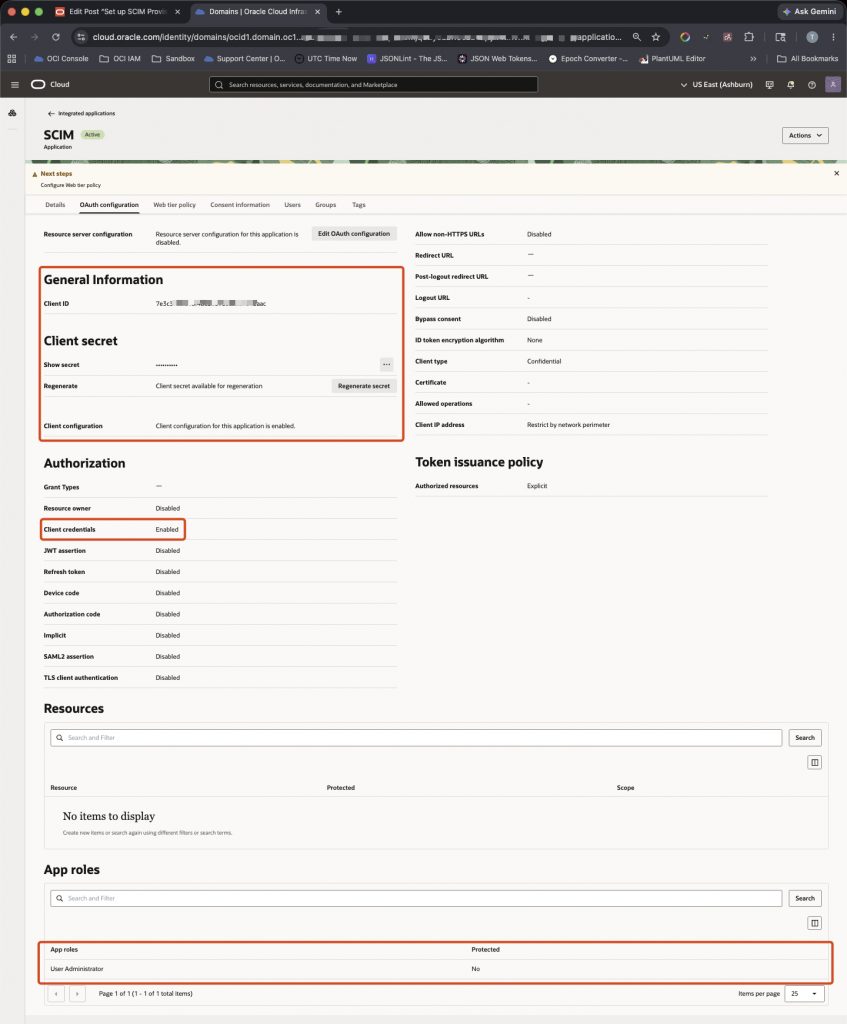
- In the OAuth client configuration, enable Client Credentials as the allowed grant type.
- In the App Roles section, click Add app roles.
- Search for and select User Administrator & click Add.
- Finish creating the application & activate it.
- Copy the Client ID and Client Secret. These values are used in the PingOne SCIM store configuration in Section 4.
For more details on the confidential application setup, see Adding a Confidential Application.
From the identity domain home page, capture the domain URL. The URL is usually in this format:
https://idcs-XXX.identity.oraclecloud.com:443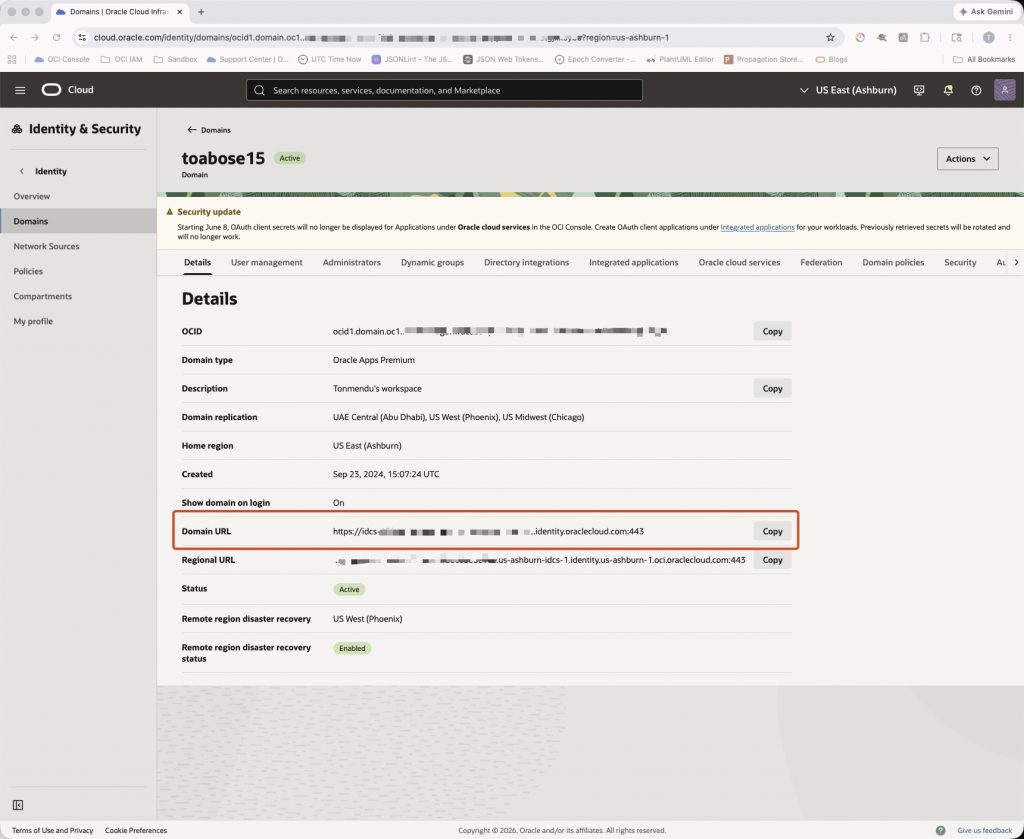
Use the domain URL to construct these endpoints:
OCI SCIM Endpoint:  {{ociDomainUrl}}/admin/v1
OCI Token Endpoint: {{ociDomainUrl}}/oauth2/v1/token
Section 2: Create the PingOne Worker Application
Create a PingOne worker application to call the PingOne API and create the SCIM outbound store.
- Sign in to the PingOne admin console.
- Open the PingOne environment that will be the authoritative source.
- Go to Applications.
- Click + to add an application.
- Select Worker as the application type.
- Create the worker application.
- Assign the worker application the Identity Data Admin role at the environment level.
- In the worker application overview, capture the following values which will be used in Section 3.
Environment ID
Client ID
Client Secret
PingOne Token Endpoint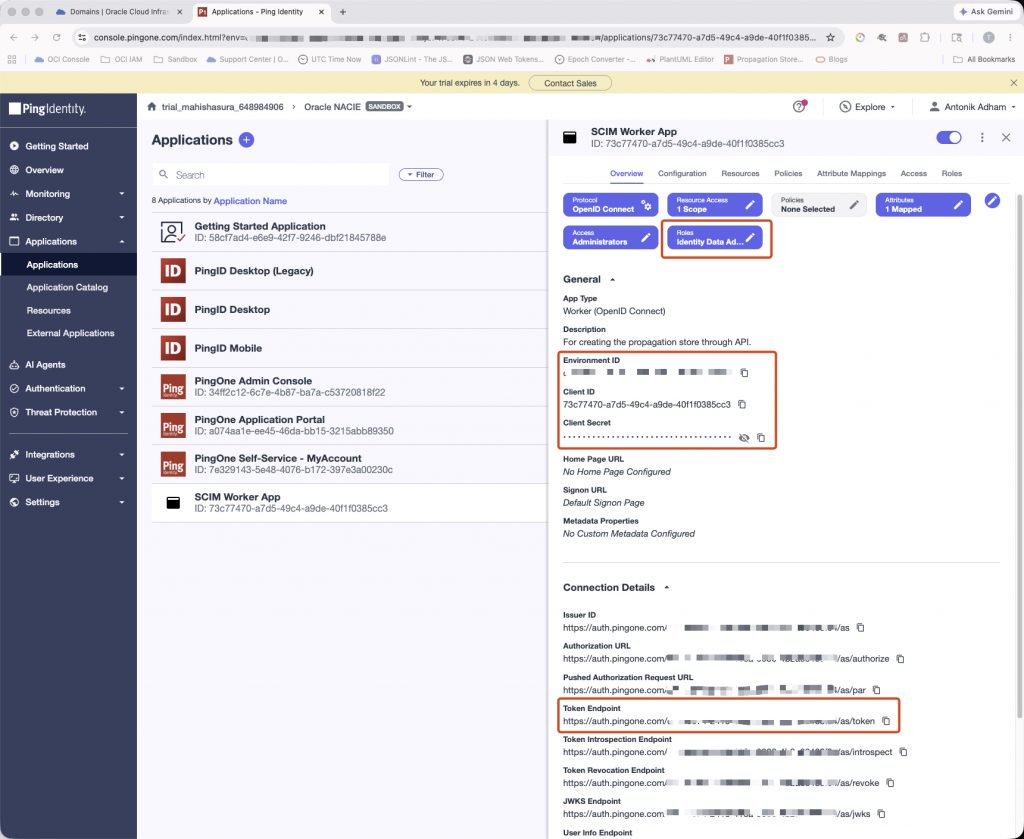
PingOne uses regional API endpoints. For example, a US environment uses:
authPath = https://auth.pingone.com
apiPath  = https://api.pingone.com/v1
For other regions, use the regional endpoints for your environment. See the community question Where to locate my apiPath? for more details.
Section 3: Get a PingOne Worker Access Token
Create the Basic authorization value from the PingOne worker application client ID and client secret. On a macOS or Linux system, execute the below:
echo -n {worker-client-id}:{worker-client-secret} | base64The output will be a base64 encoding of the worker credentials. This can be passed to the PingOne Token Endpoint using curl.
curl --location '{PingOne Token Endpoint}' \
--header 'Content-Type: application/x-www-form-urlencoded' \
--header 'Authorization: Basic {worker-credentials}' \
--data-urlencode 'grant_type=client_credentials'
The response includes an access token (we will call it ‘workerAccessToken’) for the worker app. Use this as the bearer token in the SCIM store creation request as explained in the next section.
Section 4: Create the PingOne SCIM Outbound Store
For general information on this SCIM connector, see Creating a SCIM connection. Ensure the below details are available before proceeding further.
{{apiPath}}              PingOne regional API path
{{envID}}                PingOne environment ID
{{workerAccessToken}}    Access token from the PingOne worker application
{{ociDomainUrl}}         OCI IAM identity domain URL
{{ociClientID}}          OCI IAM confidential application client ID
{{ociClientSecret}}      OCI IAM confidential application client secret
Use the following request to create the SCIM store. For more details on the various parameters this API supports, see Create Store (SCIM).
curl -v --location -X POST '{{apiPath}}/environments/{{envID}}/propagation/stores' \
--header 'Content-Type: application/json' \
--header 'Authorization: Bearer {{workerAccessToken}}' \
--data '{
    "name": "OCI IAM",
    "type": "scim",
    "status" : "ACTIVE",
    "configuration": {
        "SCIM_URL": "{{ociDomainUrl}}/admin/v1",
        "AUTHENTICATION_METHOD": "OAuth 2 Client Credentials",
        "AUTHORIZATION_TYPE": "Bearer",
        "OAUTH_TOKEN_REQUEST": "{{ociDomainUrl}}/oauth2/v1/token",
        "OAUTH_CLIENT_ID": "{{ociClientID}}",
        "OAUTH_CLIENT_SECRET": "{{ociClientSecret}}",
        "OAUTH_SCOPE": "urn:opc:idm:__myscopes__",
        "SCIM_VERSION": "2.0",
        "UNIQUE_USER_IDENTIFIER": "userName",
        "USERS_RESOURCE": "/Users",
        "USER_FILTER": "userName eq \"%s\"",
        "REMOVE_ACTION": "Delete",
        "GROUPS_RESOURCE": "/Groups",
        "GROUP_MEMBERSHIP_HANDLING": "Merge",
        "USE_GROUP_PATCH": true
    }
}'
A successful request returns HTTP 201 and a SCIM store response. The store is visible in the PingOne Admin Console under Integrations > Provisioning > Connections. A connection test can be performed before proceeding for a quick validation. This is available by editing the configuration & clicking on Test Connection.
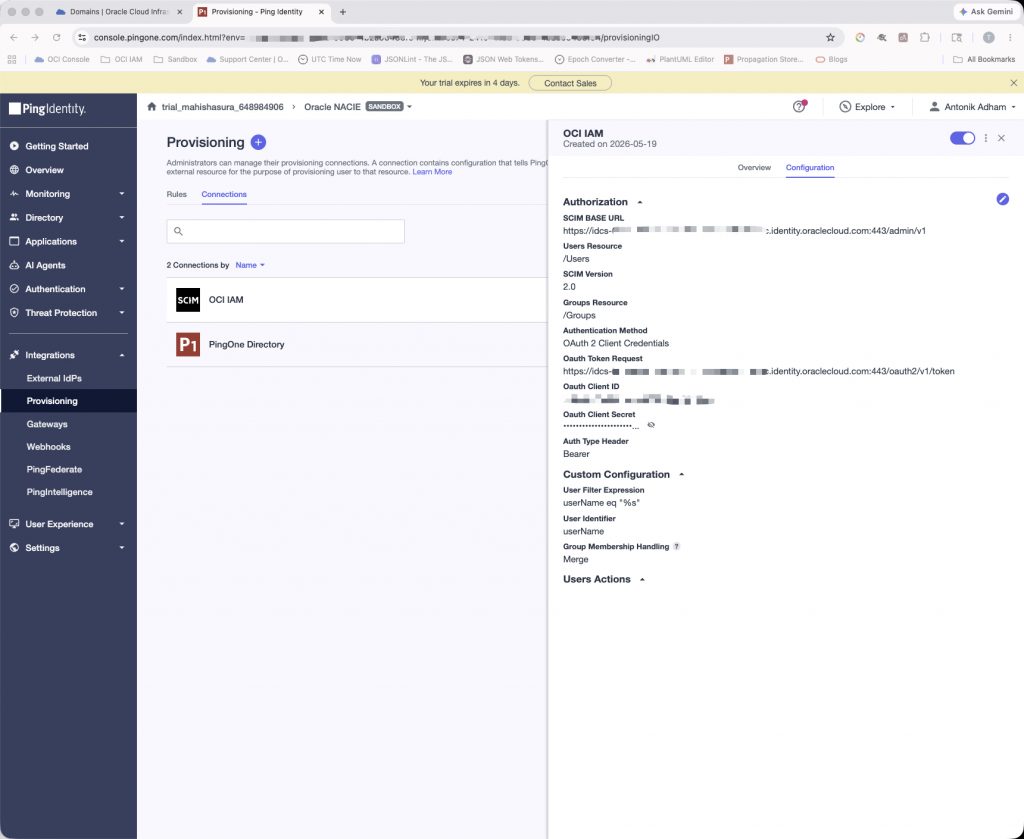
GROUP_MEMBERSHIP_HANDLING is set to Merge so that group membership changes are sent in a format accepted by the OCI IAM SCIM endpoint.
Section 5: Create the PingOne Provisioning Rule
After the SCIM store is created by the API, create a provisioning rule in the PingOne Admin Console and reference the connection.
- Open the PingOne environment home page.
- Go to Integrations & click Provisioning.
- Click + to create a New Rule.
- In the Add Rule dialog box, select PingOne as Source.
- Under Available Connections, select the OCI IAM SCIM connection that was created earlier.
- Click Continue & enter a name for the rule.
- Configure the user filter: In the tested setup, ‘Group Names‘ attribute was used to limit the scope of provisioning to particular members only.
- Configure the group filter: Select the same group that was used for user filter. This enables the group & membership details to be synchronised as well.
- Review the attribute mappings from a working setup. Save and enable the provisioning rule.
| PingOne Directory Attribute | OCI IAM Attribute |
|---|---|
| Enabled | active |
| Family Name | familyName |
| Given Name | givenName |
| Username | userName |
| Email Address | workEmail |
For more details on creating the rule, see Creating an outbound rule.
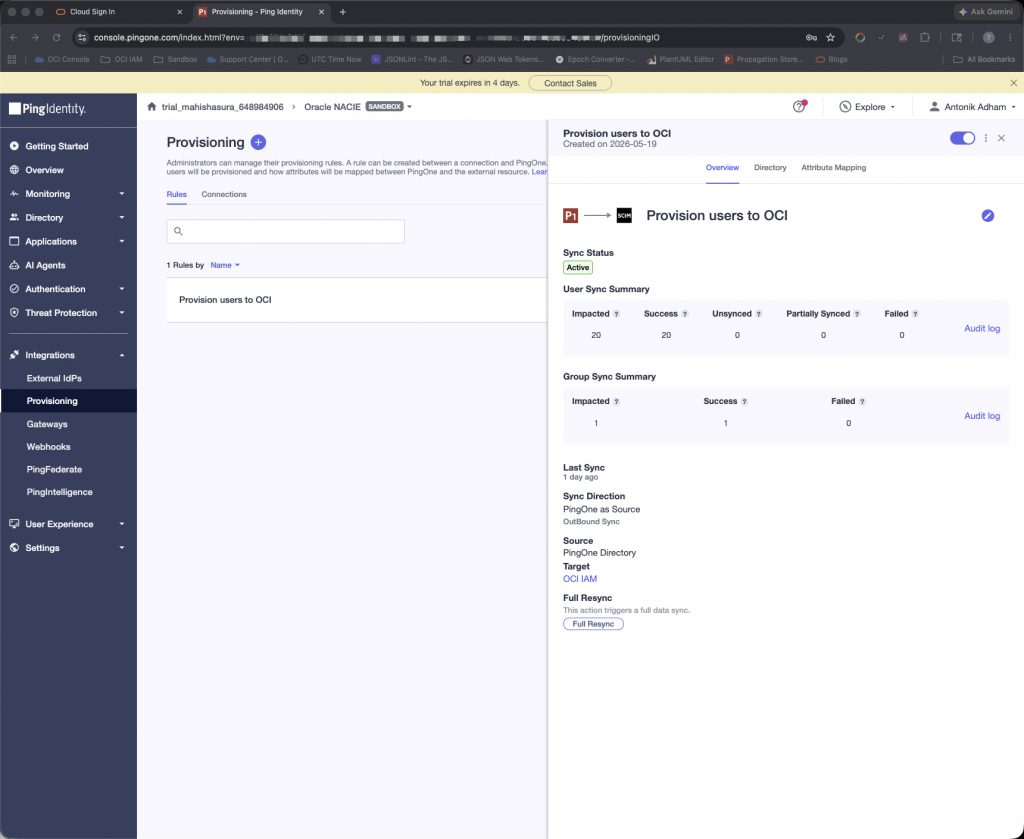
Section 6: Validate provisioning in OCI IAM & setup access
Validate that users and groups are created in OCI IAM.
- Open the target identity domain.
- Click User management and confirm that the PingOne users & groups are created.
- Open the group and confirm that the expected users are members of the group.
After the group is provisioned into OCI IAM, IAM policies can be written to grant access to any PaaS resources. For example, the below statement grants provisioned group to manage Compute instances in a particular compartment. For more details, see Getting Started with Policies.
Allow group '{identity-domain-name}'/'{group-name}' to manage instance-family in compartment {compartment-name}Similarly, to grant Service User application role in a SaaS service like Oracle Integration Cloud, the same group can be referenced.
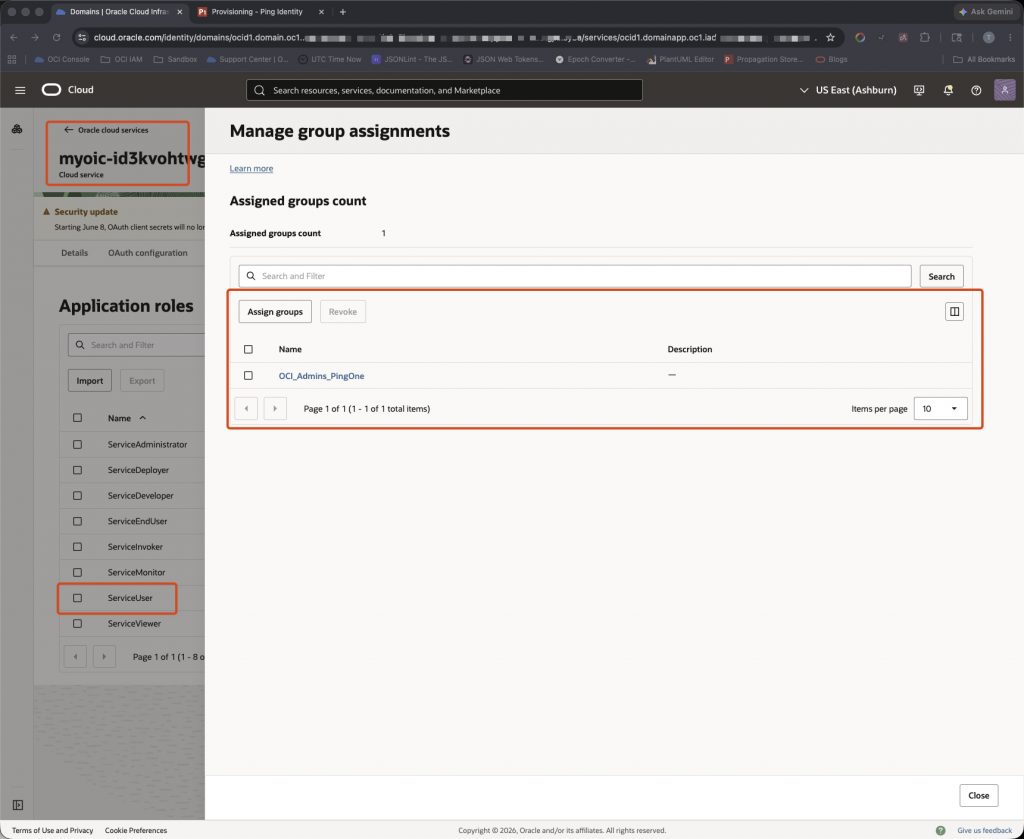
Conclusion
This setup is useful because it allows PingOne to remain the authoritative identity source while extending those identities into OCI IAM for access control. This reduces duplicate administration, keeps access aligned with the source directory, and provides a consistent way to manage cloud and application access from PingOne.