OCI (Oracle Cloud Infrastructure) Generative AI is a fully managed service that provides a range of state-of-the-art language models for building AI applications.
It enables users to easily integrate these models into various use cases, including text generation, summarization, analysis, and chatbots. OCI Generative AI also includes features for creating and fine-tuning custom models, offering a scalable and secure platform for developing and deploying AI solutions.
Oracle Cloud Infrastructure (OCI) Generative AI provides a set of pretrained large language models (LLMs) that can be used for a wide range of tasks such as text generation, summarization, translation, and code generation.
These models are hosted on Oracle Cloud and are accessible via APIs or SDKs.
The following foundation models are currently supported:
- Cohere Command Models
- Meta LLaMA (Large Language Model Meta AI)
In this blog, we’ll explore key networking considerations and supported architectures for OCI Generative AI.
Key Networking Aspects
OCI Generative AI is a regional service and is currently available in the following regions:
- Brazil East (São Paulo)
- Germany Central (Frankfurt)
- Japan Central (Osaka)
- UAE East (Dubai)
- UK South (London)
- US Midwest (Chicago)
Endpoint URL
The Generative AI service is accessible over the internet on port 443 via APIs or SDKs.
It uses the following URL format:
https://inference.generativeai.[region].oci.oraclecloud.com
Example:
https://inference.generativeai.us-chicago-1.oci.oraclecloud.com
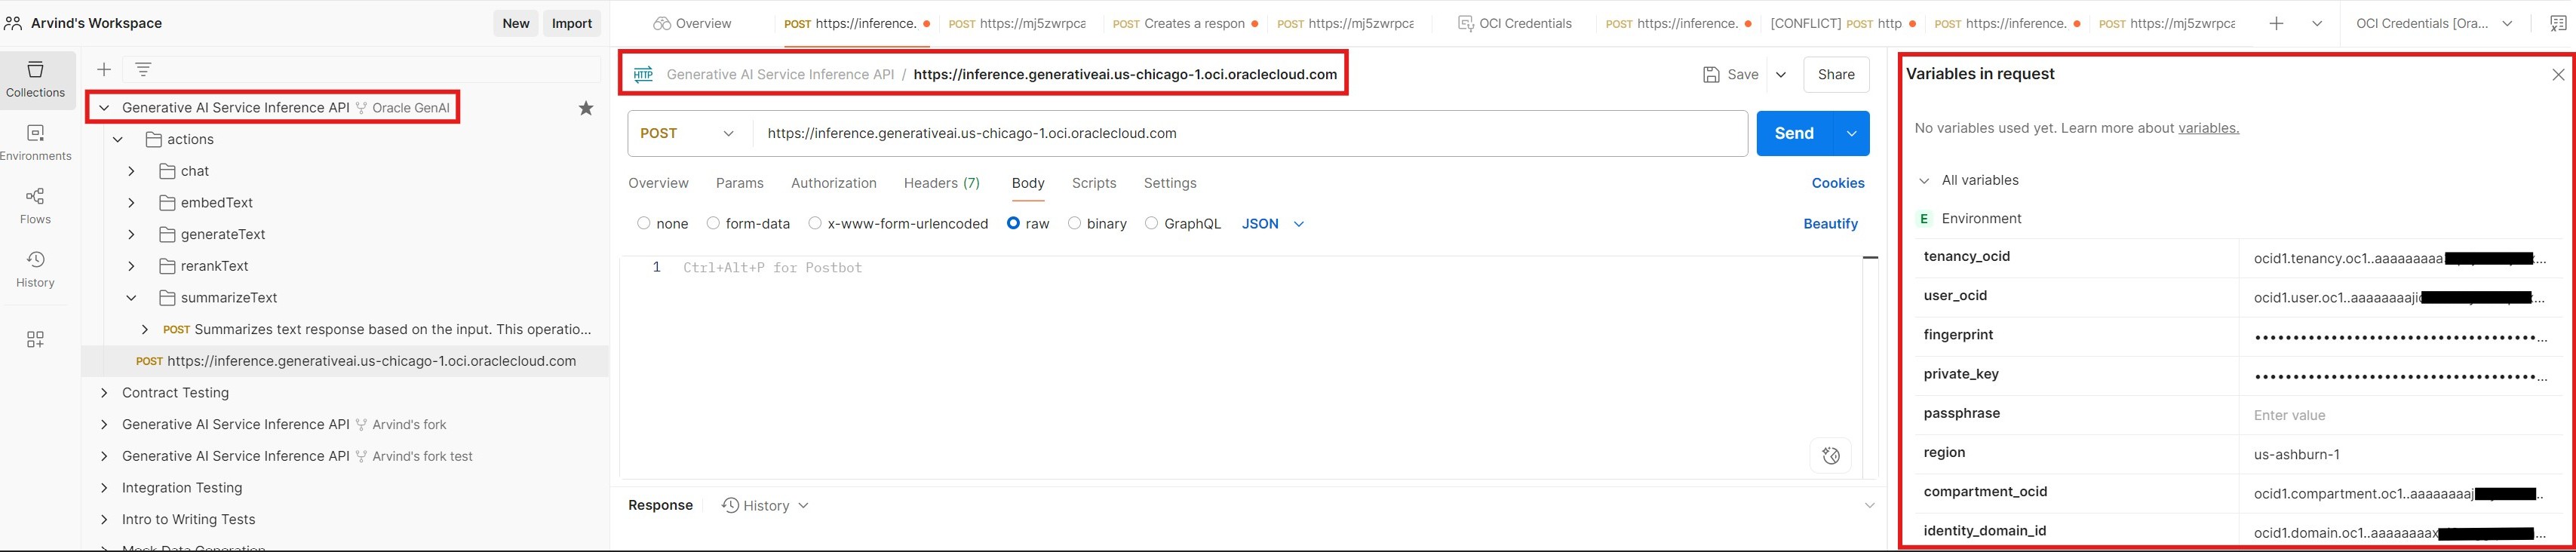
Prerequisite: Postman Setup
To access OCI Generative AI models, in this blog, I’m using Postman, it’s a popular and user-friendly API platform—to demonstrate how to call OCI Generative AI models. However, you may use any tool of your choice to make API requests.
Steps:
- Search for and fork ‘Oracle GenAI – Generative AI Service API’ into your workspace.
- Update your OCI credentials in the Postman environment variables.
Once set up, you can access OCI Generative AI using various connectivity scenarios, depending on your architecture and use case.
Scenarios:
- Access from the Internet
- Access from on-premises via VPN or FastConnect
- Access as Private Endpoint
a. Network Load Balancer (NLB)
b. API and Functions
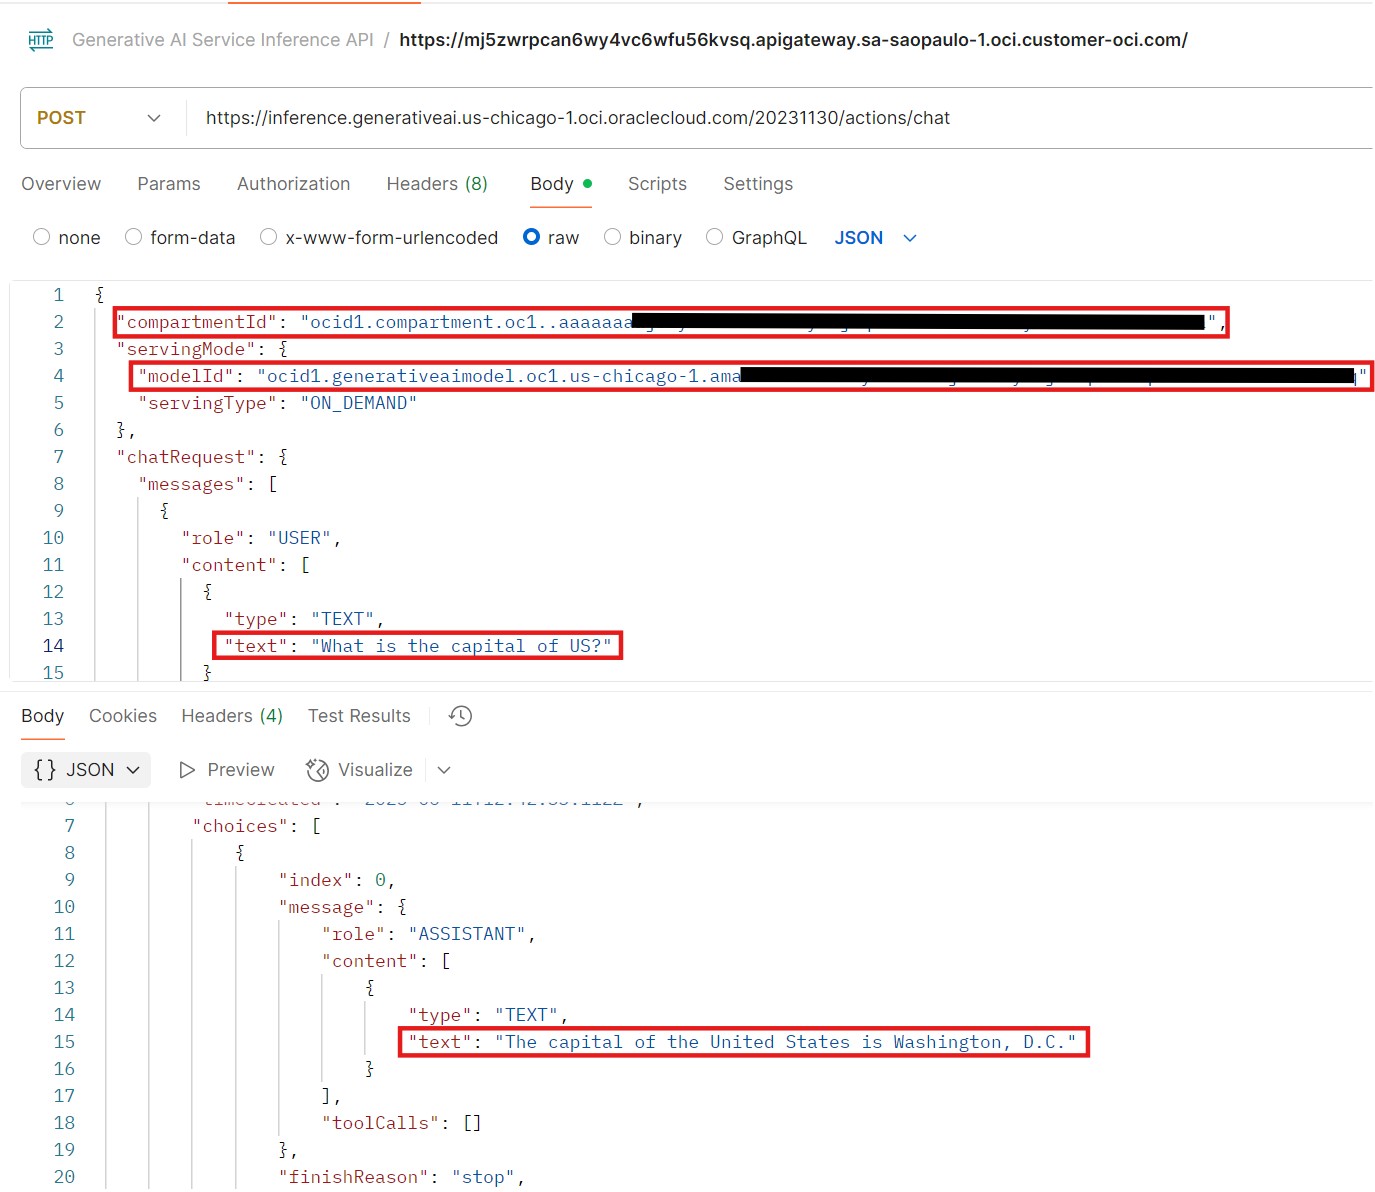
Scenario 1: Access from the Internet
This is the most straightforward method, accessing the OCI Generative AI service directly over the internet via public APIs.
You can use Postman or your own custom applications to invoke the REST APIs. For example, you can interact with the Meta LLaMA model deployed in the Chicago region by making a direct API call to its public endpoint.

Scenario 2: Access from on-premises via VPN or FastConnect
In this scenario, you can establish private connectivity (VPN or FastConnect) between your on-premises environment and OCI. Then, configure transit routing via Dynamic Routing Gateway (DRG) to Service Gateway (SG) and onward to the Oracle Services Network to access the OCI Generative AI service privately.

As mentioned earlier, OCI Generative AI is not currently available in all OCI regions. If you already have VPN or FastConnect connectivity to a different OCI region, you can configure Remote Peering Connection (RPC) between the existing region and the region where OCI Generative AI is available (e.g., US Midwest – Chicago).
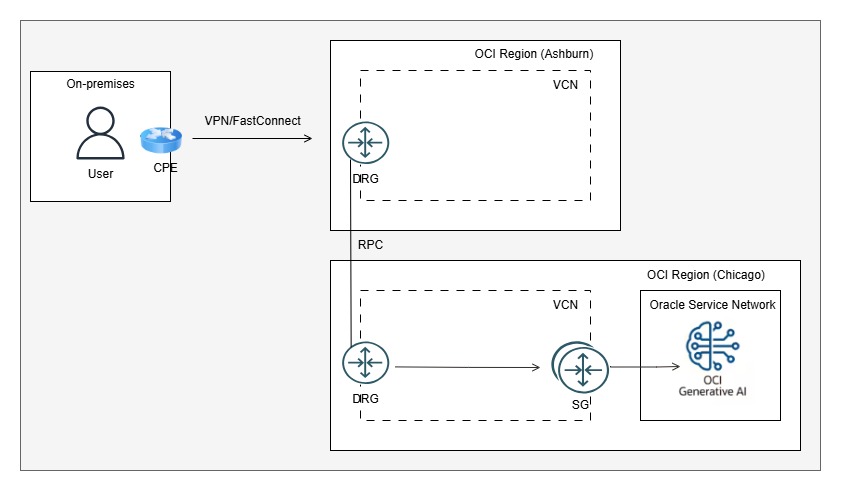
For more detail about this setup, please refer to the related blog post.
Scenario 3: Access as Private Endpoint
In some cases, organizations have existing private connectivity (VPN or FastConnect) between their on-premises environment and OCI, with BGP used for dynamic route advertisement.
To access OCI Generative AI over this connection, it is typically necessary to import all regional public routes into the routing table. A BGP route filter can then be applied to filter out any unwanted routes.
However, certain organizations with strict compliance policies may choose not to learn any public routes from OCI. In such cases, they prefer to access OCI Generative AI through a private endpoint.
To support this requirement, the following solutions can be implemented:
a. Network Load Balancer (NLB)
b. API Gateway
a. Network Load Balancer:
You can set up a private Network Load Balancer (NLB) and configure the public IP address of the OCI Generative AI service as the backend target. In the route table of the NLB’s subnet, configure the Service Gateway (SG) as the next hop to allow traffic to reach the Generative AI service.
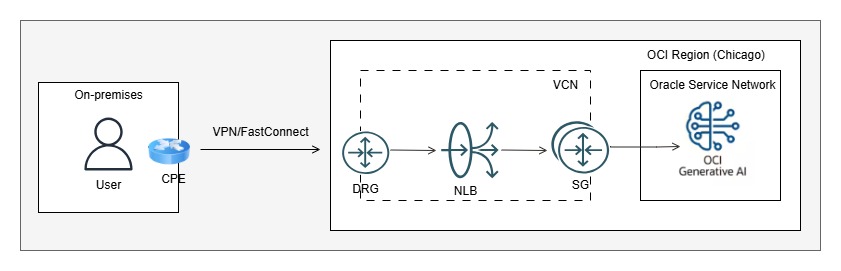
To enable access, users on-premises can manually update their local hosts file to map the OCI Generative AI FQDN to the NLB’s private IP address. However, modifying hosts files individually is a manual and non-scalable approach. A better alternative is to update the on-premises DNS server to resolve the FQDN to the NLB’s private IP.
This option offers a simple and straightforward solution for private endpoint connectivity. However, it has a limitation—if the OCI Generative AI public IP changes for any reason, the communication will fail, and the NLB’s backend configuration will need to be manually updated with the new IP.
b. API Gateway:
In this approach, an OCI Private API Gateway is set up to act as the private endpoint. User requests are sent to the API Gateway via API calls. The API Gateway then routes these requests to an OCI Function.
The OCI Function executes custom Python code that invokes the OCI Generative AI service.
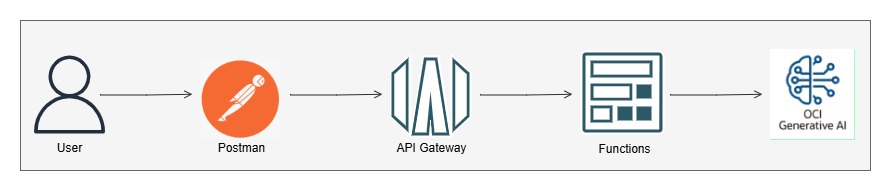
Let’s break down this method and review the step-by-step implementation:
Note that you need to add necessary IAM policies for various OCI services to work together.
Container Registry:
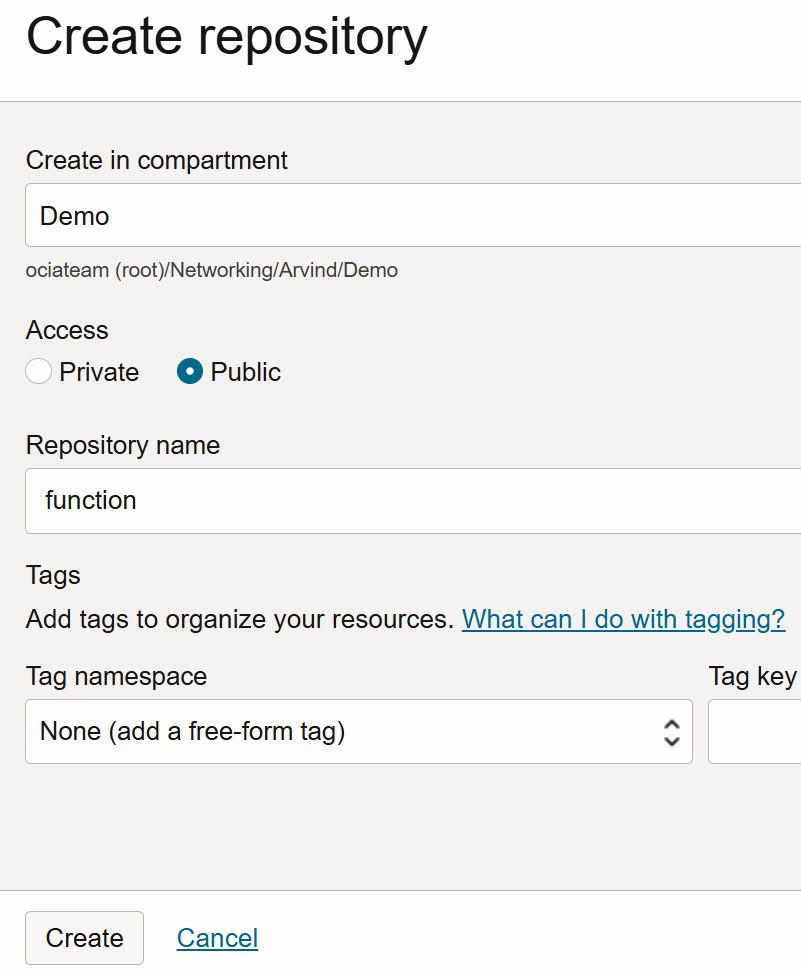
A Container Registry is required for OCI Functions because OCI Functions package and run your function code as container images. OCIR provides a secure and scalable location to store these images, enabling seamless deployment and execution of serverless functions in OCI.
Steps to Create a Repository in OCI Container Registry:
- Navigate to the Main Menu in the OCI Console. Go to Developer Services -> Containers & Artifacts → Container Registry.
- Click on Create Repository. Enter a name for the repository. Select the Access type — either Private or Public, based on your requirements.
- Confirm the Repository Name, then click Create.
Steps to Create an Application on OCI Functions:
- Navigate to the Main Menu in the OCI Console. Developer Services → Functions → Applications.
- Click on Create Application. Enter the application name. Select the VCN, subnet, and shape as per your requirements. Click Create to finish.
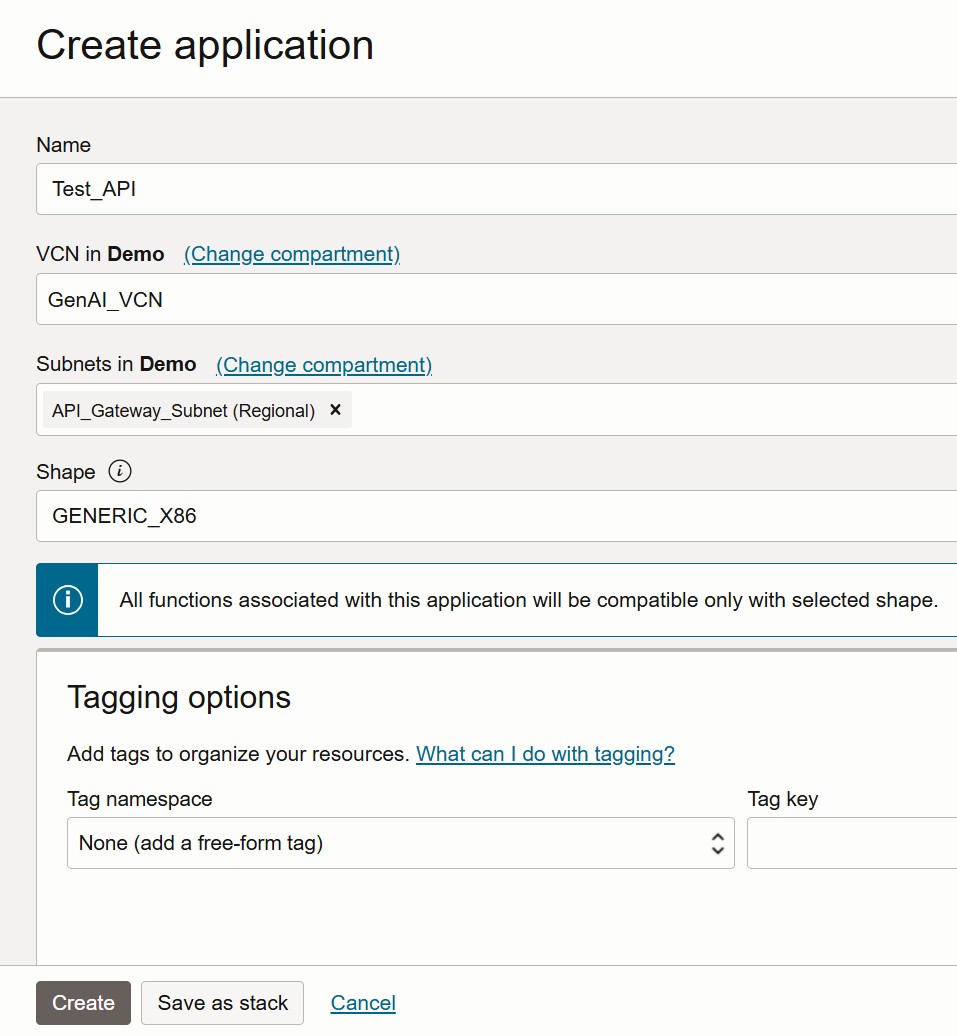
Under Resources, click on Configuration.
Enter the following Key-Value pairs, which will be used in your Python code:
- MODEL_ID – ocid1.generativeaimodel.oc1.us-chicago-1.ama###
- COMPARTMENT_OCID – ocid1.compartment.oc1..aaa##
- SERVICE_ENDPOINT – https://inference.generativeai.us-chicago-1.oci.oraclecloud.com
Next, under Resources, click on Getting Started. You’ll find two setup options:
- Cloud Shell Setup
- Local Setup
We recommend using the Cloud Shell Setup method, as it is the quickest and easiest way to invoke functions directly from the OCI environment without any local configuration.
Step1: Launch Cloud Shell
Step 2: Use the context for your region
fn list context
fn use context us-chicago-1
Step 3: Update the context with the function’s compartment ID
fn update context oracle.compartment-id ocid1.compartment.oc1..aaaaXXXXX
Step 4: Provide a unique repository name prefix to distinguish your function images from other people’s. For example, with ‘jdoe’ as the prefix, the image path for a ‘hello’ function image is ‘<region-key>.ocir.io/<tenancy-namespace>/jdoe/hello:0.0.1’
fn update context registry gru.ocir.io/ociateam/function
Step 5: Generate an Auth Token
Step 6: Log into the Registry using the Auth Token as your password
docker login -u 'oci/arvind.bassan@oracle.com' gru.ocir.io
Step 7: Verify your setup by listing applications in the compartment
fn list apps
Create, deploy, and invoke your function
Step 8: Generate a ‘hello’ boilerplate function
fn init --runtime python hello
Step 9: Navigate to the generated Function directory
cd hello
Next, update the following files to include your Python code and specify any required Python packages or libraries:
func.py
func.yaml
Requirements.txt
The contents of these files are provided in the following sections.
Step 10: Deploy your function
fn -v deploy --app Test_API
Step 11: Navigate to the previous directory and invoke your function
cd ..
fn invoke Test_API hello
Requirements.txt
fdk>=0.1.93
oci
func.yaml
schema_version: 20180708
name: hello
version: 0.0.6
runtime: python
build_image: fnproject/python:3.11-dev
run_image: fnproject/python:3.11
entrypoint: /python/bin/fdk /function/func.py handler
memory: 256
func.py
import io
import json
import logging
import os
import oci.auth.signers
import oci.generative_ai_inference
from fdk import response

def handler(ctx, data: io.BytesIO = None):
    compartment_ocid = os.getenv("COMPARTMENT_OCID")
    endpoint = os.getenv("SERVICE_ENDPOINT")
    model = os.getenv("MODEL_ID")
    signer = oci.auth.signers.get_resource_principals_signer()
    input = "Respond back with Please repeat your question"
    try:
        body = json.loads(data.getvalue())
        input = body.get("input")
        #input = "What is capital of france?"
    except (Exception, ValueError) as ex:
        logging.getLogger().info('error parsing json payload: ' + str(ex))

    logging.getLogger().info("Moving on")
    logging.getLogger().info("Gen AI API")
    generative_ai_inference_client = oci.generative_ai_inference.GenerativeAiInferenceClient(config={}, signer=signer, service_endpoint=endpoint, retry_strategy=oci.retry.NoneRetryStrategy(), timeout=(10,240))
    chat_detail = oci.generative_ai_inference.models.ChatDetails()

    chat_request = oci.generative_ai_inference.models.CohereChatRequest()
    chat_request.message = input
    chat_request.max_tokens = 600
    chat_request.temperature = 1
    chat_request.frequency_penalty = 0
    chat_request.top_p = 0.75
    chat_request.top_k = 0

    chat_detail.serving_mode = oci.generative_ai_inference.models.OnDemandServingMode(model_id=model)
    chat_detail.chat_request = chat_request
    chat_detail.compartment_id = compartment_ocid
    logging.getLogger().info("Calling")
    chat_response = generative_ai_inference_client.chat(chat_detail)
    result =  json.loads(str(chat_response.data))
    logging.getLogger().info(result)
    logging.getLogger().info(result['chat_response']['text'])
    return response.Response(ctx, response_data=result['chat_response']['text'])
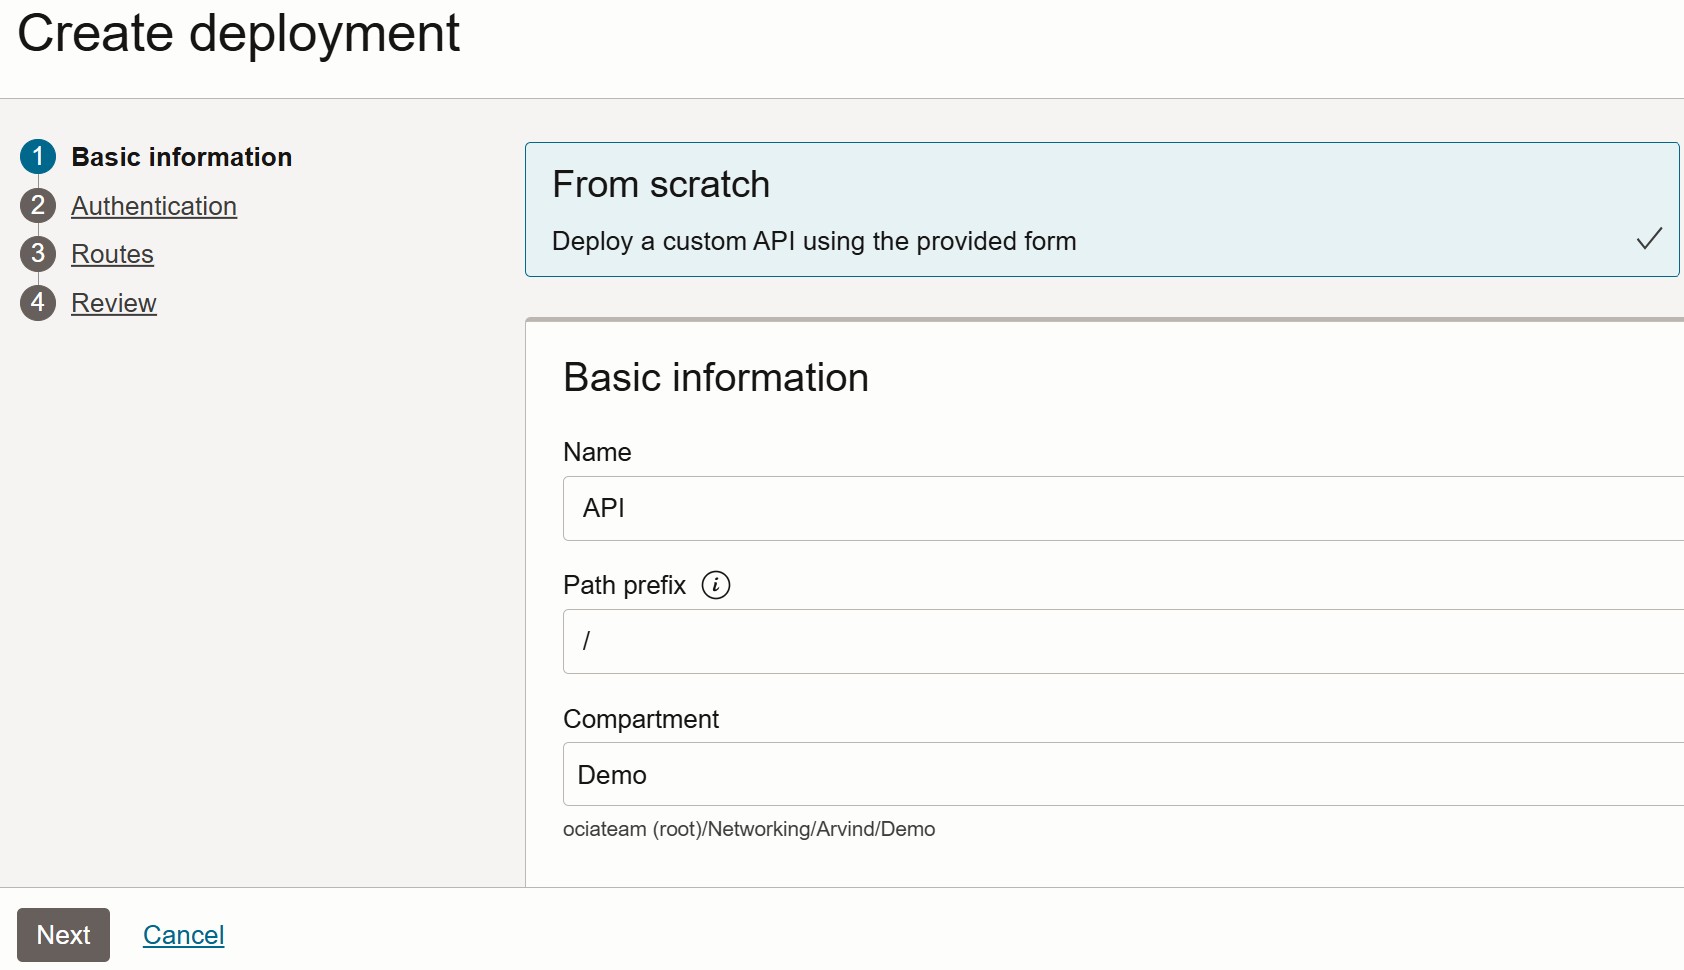
Steps to Create an API Gateway and Deployment:
- Navigate to the Main Menu in the OCI Console. Developer Services -> API Management
- Click on Create Gateway. Enter the Gateway Name, select the Type (Public or Private), choose the appropriate Compartment, VCN, and Subnet, then click Create Gateway.
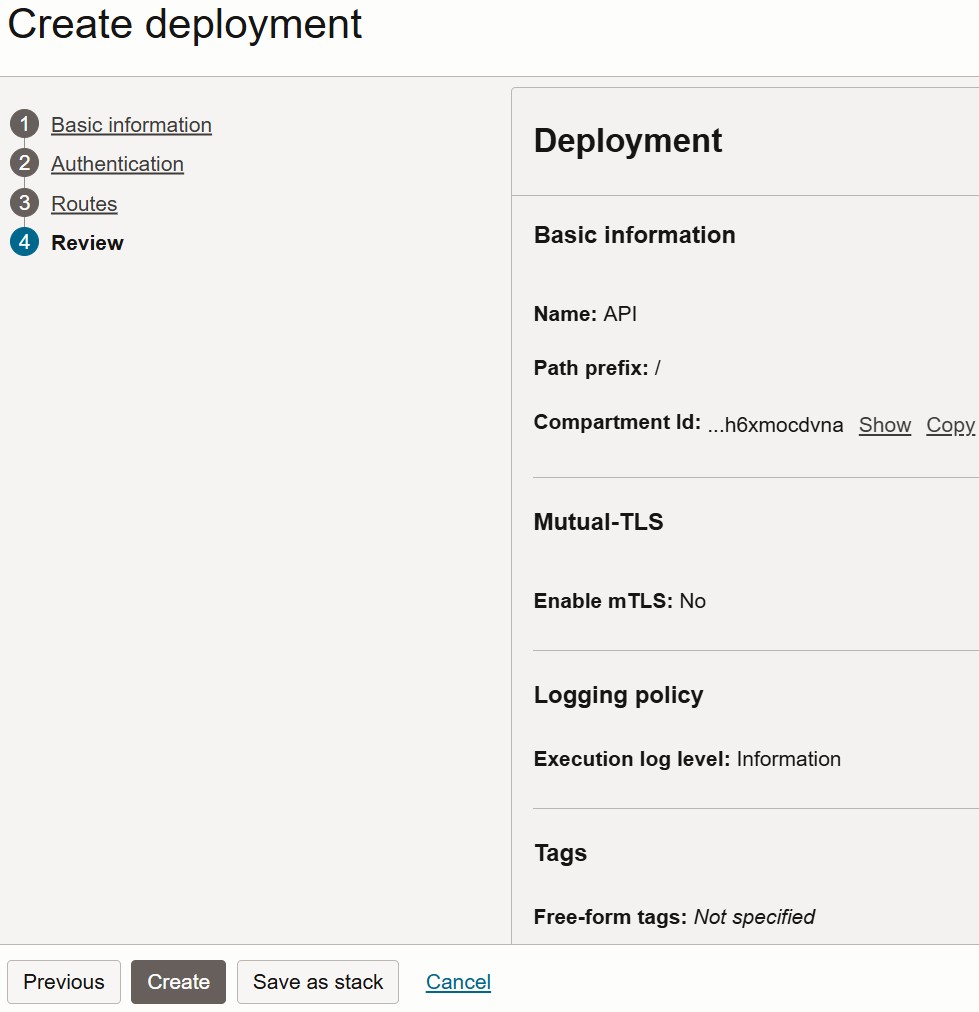
- Under Resources, click on Create Deployment. Enter the Deployment Name, set the Path (e.g., /), and select the Compartment. Click Next to continue with deployment configuration.
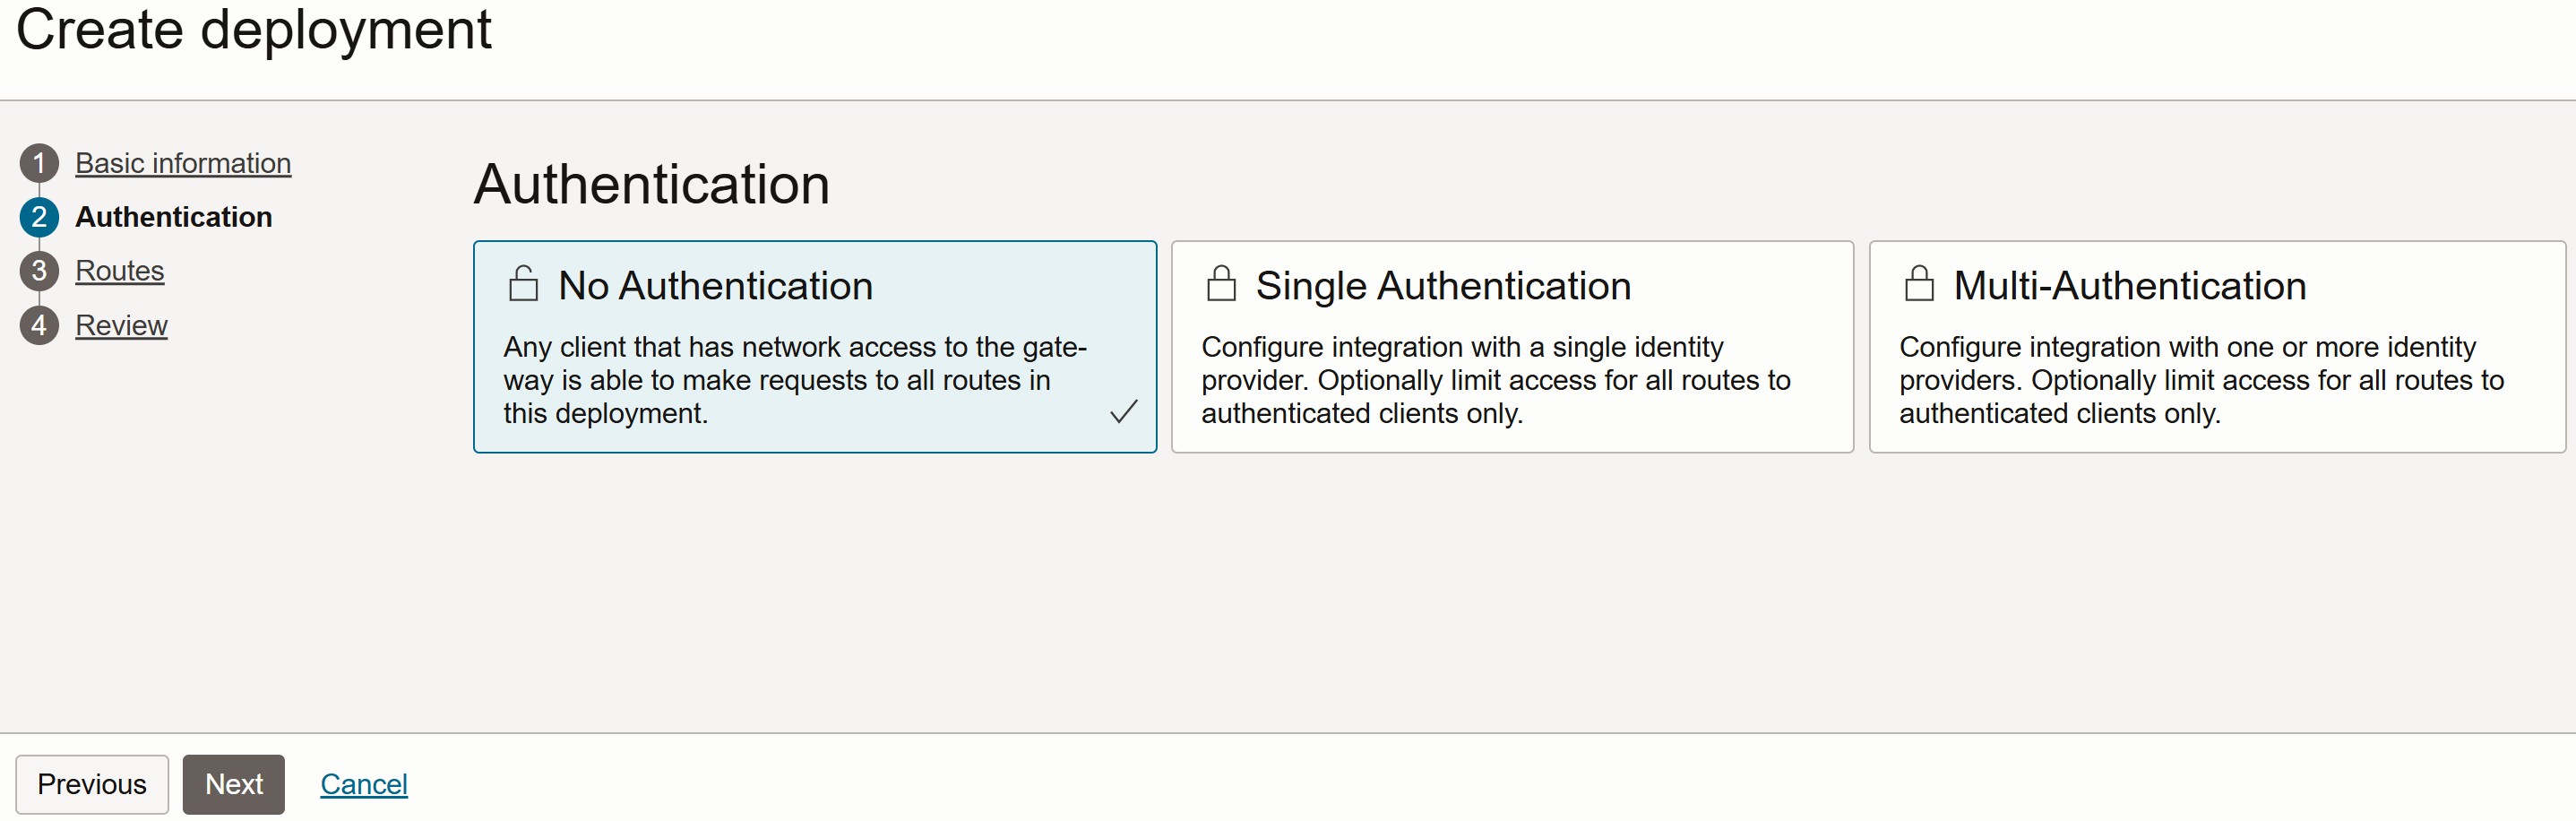
In the Authentication section, select No Authentication for this demo, then click Next to proceed.
In the Routes section: Set the Path to /. Select the Methods as ANY. Set the Backend Type to Oracle Function. Choose the appropriate Application and Function from the drop-down menus.
Click Next to proceed.

Review all the configuration details. Click on Create to complete the API Gateway deployment.
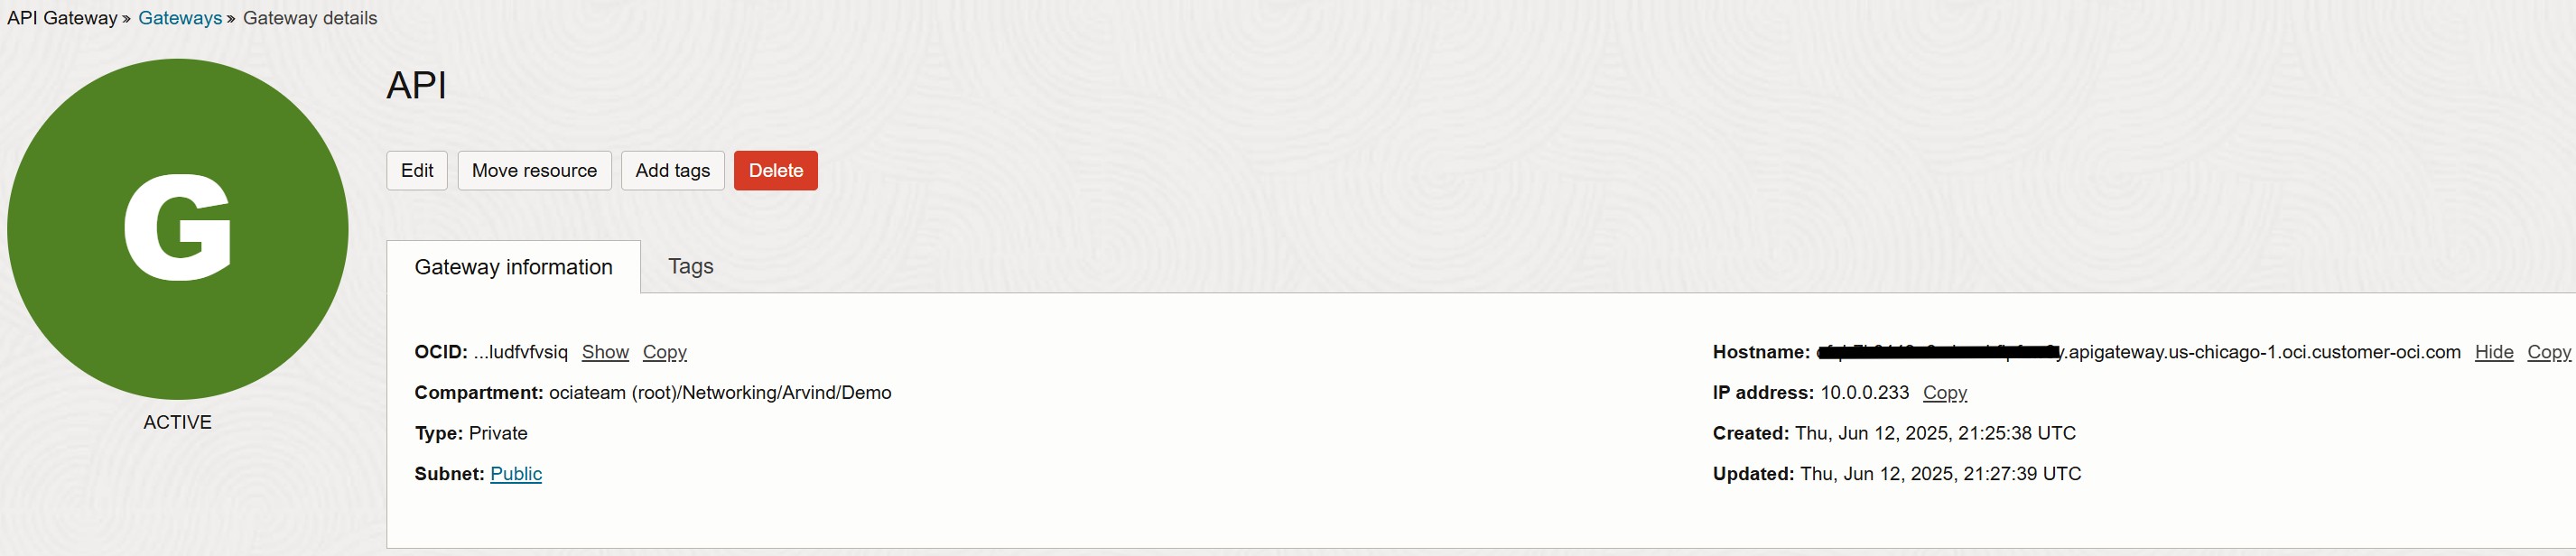
The API Gateway has been successfully created, and a Hostname has been generated.
This hostname will be used to invoke the deployed API.
This completes the final step. Now, let’s switch to the local machine to test the setup using Postman.
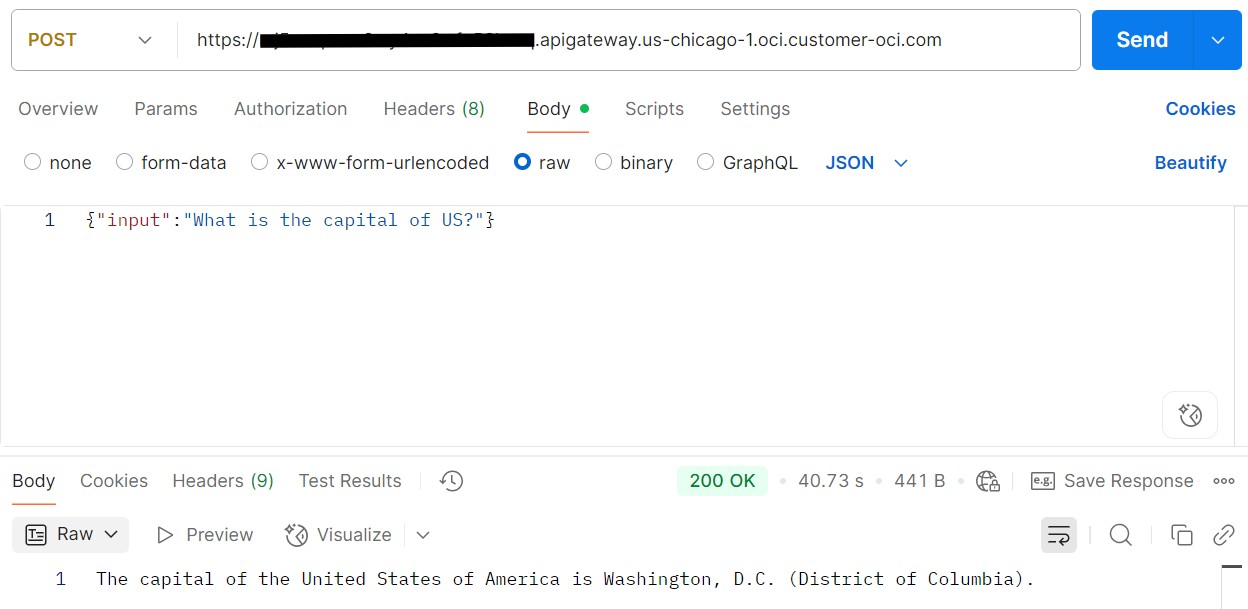
In the snippet below, we send a request to the API Gateway using the POST method. The API Gateway routes the request to the OCI Function, which executes the Python code to query the OCI Generative AI service.
The response is successfully returned and displayed in Postman.
This concludes the final method for accessing the OCI Generative AI service through an OCI API Gateway.
If you need an additional layer of security, you can protect it using a Web Application Firewall (WAF). For more details, please refer to this blog.
Conclusion:
OCI Generative AI provides a versatile and powerful platform to build AI applications. However, the right network architecture is key to ensuring secure, scalable, and compliant integration—especially in hybrid cloud environments.
Whether you choose direct internet access, private connectivity via VPN/FastConnect, or advanced private endpoints using NLB, API Gateway and Functions, OCI offers flexible networking options to meet your organization’s needs.
When designing your architecture, always consider compliance policies, route advertisement control, operational overhead, and scalability to determine the most suitable integration method.