Introduction
In today’s cloud-driven world, cloud architects and data engineers are increasingly embracing hybrid and multi-cloud architectures for enhanced performance, cost optimization, and business resilience. A key requirement is the ability to seamlessly and securely move massive datasets between cloud providers like Oracle Cloud Infrastructure (OCI) and Amazon Web Services (AWS).
Unlike transfers over the public internet, this document focuses on a secure and high-performance solution leveraging private connectivity through Equinix Fabric. This approach bypasses the public internet, offering enhanced security and predictable performance. We’ll explore a robust solution for transferring tens of petabytes of data from AWS S3 to OCI Object Storage using Equinix Fabric, specifically the Equinix Fabric Cloud Router (FCR). It addresses common challenges, outlines a proven technical implementation, and offers best practices for efficient data migration.
Use Case
This case study details the process of migrating a large dataset (tens of petabytes) from AWS S3 to OCI Object Storage. To achieve high throughput, we utilized multiple links from the Equinix Fabric Cloud Router (FCR) to each cloud provider (OCI and AWS). Instead of using a single VM with rclone, we deployed rclone within a Kubernetes container. This approach offers several key benefits:
- Enhanced scalability through parallel processing across multiple
pods - Improved fault tolerance with
Kubernetes'self-healing capabilities - Better resource utilization by dynamically allocating resources to the
rclone pods - Simplified management and orchestration using
Kubernetes'declarative configuration
Understanding Kubernetes Delegation, Parallelism, Pod Creation, and rclone Scaling Parameters
Efficiently transferring petabytes of data between cloud providers requires maximizing throughput, minimizing failures, and dynamically adapting to network and compute conditions. Kubernetes and rclone together provide a scalable and resilient foundation for this. Below, we break down the key architectural and operational concepts:
Kubernetes Delegation and Pod Creation
Kubernetes Delegationallows you to assign specific roles and permissions to workloads (“delegating” authority). In this workflow:Service Accountsare linked to specific pods, allowing them to assume identities and roles inAWSorOCIthroughIAMandWorkload Identity Federation.RBAC(Role-Based Access Control) ensures that only authorized pods can access secrets, config maps, or cloud resources.- Dynamic Pod Creation:
Kubernetes jobsand deployments can create multiple pods in parallel, each acting as an independentrclonetransfer agent. This enables horizontal scaling—simply increase the jobparallelismor replica count to launch more pods for greater throughput. - Example:
- A single
rclonejob can be run in one pod for a simple transfer. - For massive scale, a
Kubernetes JoborCronJobwithparallelism: N(whereNis the number of concurrent pods) can launch multiplerclonepods, each handling a subset of the data.
- A single
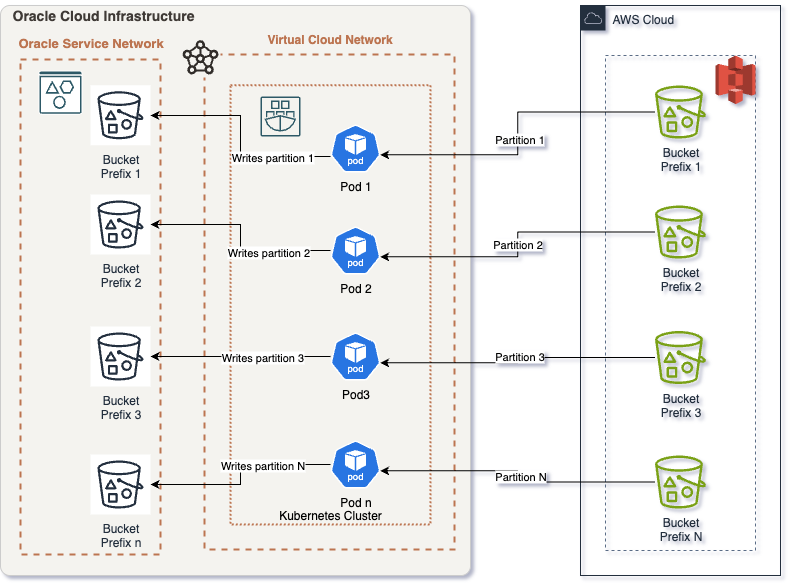
- Parallelism and Data Partitioning
- Parallelism in
Kubernetesis achieved by running multiple pods/jobs simultaneously. - Data Partitioning is crucial for avoiding contention and maximizing transfer rates:
- Split large
S3 bucketsinto prefixes (e.g.,bucket/data/part1,bucket/data/part2, etc.) and assign each prefix to a different pod. - Each pod runs an independent
rcloneprocess copying its assigned data slice fromAWS S3toOCI.
- Split large
- Benefits:
- Faster aggregate transfer speeds (more network and compute resources used).
- Isolated failures—if one pod fails, others continue.
- Easy to retry failed partitions.
- Parallelism in
Variables for rclone Optimized Scaling
rclone exposes several parameters that directly affect transfer performance and resource usage. The most relevant for scaling are:
| Variable | Description | Typical Value for Large Transfers |
|---|---|---|
RCLONE_TRANSFERS |
Number of file transfers in parallel per pod | 8-64+ (tune based on bandwidth/CPU) |
RCLONE_CHECKERS |
Number of file checks in parallel | 8-32 |
RCLONE_S3_UPLOAD_CUTOFF |
Size threshold to use multipart uploads | 256M–1G |
RCLONE_S3_CHUNK_SIZE |
Chunk size for multipart uploads | 64M–512M |
RCLONE_STATS |
Interval for rclone stats reporting |
10s |
RCLONE_LOG_LEVEL |
Verbosity of logs | INFO/WARN/ERROR |
Scaling Tips:
- Increase
RCLONE_TRANSFERSto maximize bandwidth, but avoid overwhelming your network or hitting provider rate limits. - Tune pod resource limits (
cpu,memory) to support your chosen parallelism. - Monitor error rates and adjust parameters as needed.
Putting It All Together: End-to-End Flow
- Split the data into logical partitions (prefixes or buckets).
- Deploy a
Kubernetes Jobwithparallelismequal to the number of partitions. - Each pod:
- Authenticates to
AWS/OCIusing delegated identities. - Runs
rclonewith optimized parameters. - Transfers its assigned data partition.
- Reports status and metrics.
- Authenticates to
- Monitor all pods, aggregate stats, and handle retries for any failed partitions.
Challenges
Transferring massive datasets between cloud providers like AWS and OCI presents several significant hurdles. These challenges can impact project timelines, costs, and data integrity. Common obstacles encountered include (but are not limited to):
- Bandwidth Limitations: Insufficient network bandwidth can drastically extend transfer times, leading to project delays and increased operational overhead.
- Latency and Throughput: Geographical distance between
AWSandOCIregions, along with network congestion, can severely impact transfer speeds, particularly when relying on the public internet. High latency translates to lower throughput and longer transfer windows. - Cost Optimization: Data egress fees from
AWS S3can be substantial for large datasets. Optimizing transfer methods to minimize data volume and transfer time is crucial for cost control. - Security and Compliance: Protecting sensitive data during transit is paramount, and organizations must adhere to industry regulations such as HIPAA, GDPR, and PCI DSS. Secure transfer mechanisms are essential for maintaining compliance.
- Data Integrity Verification: Ensuring data accuracy and completeness throughout the transfer process is critical to avoid data corruption and application errors. Robust checksum verification mechanisms are necessary.
- Complexity of Management: Managing petabyte-scale data transfers requires careful orchestration, continuous monitoring, and efficient troubleshooting across multiple cloud environments. Automation and centralized management tools are essential.
- Data Transformation: Migration often requires data transformation to adapt to the specific storage characteristics of the target environment.
Best Strategies
To overcome the challenges of transferring large datasets between AWS and OCI, implementing effective strategies is crucial. These best practices focus on optimizing transfer speeds, ensuring data security, and maintaining data integrity throughout the migration process. The following strategies are recommended:
- Private Network Connectivity: Leverage dedicated, low-latency connections like
OCI FastConnectandAWS Direct ConnectthroughEquinix Fabric. This bypasses the public internet, providing consistent bandwidth and reduced latency for faster, more reliable transfers. - Data Compression and Deduplication: Reduce the amount of data transferred by employing compression algorithms (e.g.,
gzip,Snappy) and deduplication techniques to eliminate redundant data. This minimizes transfer time and egress costs. - Parallel and Multi-threaded Transfers: Utilize tools like
rclone,gsutil(with parallel composite uploads), orAWS DataSyncto perform concurrent transfers, maximizing throughput. Optimize the number of parallel streams based on network bandwidth and resource availability. - Incremental Synchronization: Implement tools that support incremental transfers to minimize the amount of data transferred after the initial full copy. This is particularly useful for frequently updated datasets.
- Checksum Verification: Implement end-to-end checksum verification (e.g., using
MD5,SHA-256) to ensure data integrity. Verify checksums at the source and destination to detect any data corruption during transit. - Automation and Orchestration: Automate the entire data transfer process using tools like
TerraformorAnsiblefor consistent and repeatable deployments.
Equinix Fabric Benefits
Advantages of Using Equinix Fabric: Equinix Fabric plays a vital role in enabling secure, high-performance data transfers between AWS and OCI. By providing private, direct connections and advanced routing capabilities, Equinix Fabric offers significant advantages over relying solely on the public internet. Some of the key benefits include:
- Rapid Deployment:
Equinix Fabricsimplifies and accelerates the provisioning of private connections betweenAWSandOCI, often within minutes via a self-service portal or API. Equinix Fabric Cloud Router:Offers on-demand, high-throughput routing capabilities, enabling seamless and flexible connectivity between cloud providers without the need for physical hardware.- Reduced Latency and Increased Speed: Private, direct links minimize network delays, leading to significantly faster transfer times compared to the public internet. This is crucial for large datasets.
- Enhanced Security: Data traverses a controlled, private network environment, reducing exposure to public internet threats and enhancing data security and compliance.
- Reliable and Consistent Transfers: Dedicated circuits minimize packet loss and network interruptions, ensuring reliable and consistent data transfers.
- Predictable Cost Control: Offers predictable bandwidth charges, potentially reducing variable egress costs associated with public internet transfers. Provides the flexibility to scale bandwidth on demand to meet changing data transfer needs.
- Global Reach:
Equinix Fabricprovides a global network of interconnected data centers, enabling connections between cloud providers in different regions.
Solution Description
Prerequisites
- AWS Account: An active
AWSaccount with thes3:ListBucket,s3:GetObject,s3:RestoreObjectands3:DescribeObjectpermissions to access, read and restore data from the sourceS3bucket(s). - OCI Account: An active
OCIaccount with theOBJECTSTORAGE_NAMESPACE_READ,OBJECTSTORAGE_BUCKET_READ,OBJECTSTORAGE_OBJECT_CREATE, andOBJECTSTORAGE_OBJECT_READpermissions to write data to the destinationObject Storagebucket(s). - Equinix Fabric Account: An
Equinix Fabricaccount with the ability to provision virtual circuits betweenAWS Direct ConnectandOCI FastConnect. - OCI Tenancy Limits: Verify and, if necessary, increase
OCItenancy limits (network, storage, compute) to accommodate the anticipated data volume and transfer rates. Pay close attention toObject Storagelimits, such as the number of buckets and objects. - AWS Account Limits: Verify and, if necessary, increase
AWSaccount limits (network, storage, compute) to support the data transfer. Focus onS3request limits and network bandwidth limits. - (Optional) S3 Glacier Retrieval: If data is archived in
S3 Glacier, initiate the retrieval process well in advance, as this can take considerable time (hours to days) depending on the retrieval tier selected (Expedited, Standard, Bulk). Consider usingS3 Batch Operationsto restore a large number of objects from Glacier. - S3 Data Organization: Organize and, if needed, clean the dataset within the
AWS S3bucket(s). Consider usingS3 Lifecyclepolicies to manage data aging and automate the transition of data to different storage tiers. - (Optional) Bucket Segmentation: For very large buckets (billions of objects), consider breaking them down into smaller, more manageable buckets to improve transfer parallelism and reduce the impact of potential
S3listing limitations. - OCI Object Storage Setup: Create the destination
OCI Object Storagebucket(s) and configure the appropriate storage tier (e.g., Standard, Archive, Infrequent Access) based on data access frequency and cost requirements. - IAM Configuration: Configure the necessary Identity and Access Management (
IAM) policies in bothOCIandAWS. Specifically, createOCI IAMpolicies andAWS IAMroles (with appropriate permissions) for theKubernetescluster nodes or compute instances that will be performing the data transfer. Use Instance Principals orIAM Rolesfor secure, credential-less authentication. - Private Endpoints: Configure
AWS PrivateLinkforS3andOCI Private EndpointsforObject Storage. Ensure that the requiredVPC/VCNshave access to these private endpoints. This keeps traffic off the public internet, enhancing security and reducing data egress costs. Ensure proper DNS resolution is configured for the private endpoints.
Step-by-Step Process
- Establish Connectivity Between
OCIandAWSviaEquinix Fabric:
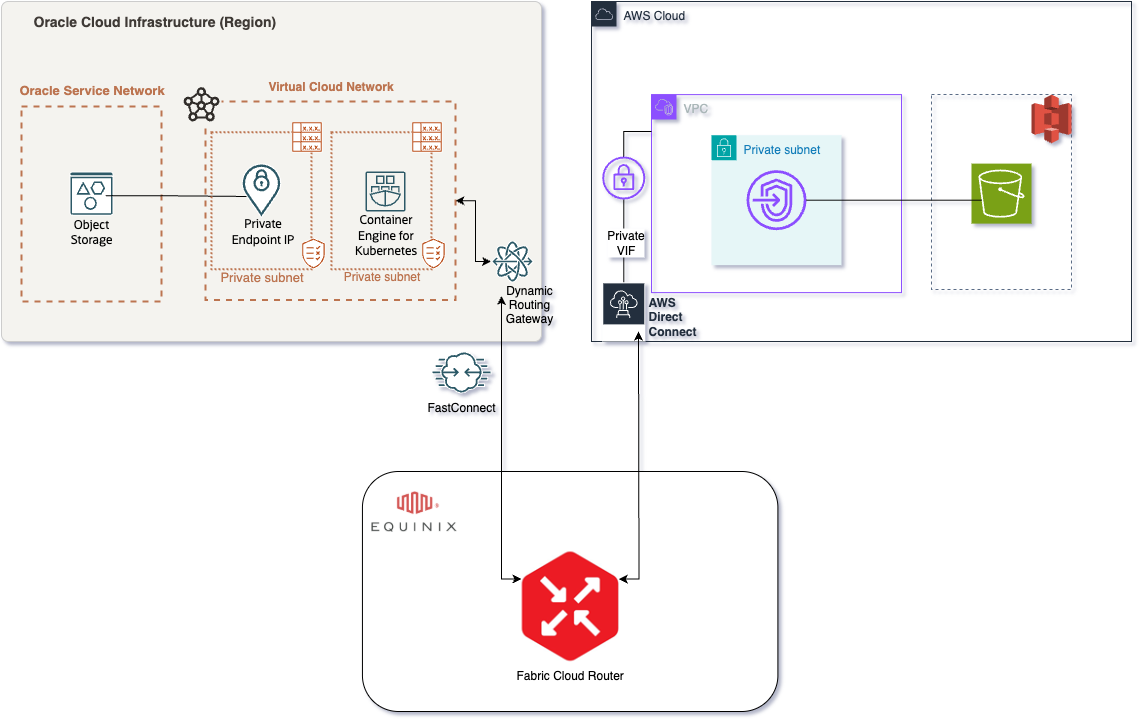
- Virtual Circuit Type: Virtual circuits with appropriate bandwidth should be provisioned with a private connection. For this use case, partner virtual circuits from
OCI FastConnecttoEquinix Fabric Cloud Routerand a hosted connection fromAWS Direct ConnecttoEquinix Fabric Cloud Router. For high-level configuration, refer this blog. - BGP and routing:
BGPprotocol is enabled to properly propagate the routing information. Configure the properASNsbetween the cloud and fabric for proper connectivity. This set up is needed to allow traffic to flow properly fromAWStoOCI. - Be mindful of any cloud provider limitations, such as
AWS‘s limit onBGP100 Accepted Prefixes as stated here. We address these by summarizingVCN-announced prefixes using features available inOCI, as explained this blog. - Verify that network configurations allow secure, high-speed access to both cloud endpoints. This includes route tables, security lists/network security groups, and firewall rules.
- Test connectivity using tools like
ping,traceroute, andiperf3. - Ensure that
MTUsizes are consistent across the entire path to avoid fragmentation.
Kubernetes Configuration
This configuration outlines how to run Kubernetes within the OCI cloud and leverage it to orchestrate secure data movement between AWS and OCI using the rclone utility. The following sections detail the configuration of your workloads for both OCI and AWS authentication.
- Prerequisites:
- Make sure that the cloud networks are properly peered together. This will allow the
OCI nodeto reach theAWS endpoint.
- Make sure that the cloud networks are properly peered together. This will allow the
- Workload Identity for OCI
- Create your
Kubernetes Service Account:
Here’s what the Kubernetes Service Account creation might look like:
kubectl create serviceaccount <your-oci-workload-identity-sa> -n <namespace>
- Create your
IAM PolicyforOCI:- One policy will be used to give permission to your namespace, and the other will be used to allow the cluster to create the annotations and trust policies.
Here’s what the OCI IAM policies might look like:
# Policy to allow rclone pods in the specified namespace to assume the OCI workload identity. Allow any-user to use dynamic-groups in compartment <your_compartment_ocid> where ALL {request.principal.type='kubernetes', request.principal.namespace='<your_k8s_namespace>', request.principal.serviceaccount='<your-oci-workload-identity-sa>', target.dynamic-group.id='<your_dynamic_group_ocid>'}" # This policy allows the OCI native integration the ability to create the policies. Allow dynamic-group <your_dynamic_group_name> to use workload-identity-federation-family in compartment <your_compartment_ocid>- Create Dynamic group with the name
<your_dynamic_group_name>:
Here’s what the OCI Dynamic Group might look like:
ANY {resource.namespace = '${var.k8s_namespace}', resource.serviceAccount = '<your-oci-workload-identity-sa>'} - Create your
- Token Based Authentication to AWS
- Create a
SecretcontainingAWScredentials:
Here’s what the Kubernetes Secret for AWS credentials might look like:
apiVersion: v1 kind: Secret metadata: name: aws-secret namespace: namespace # Replace with your namespace type: Opaque data: aws_access_key_id: <base64 encoded AWS Access Key ID> aws_secret_access_key: <base64 encoded AWS Secret Access Key> - Create a
- Deploy
rcloneContainer in Kubernetes:- Create a
ConfigMapto hold yourrclone.conffile:
Here’s what the ConfigMap for rclone.conf might look like:
apiVersion: v1 kind: ConfigMap metadata: name: rclone-config namespace: <your-namespace> # <-- Add your Kubernetes namespace here data: rclone.conf: | [oci] type = s3 provider = OCI region = <YOUR_OCI_REGION> # <-- Add your Oracle Cloud region (e.g. us-ashburn-1) namespace = <YOUR_OCI_NAMESPACE> # <-- Add your Oracle Cloud Object Storage namespace compartment = <YOUR_OCI_COMPARTMENT_OCID> # <-- Add your compartment OCID # No access keys needed for OCI; authentication uses OCI Workload Identity [aws] type = s3 provider = AWS access_key_id = "$(AWS_ACCESS_KEY_ID)" # <-- Will be injected from environment variable secret_access_key = "$(AWS_SECRET_ACCESS_KEY)" # <-- Will be injected from environment variable region = <YOUR_AWS_REGION> # <-- Add your AWS region (e.g. us-east-1) - Create a
- Next, create the
rclone-deployment.yamlfile:Here’s what the rclone Kubernetes Job YAML might look like:
apiVersion: batch/v1 kind: Job metadata: labels: app: rclone-bucket app.kubernetes.io/name: rclone-bucket bucket: # The name of your AWS S3 bucket (e.g. "my-backup-bucket") period: T0 name: # A unique name for this rclone Job namespace: # The Kubernetes namespace where this Job will run spec: backoffLimit: 3 completionMode: NonIndexed completions: # Number of parallel transfers (partitions) (e.g. "1") parallelism: # Number of pods to run at once (e.g. "1") suspend: false template: metadata: annotations: service.beta.kubernetes.io/oci-workload-identity: "true" # Enable OCI workload identity kubectl.kubernetes.io/default-container: main labels: app: rclone-bucket app.kubernetes.io/name: rclone-bucket bucket: period: T0 spec: serviceAccountName: # ServiceAccount with OCI Workload Identity permissions containers: - name: main image: rclone/rclone:latest imagePullPolicy: Always command: ["/bin/sh", "-c"] args: - > rclone sync ${BACKUP_SRC_REMOTE}:${BACKUP_SRC_PATH} ${BACKUP_DST_REMOTE}:${BACKUP_DST_PATH} --config /config/rclone.conf env: - name: AWS_EC2_METADATA_DISABLED value: "true" - name: AWS_ACCESS_KEY_ID valueFrom: secretKeyRef: name: aws-secret # The name of the Kubernetes secret containing AWS keys key: aws_access_key_id - name: AWS_SECRET_ACCESS_KEY valueFrom: secretKeyRef: name: aws-secret # The name of the Kubernetes secret containing AWS keys key: aws_secret_access_key - name: TZ value: UTC - name: BACKUP_SRC_REMOTE value: aws # Use "aws" as defined in rclone.conf - name: BACKUP_SRC_PATH value: # Path in the AWS bucket (e.g. "bucket/data/path") - name: BACKUP_DST_REMOTE value: oci # Use "oci" as defined in rclone.conf - name: BACKUP_DST_PATH value: # Path in the OCI bucket (e.g. "bucket/backup/path") - name: RCLONE_LOG_LEVEL value: INFO - name: RCLONE_STATS value: 10s - name: RCLONE_STATS_FILE_NAME_LENGTH value: "0" - name: RCLONE_STATS_ONE_LINE value: "true" - name: RCLONE_CHECKERS value: # Number of files to check at once (e.g. "8") - name: RCLONE_TRANSFERS value: # Number of parallel file transfers (e.g. "8") - name: RCLONE_S3_UPLOAD_CUTOFF value: 512M - name: RCLONE_S3_CHUNK_SIZE value: 256M resources: limits: cpu: # Max CPU to use (e.g. "16") memory: # Max memory to use (e.g. "256Gi") requests: cpu: # Min CPU to reserve (e.g. "16") memory: # Min memory to reserve (e.g. "256Gi") terminationMessagePolicy: FallbackToLogsOnError volumeMounts: - mountPath: /config name: rclone-config-volume readOnly: true # Probes for better introspection livenessProbe: exec: command: ["/bin/sh", "-c", "rclone version"] initialDelaySeconds: 30 periodSeconds: 60 timeoutSeconds: 10 failureThreshold: 3 readinessProbe: exec: command: ["/bin/sh", "-c", "rclone listremotes --config /config/rclone.conf"] initialDelaySeconds: 30 periodSeconds: 60 timeoutSeconds: 10 failureThreshold: 3 dnsPolicy: Default restartPolicy: OnFailure schedulerName: default-scheduler securityContext: runAsGroup: 65534 runAsNonRoot: true runAsUser: 65534 terminationGracePeriodSeconds: 30 volumes: - name: rclone-config-volume configMap: name: rclone-config # Must match your ConfigMap name ttlSecondsAfterFinished: 691200 - Running Data Transfers with
rclone:Here’s how to launch the rclone Kubernetes Job:
kubectl apply -f rclone-deployment.yaml
Post-Transfer Validation
- Checksum Verification: After the transfer is complete, perform a thorough checksum verification between the source and destination to ensure data integrity.
rclone checkcommand can be used for this purpose. Compare checksums for all files, and investigate any discrepancies. - Data Sampling: Select a random sample of files and manually verify their contents to ensure data accuracy. Verify file sizes, modification dates, and data within the files.
- Application Testing: If the transferred data is used by applications, perform thorough testing to ensure that the applications function correctly with the new data in
OCI. Run integration tests and user acceptance tests to validate application functionality.
Monitoring and Alerting
- Cloud Provider Monitoring: Monitor the following metrics in
AWS CloudWatchandOCI Monitoring:S3 Bucket SizeObject Storage Namespace SizeRequest LatencyNetwork Traffic
- Network Monitoring: Utilize network monitoring tools to track:
- Bandwidth Utilization: Alert if bandwidth utilization exceeds 80%.
- Latency: Monitor latency between
AWSandOCI. - Packet Loss: Monitor packet loss between
AWSandOCI.
- rclone Monitoring: Track the number of files copied, number of errors,
rcloneprocess health. - Alerting: Set up alerts based on the following thresholds:
Network Bandwidth Utilization:Alert if bandwidth utilization exceeds 80%.Transfer Completion Time:Alert if the transfer is taking longer than expected.Error Rates:Alert if the error rate exceeds a certain threshold.rcloneprocess unhealthy
Conclusion
- With these strategies and steps, organizations can effectively manage large-scale data transfers between
AWSandOCIusingEquinix Fabric, ensuring high performance, security, and cost-effectiveness. By leveraging private network connections, instance principals authentication, and efficient data transfer tools, you can streamline your multi-cloud data migration initiatives. Proper planning, configuration, monitoring, and validation are key to a successful data transfer. - Consider documenting the entire process, including configuration details, troubleshooting steps, and lessons learned, for future reference.